Your Xola Settings act as the central command hub for your operations—giving you in-depth control over every aspect of your business, from day-to-day details to strategic integrations. Here, you can personalize your business information, upload brand imagery, and seamlessly adjust everything from how your team is managed to the customer experience you deliver. Need to add buttons to your website, set tax rates, or automate communications? It all starts here.
Within these settings, you can enable and configure critical features such as taxes and fees, payment gateway details, hardware setup, and multi-language support. Set up user access rules to match each staff role, automate system notifications for both customers and team members, and easily connect to third-party apps for marketing, reporting, and hardware solutions. You can even adapt your reservation flow, define internal preferences for how purchases are handled, and lock in precise operational standards that keep your business secure and scalable.
Whether you’re launching a brand new business or optimizing a high-volume operation, Xola Settings put the tools and flexibility you need right at your fingertips—making it easy to deliver a polished and uniquely branded experience every time.
User Access: Administrator roles have access to set up ALL sections in settings.
Reservationist or Reservationist Lite roles have access to My Profile, Preferences (Default Post Purchase Actions and Expand Note set up only), and Hardware sections in settings.
Equipment Manager or Accountant roles have access to My Profile section in settings.
Guide roles have access to My Profile and Guide Profile sections in settings.
Curator roles have access to My Profile and Apps section in settings.
Guide Manager roles have access to My Profile and Preferences (Roster Export set up only) sections in settings.
Marketer roles have access to Company Profile (Social Link set up only), My Profile and Button Code sections in settings.
To grant access to users, click here.
What's covered in this article:
- Company Profile
- My Profile
- User and Access
- Languages
- Notifications
- Button Code
- Preferences
- Fraud Fighter
- Gratuity
- Apps
- Taxes and Fees
- Payments
- Hardware
- Kiosk
Company Profile
Basic Information
- Picture
- The picture that you use is highly visible to your customers. Your picture will be visible to your customers in many of the emails they receive and it is highly recommended you use a high-quality picture that is representative of your brand. Specifically, your picture image in Xola holds a 4:3 aspect ratio, and the recommended pixel dimensions are 1024 x 768.
Note: The size of the image uploaded will not be adjusted when used, so try to use an image size that would fit well at the top of email communication.
- Company Name
- Will show in your communications to your customers, like the confirmation, reminder, review, etc.
- Phone Number
- Ensure this is a phone number where customers can contact you, as this number will be present in customer communications.
- Website URL
- Address and City
- This address will be used in customer communications.
- Social Links
- When you add a social media link to your account, there are two places they will show up.
- First, every social media URL that you add will appear in the following emails to your customers:
- Reservation confirmation
- Reservation modification
- Reservation modification for completed reservations
- Reservation cancellation
- Reservation reminder
- Additionally, if you use the Global Reviews feature, the link to your TripAdvisor or Yelp page will be pulled into the Review Email so that customers can click directly through to the page to leave a review. Facebook, Instagram, Snapchat, TikTok, and X links are only included in the confirmation and reminder emails.

My Profile
- Basic Information
- Update your basic information for your Xola profile
- Name
- Phone
- Update your basic information for your Xola profile
- Passwords
- This is where you can edit or change your password.
- Multi-Factor Authentication
- This is an extra layer of security for your Xola account that is enabled when you first gain access to your account. This works by sending you a text with a one-time use code anytime you would like to change your password or banking details moving forward. When entering the phone number in the field, ensure it is in country code format.
Multi-Factor Authentication is only available for Primary and Admins.
- Sync Calendar
- It's easy to sync your Xola calendar with Google or iCal Calendar to stay organized and on top of your reservations wherever you check them.
- For Google Calendar
- Copy the link that appears in settings.
- In Google Calendar, on the left-side menu bar, click the arrow next to Other Calendars and select the From URL option.

-
-
- Paste in the URL generated from the Xola dashboard.
-

-
-
- Click Add Calendar.
- Check out your synced calendar!
- For iCal (Apple Calendar)
- Copy the link that appears in settings.
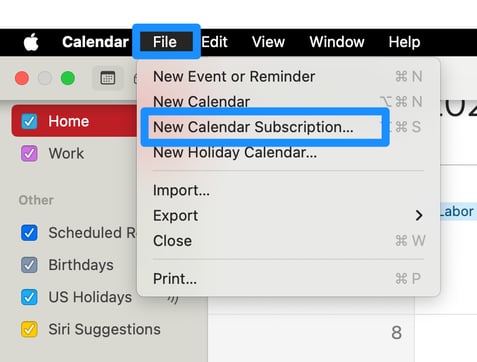
- In iCal, click File and select New Calendar Subscription.
-
-
-
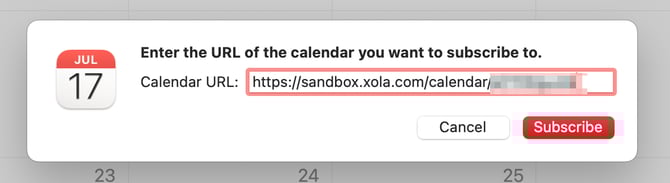
- Paste in the link from Step 2 and click Subscribe.
-
-
-
- Fill in your iCal preferences.
-
Sync Calendar is only available for Admins, Reservationist, Equipment Manager, Guide, Guide Manager or Reservationist Lite.
User and Access
A Xola user's access level limits their access to certain tabs as well as certain abilities, like refunds. Please see Access Levels for an in-depth breakdown of each User.

- At the top of the page, you can filter your users. Click on the All User Roles button and select which access level users you want to see. You can also filter by All, Pending (those who have not set up a password), and Active.
- To add a User in Xola, select the blue Add User in the upper-right-hand corner.
- In the modal popup that appears, type in Name and Email (phone number and nickname optional), and Roles and click Save Changes.
- The User will receive an email to verify their email. Until they verify, they will not be able to log in and will remain Pending in Xola.
- After a user is created, you can click the
 icon and perform the following actions:
- Update Roles: Change the user access level if needed.
- Revoke Access: Revokes the user's access to your account and deletes the user.
- Reset Password: Send the user a password reset email.

Grant Access User Roles Explained
Role Permissions
| Role | Access Level |
|---|---|
| Administrator | Full access to all areas of your Xola account, including settings, reports, purchases, products, customer data, and marketing tools. This role is ideal for business owners and high-level managers. |
| Curator | Can create and edit products, including product details, pricing, availability, and schedules. Curators do not have access to financial or customer data unless explicitly granted. |
| Equipment Manager | Can create and manage equipment. They can also assign equipment to events and manage availability. Ideal for staff who oversee gear and resource allocation. |
| Reservationist | Can create and modify purchases, view the Dashboard, Rosters, and Customer profiles. |
| Reservationist Lite | Can create and modify purchases, but does not have the ability to issue refunds. This role is perfect for newer staff or seasonal employees with limited access needs. |
| Guide Manager | Can assign guides to events and manage the guide schedule. This role is for operations staff responsible for managing tour staff or instructors. |
| Accountant | Can view all purchases and financial data, including transaction history and reports, but cannot modify products, schedules, or reservations. |
| Guide | Can be assigned to events by a Guide Manager and view their upcoming assignments. They cannot make changes to products or reservations. |
| Marketer | Can access the Marketing tab, create and manage coupon campaigns, and view or copy embedded button code for online booking. Ideal for marketing staff or consultants. |
Here’s a breakdown of which navigation tabs are visible to each user role in Xola:
| Role | Dashboard | Roster | Purchases | Customers | Products | Resources | Reports | Marketing | Distribution | Settings |
|---|---|---|---|---|---|---|---|---|---|---|
| Administrator | ✅ | ✅ | ✅ | ✅ | ✅ | ✅ | ✅ | ✅ | ✅ | ✅ |
| Curator | ❌ | ❌ | ❌ | ❌ | ✅ | ❌ | ❌ | ❌ | ❌ | ✅ (Apps configuration) |
| Equipment Manager | ✅ (for assigning equipment) | ❌ | ❌ | ❌ | ❌ | ✅ (Equipment only) | ❌ | ❌ | ❌ |
✅ (My profile) |
| Reservationist | ✅ | ✅ | ✅ | ✅ | ❌ | ❌ | ❌ | ❌ | ✅ (Agents) | ✅ (Hardware) |
| Reservationist Lite | ✅ | ✅ | ✅ (no refund) | ❌ | ❌ | ❌ | ❌ | ❌ | ❌ | ✅ (Hardware) |
| Guide Manager | ✅ (for assigning guides) | ✅ | ❌ | ❌ | ❌ | ✅ (Guide Management only) | ✅ (Gratuity Report only) | ❌ | ❌ | ✅ (Roster Export ) |
| Accountant | ❌ | ❌ | ✅ (view-only through reporting) | ❌ | ❌ | ❌ | ✅ | ❌ | ❌ | ✅ (My profile) |
| Guide | ✅(for assigned events) | ✅ (for assigned events) | ❌ | ❌ | ❌ | ❌ | ✅ (Their Gratuity Report only) | ❌ | ❌ | ✅ (My profile and guide profile) |
| Marketer | ❌ | ❌ | ❌ | ✅ (not message templates) | ❌ | ❌ | ❌ | ✅ | ✅ (View only) | ✅ (Company Profile (social links only) and Button Code) |
API Keys
An API key is a secure code that allows external apps or systems to connect to your Xola account. It enables you to safely share access with other platforms to pull data, update products, manage reservations, or integrate with marketing and reporting tools—without sharing your personal login credentials.
What You Can Do with an API Key
Once created, an API key allows external systems to:
-
Retrieve booking and reservation data automatically
-
Create or update products and availability
-
Access reporting and financial data
-
Integrate with third-party marketing, analytics, or hardware tools
API keys make it easy to securely connect Xola with other systems, automate workflows, and extend your platform’s capabilities.
Adding an API Key
To create a new API key:
-
Click Add API Key, then:
-
Name your key – Choose a clear, descriptive name so you can easily identify its purpose, especially if you have multiple integrations.
-
Select an access level – This determines what the key can view or modify. Only grant the permissions necessary for the integration.
-
-
Click Save – Your API key will be generated and ready to use.
Note: Be sure to store your API key securely. Anyone with access to the key can interact with your account based on the permissions you’ve assigned, so treat it like a password.
Managing an API Key
Once an API key has been created, you can manage it directly from the API Keys section in Users & Access. Available actions include:
- Copy the API key – Easily copy the secure key to use in your integrations. Be sure to store and share it securely.
- Revoke the API key – Disable the key at any time to immediately remove access for any connected systems.
- Edit the API key – Click the
 icon to update the key’s name or adjust its permission levels as needed.
Regularly reviewing and managing your API keys helps ensure your integrations remain secure and aligned with your current business needs.
Languages
Language
Account Language: This can only be set up by the Primary of the account. This will be the default for all users of this account when they log in.
My Language: Each user can adjust this individually from their own Settings. Select the language in which you’d like your Xola account to appear, and it will override the default set by the Primary for your login only.

Translations
Manage content translations for all the languages your customers can choose at checkout, ensuring that key touchpoints like product titles, descriptions, pricing labels, checkout fields, and confirmation messages are displayed in their preferred language. This allows you to deliver a consistent, localized booking experience for international guests while keeping your core setup centralized in Xola.
-
Click on the + Add Language button and search or select the language from the dropdown. Then click Add.
- Next hit Save at the bottom of the screen.
- Once Saved you can click on the icon to view the translations. You can choose to manually modify the translation of each item of a product.
- Use the filters to filter the content or product you would like to translate.
- Click into the Translation column to delete and replace the text.
- Changes will automatically save.
- You can also delete a translation by using the
 icon.
icon.

Notifications
There are distinct groups of people for whom you can control notification preferences in Xola including which ones get sent and, in some cases, how far in advance they are sent out.
- Sent to Account Owner: These are notifications sent to the primary email address associated with the account.
- Sent to Company: These are notifications sent to the communication email address associated with the account.
- Sent to my customers: These notifications are sent to your customers, provided they have a valid email address or mobile phone number.
- Sent to my guides: These notifications are sent only when a guide is assigned or unassigned to a specific tour.
In Settings > Notifications, you can see a breakdown of all the different notifications sent to these groups. By using the toggles you can designate whether or not you want this notification sent out and override the default timing of certain notifications.
- Toggle on or off any of the notifications based on your preferences.
- Optionally, override the default timing and set custom timing for certain notification times.
- Save your changes.

Button Code
When we talk about buttons in Xola, we're talking about three things:
- The Javascript code you install on your site,
- The Design and Color of your checkout.
- The Button Type that is displayed on your website.
For more on buttons, please visit Button Installation.
Preferences
Purchases
Auto AcceptAll products default to Auto Accept. You can override this by clicking on the ![]() icon and selecting which products you want to be auto-accepted. Anything unchecked will be on Manual Accept.
icon and selecting which products you want to be auto-accepted. Anything unchecked will be on Manual Accept.
- Auto Accept: Means that Xola will automatically accept all reservations on your behalf.
- Manual Accept: Means you can manually review each reservation and accept or decline it.
- Customers will have a pending charge for the amount of the experience until you accept or decline the reservation in the Purchases Tab. This message will show to your customers upon checkout: "Your credit card statement may show a pending charge for the full booking value of $xx.xx."
- Any reservations made in the back office will override this rule and be automatically accepted. If there was card information entered, it will be charged unless you select the "Do not charge card now" option.
- The only time this would not be true for a back-office purchase placed for a Manual Accept product is if the experience has a per-event minimum set that has not been fulfilled. In that case, you would have the option to override and accept the reservation manually.
Auto Check-in
In Xola, there are two ways to check in a customer for an experience. One option is for a staff member to use the check-in button for a customer on the Xola desktop or mobile app. The other option is to enable Auto Check-In for your experiences. When this is toggled on, all guests will be marked as arrived if the following two conditions are met:
- The reservation is made in the back office.
- The reservation is made within the requested time interval.
For example, if it is set up so that the auto check-in is ‘60’ minutes, any reservation made in the back office within 60 minutes of the experience's start time will mark all guests in that party as arriving.
Post-Purchase Action Preference
After you have made a purchase in the back office, you can choose from the following to happen after:
- Manage the reservation in the Purchases tab
- Go to the Dashboard
- Make another Reservation
Modify OTA (Online Travel Agency) Bookings
If the Modify OTA Bookings is toggled on, then a reservationist or admin will have the option to modify any OTA reservation that comes in. These a reservations that come from places like Viator, Get your Guide, Expedia, etc.
Allow Past Dates
Allow reservationists to create new reservations for past dates. To learn more, click here.
Email Required
If Email Required is toggled on, a reservationist can complete a reservation in the back office without entering a customer's email address by clicking the toggle next to email in a purchase workflow. However, the customer will need to enter their email address during the online checkout. 
If the Email Required option is toggled off, a reservationist must enter the customer's email to complete a purchase, and there is no way to opt out of collecting the email. However, the customer must still provide their email during the online checkout process. 
Phone Number Required
If the Phone Number Required is toggled on, a reservationist can complete a reservation in the back office without entering a customer's phone number by clicking the toggle next to the phone number in a purchase workflow. However, the customer must enter their phone number during the online checkout.
If the Phone Number Required option is toggled off, a reservationist must enter the customer's phone number to complete a purchase. There is no way to opt out of collecting the phone number. The customer also does not have to provide their phone number during the online checkout process.
Retain Current Price Configuration
When toggled on, when you make a modification to a purchase, and there is a difference in price, the retain current price toggle will be on by default.

Expand Notes Section
When toggled on, your notes will expand in the notes section in the roster, and purchase details when notes are present.
Customer Emails
If you toggle this on, the gift recipient will receive an email with their gift code and tiles for other experiences you offer. If you are selling gift offers with experience restrictions, we recommend you keep this option off.
Customer Phone Number Required
If you toggle this on, gift purchasers must provide a phone number when buying a gift.
Roster
Xola allows you to customize what is included in your roster export by toggling the different data points on and off. To learn more about your Roster Export, click here.
Fraud Fighter
Fraud Fighter is a comprehensive fraud prevention suite that brings multiple risk-mitigation tools together in one configurable settings area. It layers bot protection, payment authentication, and identity verification to cut down on fraudulent bookings while keeping checkout smooth for guests. You can enable three key components to tailor your fraud protection.
Frictionless Bot Defense
Protects checkout from automated/bot traffic (formerly CAPTCHA). This bot runs in the background to minimize user friction while preventing abuse.- Just toggle this feature on to begin using. No other action is required.
3D Secure Enforcement
Enables you to define transaction thresholds that trigger 3D Secure authentication. Adds an extra layer of payment verification for high-risk transactions.- Toggle on the 3D secure toggle
- Set a threshold $ amount in the dropdown.
- Any purchases over this amount will enable the 3D secure enforement.
Pre-Check
Collects photo ID + live selfie verification via a mobile-friendly checkout flow. This feature will also Automatically send a pre-check link in confirmation emails for completion prior to arrival. It will Captures and attach Government ID (front + back), Live selfie (camera required, no uploads), Full legal name (matched to ID)and/or Signature + verification acknowledgment. The field you choose to capture are automatically synced to reservation questionnaires in the purchases tab and roster for you to manage.- Toggle on the Pre-Check.
- Next, choose the products you want this to apply to.
- If you enabled for all products, new fields will be included as part of your global questionnaire.
- If you select only specific products, Xola will override your global questionnaire at the experience level and apply new fields only to that experience.
- The new questions will show on the confirmation email in a new area called Pre-Check.
- When the customer click on the Pre-Check button they will be taken to a screen to upload all the information.
- After the information is uploaded by the customer it will show on your roster and on the purchases tab.
To learn more about how to manage Pre-Check, click here.
Gratuity
With the Gratuity feature in Xola, you can seamlessly accept and track digital gratuities from your customers, ensuring your staff is recognized and rewarded for outstanding service. This tool enables you to create preset gratuity options—like suggested dollar amounts or percentages—making it easy for guests to select a tip amount that fits their preference. Gratuity requests are sent automatically to customers via email or SMS link after their experience, allowing guests to leave a tip conveniently by credit card.
To learn more about how to set up the Gratuity feature, click here.
Apps
Most apps that are installed from the App Store and have a configuration page can be configured here. Just hit Configure and follow the directions on the next page.
Taxes and Fees
Taxes and Fees are set here and then applied to whichever products you specify. To learn more, please read this article.
Payments
The Payment Details section of your account must be configured before you can accept payments. The information entered must be detailed and correct.
Payment Gateway
The payment gateway is the credit card processor that you use on Xola. This is set when your account is created and can only be changed by Xola Support.
KYC
The payment processor requires this information. When entering it, please include the same information that is consistent with the information you provided on your most recent tax filings.
For example, if your company name has an LLC at the end, please include it here. The fields that Xola requires you to fill out may change depending on the region you are in.
Click Update KYC. A pop-up screen will appear, walking you through the information you need to enter to verify your account with Stripe.
Once the payment processor has verified you, you will see a verified green icon, and you will have no action items.


Bank Account
This information tells Xola which account to deposit the funds from processed credit card payments. As with the Legal Entity information, the information entered here must be correct to guarantee the success of your payouts.
If changes are made to bank account information, there is a 48-hour pause on payouts, and the the Primary email will also receive an automated email of the bank account change.
Credit Card Settings
Additional Billing Information
When toggled on, this requires additional information from your customer, such as the billing address, when using your checkout.
Descriptor
Enter a Credit Card statement descriptor that will show to your customer on their bank statements. Be sure to make this something that your customers will recognize!
What will show up on your customer's credit card statement will depend greatly on their bank account. In most cases, a bank will have three fields:
- Company Name = Your company's CC Statement Descriptor in Xola
- Description = The name of the Experience in Xola
- Amount = Price paid on transaction
Payment Methods
If you accept forms of payment outside of Xola, you can configure a custom payment method to appear in your reporting. This will not allow Xola to process the payment, but rather, it will make the payment method appear in the "method" column of your report exports for the transactions that the custom method applies to.
To add a payment method, click Add custom payment method, and in the pop-up, enter the following:
- Name: The name of the custom payment method, which will show in reports.
- Comment Label: These tags will show in purchases and reports.
- Comment:
- Allowed: A Reservationist can leave a comment when using this payment method
- Required: If toggled on, a reservationist is required to leave a comment.

After a custom payment method is created, you can:
- Star: By clicking on the star next to the payment method, this will set it as your default customer payment method. So when you select the Other option while making a purchase, it will automatically default to this starred payment method.
- Edit: Click the
 icon to edit the Payment Method
 - Delete: Click the
 icon to delete the Payment Method

Checkout Payment Methods
Configure additional payment methods for your customers to use during checkout. When you click on each option, you can enable the payment methods. Once enabled, your checkout will display the different payment options to customers in the Payment Method section.
- Cards: Popular for consumers and businesses to pay online or in person. Stripe supports global and local card networks.
-
Wallets:Improve conversion and reduce fraud on mobile. Customers pay with a stored card or balance.
- Apple Pay
- Google Pay
- Link
-
Buy now, pay later:Reach customers who want to pay in installments. Your business still receives full payment at checkout.
- Affirm
- Afterpay/Clearpay
- Klarna

Buy Now, Pay Later FAQs
Will I get paid out in installments?
No, you will be paid in full up front. Guests can choose BNPL at checkout to split their purchase into installment payments. However, you will be paid in full after the booking is processed, just as normal.
Can I issue a refund for a BNPL purchase?
Yes, refunds can still be processed through Xola. However, refunds are limited to the BNPL platforms refund window, which is typically between 120–180 days from the original purchase date.
Can I add additional charges to a BNPL booking after it's been finalized?
Yes, additional charges can be added to the booking and collected using a different payment method. However, the original BNPL payment method cannot be recharged once it has been finalized.
How are disputes handled with BNPL bookings?
Disputes and chargebacks follow the same general process as standard payments, but they are managed directly through BNPL platform rather than Stripe or the guest’s credit card provider.
Hardware
This is where you set up any purchased hardware, such as credit card swipers, receipt printers, and ticket printers. To learn more about the Hardware you can use, click here.
To print a receipt or save it as a PDF using your office or home printer, navigate to the Receipt Printing section and select "Use Computer Print Dialog" as your printing option. Click Save to apply your selection. Then, in the Purchases tab, use the Print Receipt button on the modification bar to print a physical copy or save the receipt as a PDF to share with your customer.
Kiosk
Xola's Kiosk app is a guest-facing solution that allows your guests to sign Xola Waivers and check in for their reservations, streamlining your front desk operations and enhancing the guest experience right from the start.
To learn more about Kiosk and see the kiosk in action, click here.
Under the Kiosk Settings, you can customize the Kiosk for your business.
General
- Show New Booking Button: When toggled on, this will display a button for your guest to make their own bookings right from the homescreen.
- Show Check-In Button: When toggled on, this will display a button on the homescreen for your guest to check themselves and their group in for the experience they are there for.
- Show Sign Waiver Button: When toggled on, this will display a button for your guest to sign the waivers you have set up right from the homescreen.
- Automatic Idle Reset: When toggled on, the kiosk will automatically return to the homescreen after the period of inactivity you set. This ensures that if a guest walks away before completing their action, the kiosk will detect the inactivity and reset for the next guest.
- Settings Screen Password: If set up, this password will be required for a user to input when trying to access the Hardware section of the Kiosk app.
- Show Name Field for New Purchases: Requires the customer to put in a name when making a purchase.
- Show Phone Number Field for New Purchases: Requires the customer to put in a phone number when making a purchase.
- Show Email Address Field for New Purchases: Requires the customer to put in an email address when making a purchase.
Theme
Here you can set up a picture to display on the Homescreen and the Header. You can even upload a video to show when the kiosk is idle. If these images or videos are not set up for the Homescreen, then the Xola logo will show instead.
Products
Display Products: Click on the dropdown to choose how you want to display the products you offer on Kiosk when a guest is making a reservation:
-
List Layout: This gives the customer a scrollable, easy-to-read list of all the products you’ve chosen to feature on the kiosk.
- Grid Layout: Displays your products in a tiled grid, side by side, so guests can quickly browse and choose their experience.
Products to Display: Click on the ![]() icon to show a list of all your products.
icon to show a list of all your products.
-
Drag and drop the products you want to feature on the kiosk into the right-hand column.
-
Click Save.
If you are using one of our compatible ticket printers with your kiosk, you can customize the tickets that are printed to better match your brand and guest experience. This includes adding your logo or header image and inserting a custom thank-you or informational message so that every printed ticket feels polished, on-brand, and clear for your guests and staff.
- Star TSP100 (all variants)
- Star TSP143 (all variants)
- mc-Print2
- mc-Print3
- TSP743 (all variants)
- TSP847 (all variants)
Receipt Ticket Header Image: Upload an image, that you want to display at the top of your printed ticket.
- Click on Upload New Photo.
- Check that the image is in PNG or JPG format and does not exceed 5MB
- If you wish to delete the current photo that is uploaded, click delete photo.
- Enter the text you want to include in the text box.
Example of a ticket with picture at the top and Thankyou Message of "Have a Nice Day!" at the bottom:
