Xola’s check-in preferences give you full control over how guests are checked in for your events, enabling a seamless and professional experience for both your staff and customers.
You can configure standard or enhanced check-in policies, such as setting check-in validity windows that determine when guests are allowed to check in, and enabling multiple check-ins if your operation requires it. Staff can mark each guest as Checked-In upon arrival, which secures their spot on the event roster and triggers follow-up actions like review requests or gratuity prompts. If a guest doesn’t show up, staff can easily mark them as a No-Show, keeping your records accurate and freeing up spots for waitlisted or last-minute guests if you want to make that capacity available.
All of these actions are managed within Xola’s unified dashboard - maintaining a frictionless staff workflow. By customizing check-in rules for each experience or using global settings, you ensure your check-in process is tailored to your operation’s needs. This flexibility enables operational consistency, produces better data for post-event communication, minimizes confusion at entry, and streamlines the work of managing guest flow, no-shows, and last-minute arrivals.
User Access: Administrator or Curator roles have access to this set up.
Administrator, Reservationist, Reservationist Lite, Equipment Manager or Guide Manager roles can mark check in or no show on the Dashboard.
Guide roles can only mark check in or no show events they are assigned for on the Dashboard.
To grant access to users, click here.
What's covered in this article:
- How to set up Check-in Preferences
- How to set up Enhanced Check-in Preferences
- How to mark a Guest as Checked-In or as a No-Show
How to set up Check-in Preferences
To set up your Check-in preference, go to Products > Experiences.
- Global Check-in preferences: This applies to all your products.
- Select Global Settings > Check-In Preferences.
- Toggle on the Require guests to check in to participate in the event option.
- When this feature is enabled, guests who are marked as checked in will receive the review, gratuity requests, and follow-up emails, but those who are not marked as checked in will not receive these emails.

How to set up Enhanced Check-in Preferences
Now that you have your check-in preferences globally, it is time to set up your enhanced check-in preferences on an experience level.
- Go to Products > Experience.
- Go to the Experience > click Edit > go to the Guest Management tab on the left-hand side.
- Go to Check-in> Toggle on Override global check-in settings.
-
Next, toggle on Require Check-In. This allows guest check-ins for this experience.

-
Next, you can choose the Check-In Validity where you can choose between:
- All guests must check in within a limited window.
- When toggled on, you can create a window of time when a customer can check in.
- Click Add Window.
- Name: Name the window so you can easily keep up with each unique window created.
- Availability
- Available means that this window is available for your customer to check in.
- Unavailable means your customer will not be able to check in during this window.
- Dates
- Date Range: Choose a date range that you want as your window. Here, you can choose a start and end date, days of the week, and a time range.
- Specific Dates: Choose specific dates on a calendar view and a time range.
- Relative to purchase date: Choose terms in which guest will need to follow to check in. This will allow you to pick the amount of minutes, hours, or days you want to allow customers to check in after they make the purchase of the event.
- Summary: This will outline the window you created.
- All guests must check in within a limited window.

-
- Check-ins must be within a limited window after the first check-in.
- When toggled on, you can set the number of minutes, hours, or days you want to allow guests to continue checking in for the event.
- Check-ins must be within a limited window after the first check-in.

- Now choose if you would like to allow Multiple Check-Ins.
- Once toggled on, you can select the following:
- Multiple check-ins: Allows customers to check in multiple times, within the limit you set.
- Once toggled on, you can select the following:

-
-
- Unlimited check-ins: Allows customers to check in unlimited times. If you have a window set, the unlimited check-ins will stop when the window is no longer active.
-

Note: When the check-in feature is enabled, customers who are marked as checked in will receive the review, gratuity requests, and follow-up emails, but those who are not marked as checked in will not get these emails.
How to mark a Guest as Checked-In or as a No-Show
Check-In
On Dashboard
- Navigate to your Dashboard, locate the guest's event, and click on it to show the roster.
- Next, locate the Check-In column under the guest section:
- Check in the group by clicking on the green
 button next to the group name at the top.
 - You can check in the individual members of a group by clicking on the down arrow next to the group's name and then clicking the green
 button next to the individual's name.
- Check in the group by clicking on the green
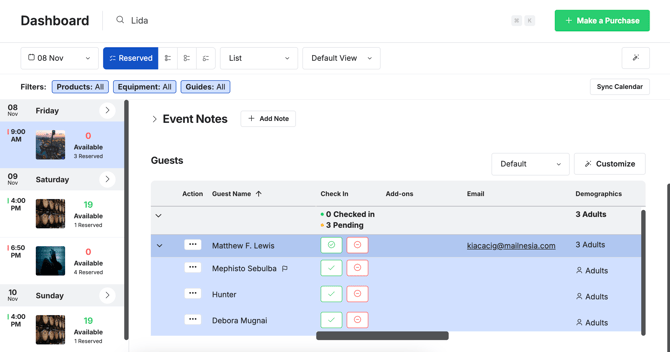
If the Identify Unique Attendees option is turned off under Experience > click Edit > Guest Management tab you can only check in guests at the group level—individual guest check-in will not be available.
On The Quick Dashboard Search Bar
- Navigate to your Dashboard. At the top of your screen, there is a search bar that enables you to quickly find a customer using their name, email, phone number, tag, or ID.
- Once a customer is searched and selected, click the check mark. Here you can:
- Check in the group by clicking on the green button next to the group name at the top.
- Check in the individual members of a group by clicking the green button next to the individual's name.
- You will also see a guest count on the dashboard, which will show you the total number of guests marked as checked in.
- Check in the group by clicking on the green
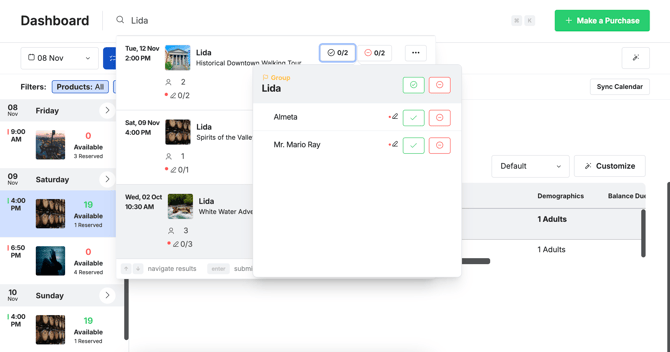
If the Identify Unique Attendees option is turned off under Experience > click Edit > Guest Management tab you can only check in guests at the group level—individual guest check-in will not be available.
No-Show
On Dashboard
- Navigate to your Dashboard, locate the guest's event, and click on it to show the roster.
- Next, locate the Check-In column under the guest section:
- Mark the group as a no-show by clicking on the red
 button next to the group name at the top.
 - You can mark individual members of the group as no-shows by clicking on the down arrow next to the group's name and then clicking the red
 button next to the individual's name.

- Mark the group as a no-show by clicking on the red
- When you mark a guest as a No-Show, you will be met with two options:
- Increase the availability of the event: This will open all reserved capacity for others to fill online or in the back office.
- Do not increase the availability: This will not open up the capacity for others to fill the spots.

If the Identify Unique Attendees option is turned off under Experience > click Edit > Guest Management tab you can only mark No Show guests at the group level—individual guest No Shows will not be available.
On The Quick Dashboard Search Bar
- Navigate to your Dashboard. At the top of your screen, there is a search bar that enables you to quickly find a customer using their name, email, phone number, tag, or ID.
- Once a customer is searched and selected, click the red
 button.
- Mark the group as a no-show by clicking on the red button next to the group name at the top.
- Mark the individual members of a group as a no-show by clicking the red button next to the individual's name.
- When you mark a guest as a No-Show, you will be met with two options:
- Increase the availability of the event: This will open all reserved capacity for others to fill online or in the back office.
- Do not increase the availability: This will not open up the capacity for others to fill the spots.
- When you mark a guest as a No-Show, you will be met with two options:
- Reservations will remain on the roster for that event.
- If a no-show reservation still has a balance due, you will still see this purchase in the Pending Action Queue.
Pro Tip: If you mark someone as a no-show, by accident and need to correct this, simply just click the red ![]() button again, and they will no longer be a no-show.
button again, and they will no longer be a no-show.
If the Identify Unique Attendees option is turned off under Experience > click Edit > Guest Management tab you can only mark No Show guests at the group level—individual guest No Shows will not be available.