Digital waivers are an essential part of many activities—whether you're offering ziplines, kayak tours, ATV rentals, or any other adventure-based experience. With Xola Waivers, you can easily collect, track, and manage waivers directly within your booking flow—no paper, no third-party tools, and no extra steps for your team.
Guests can sign waivers during checkout or via the confirmation email, ensuring everything is completed before arrival. Plus, Xola Waivers allow you to embed custom questionnaires, so you can gather key customer information in advance—making check-in faster and your operations more organized.
No more chasing down forms or dealing with fragmented systems. With Xola Waivers, everything is centralized, secure, and ready when you need it—so your team stays focused and your guests enjoy a smoother start to their experience.
User Access: Administrator or Marketer roles have access to set up and manage Xola waivers in Xola.
Administrator or Reservationist roles can view and link Xola waivers to reservations and manage which products are assigned to waivers in Xola.
Reservationist Lite roles can view and link Xola waivers to reservations in Xola.
Equipment Manager, Guide Manager or Guide roles can only view Xola waivers linked to reservations on the Roster.
To grant access to users, click here.
What's covered in this article:
How to Get Started
-
Install the Waivers App
- Log into your Xola account.
- Go to App Store.
- Find Xola Waivers and click Install.
-
Create a Waiver Template
- Once installed from the App Store, you can create your own Xola Waivers. Go to Settings > Apps > Xola Waivers > Configure and click on the Create a Waiver to begin building.
- Title: This will show at the top of the waiver to your customer.
- Body: This is the text you want your customers to agree to. In addition to your text, the Body can have a few variables to choose from when adding custom content to your waiver. These variables will dynamically populate content in the waiver. The available variables are:
- Required Check Box: This box is placed in the waiver which the customer must check to finish and agree to.
- Current Date: The date on which the waiver is opened.
- Electronic Consent: This is the paragraph that will show on the waiver for your customers to see and agree to before they sign.
- Additional Documents: In addition to or to replace the body of your waiver, you can upload a PDF. Click on the Upload PDF button under the Electronic Consent.
- Once installed from the App Store, you can create your own Xola Waivers. Go to Settings > Apps > Xola Waivers > Configure and click on the Create a Waiver to begin building.
Note: This feature gives you greater control over the design of your waiver, allowing you to include images, highlighted text, and more. The PDF will display inline within the waiver, rather than as a downloadable link.

-
Configure Waivers for Minors (optional)
-
Check the box if you want to allow a minor to sign a waiver; this setting is optional.
-
If chosen, you will need to set up the following options:
-
Minor Instructions: Add a custom message to tell Parents/Guardians what to do.
-
Waiver Requirements
-
Require one waiver per minor: This means each minor will need their own waiver.
-
Allow multiple minors on the same waiver: This means one parent/guardian could sign for multiple minors on one waiver.
-
-
Parent/Guardian Rules
-
Only the parent/guardian must sign the waiver.
-
Minors must sign the waiver in addition to a parent/guardian.
-
-
-
Once everything is completed, click Save Template.
-

Example of a waiver

-
Add Questionnaires to Waivers
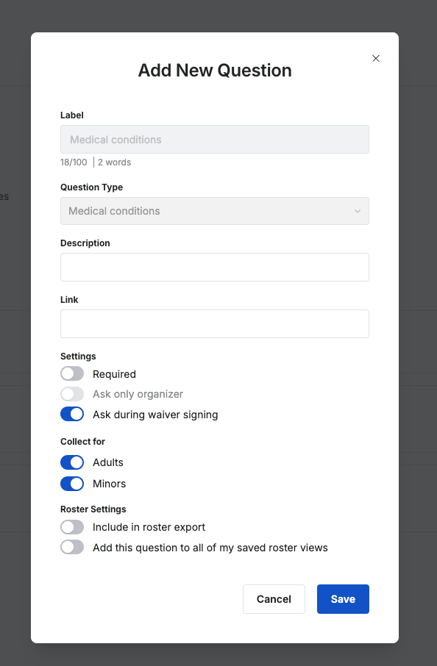
- Questionnaires collect additional information from your customers. What is included in the Questionnaire is completely customizable, and it can be set up as Global or Experience-Specific.
- To add these questionnaire questions to your Waiver, go to your questionnaire settings in your Xola account, add the question and toggle on Ask during waiver signing so these questions will show on your Xola Waivers.
- Next, choose if you want to collect this question for Adults, Minors, or Both.
-
- You can also choose to display the answers on your Roster Export and Roster.
Note: If you have Date of Birth Questionnaire turned on, when someone fills out the Date of Birth on the Waiver, the answer will show on the roster on your Xola dashboard and the Purchases Tab, under the questionnaire answers.
-
Assign Waivers to Experiences
-
Under the Customers > Digital Waivers tab, assign each waiver template to the correct tour or experience.
-
Click the
 button to apply the waivers to the products for which you want your customers to sign a waiver.
-

-
- Once this is complete, the customer will be asked to sign the waiver after completing a purchase at checkout. They will also receive a confirmation email with a link to sign the waiver. You can also configure Waiver reminder emails to send to them in addition to the confirmation email.
-
Set Up Customer Waiver Reminder Notifications
- You can set up waiver reminder emails and/or SMS for the customer to make sure all waivers are signed before the experience. By default, reminders are set to be sent 7 days, 3 days, and 1 day before arrival.
- You can override the default and set reminders in any increment you would like. You choose how many reminders are sent and if they are sent after the purchase or before the arrival date. To set this up:
- Go to Settings > Notifications.
- Scroll down to the Sent to Customers section.
- Under Waiver Reminder, click on the underlined days.
- Now pick how many reminders the customer will receive (up to 3).
- Then, slide the slider to choose the timeframe.
Note: The waiver reminder will not be sent after everyone has signed the waiver. It will only be sent when there are outstanding waivers to be signed by the group.

Waiver Reminder Email Example

Waiver Reminder SMS Example

How it Works
Once you've set up your waivers, here's what happens from the customer's perspective:
During Checkout
After a customer completes a purchase for an experience with a Xola Waiver tied to it, the checkout window will ask them to fill out the waiver.

This same digital waiver link will also be included in your customer's Confirmation and Reminder emails. They can click the link in the email at any time to sign.

Sharing the Waiver
Customers will also be allowed to sign another waiver or share the waiver link with other guests. They can click the share link, and a waiver URL will be copied. They can then send it to others via email, text, or group chat.

Reminders
Automated reminders (via email and/or SMS) go out before the event. You can customize how far in advance and how often these send.
You can also resend the Waiver reminder email to a customer by going to the Purchases tab, searching for the customer's purchase, and clicking on the Resend Waiver button.
Note: To use the Resend Waiver feature on Purchases, the Waiver Reminder must be turned on under Notifications.

Note: When the waiver reminder is resent, it will show who has signed the waiver already!

Check-In
Waivers will automatically link to purchases when signed from the link sent in their confirmation email (or can be manually linked when signed from a generic link).

Manually Manage Waivers
- Purchases tab
- Navigate to the Purchases tab.
- Within the purchase, go to the Attendees section.
- To manually link waivers, click on the
 icon with the colored dot. Now, click on the Link a Waiver button, select the waiver you would like to link, and hit Save. These waivers will appear, and the name on the waiver will appear in the attendees' section.
 - To make corrections to your guest's waivers, click on the
 icon with the colored dot and then click the
  icon. A pop-up will appear allowing you to update the information your guest submitted. If you use the questionnaire in the waivers feature, you can also modify their responses here.
 - To unlink the waiver, click on the icon with the colored dot and then click the
 icon next to the customer's waiver you want to unlink. This will unlink the waiver and allow you to link another one. The name of the guest will also be removed from the attendees section.
 - To view the waiver, click on the icon with the colored dot and then click the
 icon. This will download the signed waiver to another screen for you to view.

- Roster
- Navigate to the Dashboard.
- Click on the timeslot, and go to the Roster.
- To manually link waivers, click on the icon with the colored dot in the Roster grid. Now, click on the Link a Waiver button, select the waiver you would like to link, and hit Save. These waivers will appear, and the name on the waiver will appear in the attendees' section.
- To unlink the waiver, click on the icon with the colored dot and then click the icon next to the customer's waiver you want to unlink. This will unlink the waiver and allow you to link another one. The name of the guest will also be removed from the attendees section.
- To view the waiver, click on the icon with the colored dot and then click the icon. This will download the signed waiver to another screen for you to view.

Tip: You can allow linking of previously linked waivers to new purchases if needed. Go to Customers > Digital Waivers > Global Settings and check the box to enable this.
Tips for Success
-
Prompt guests to sign waivers at checkout or via confirmation email before arrival.
-
Use waiver-attached questionnaires to collect important customer info in advance.
-
Set clear waiver rules for minors to streamline family check-ins.
-
Enable and customize when reminder emails or texts are sent to ensure waivers are signed on time.
-
Monitor waiver status using colored icons in the Purchases tab or Roster.
-
Edit waiver details or questionnaire responses manually when needed.
-
Allow previously signed waivers to be reused for returning guests if applicable.