The Roster View in Xola is your real-time, interactive dashboard for managing individual events with precision and ease. When you click into an event from the main Dashboard, you’re taken directly to its dedicated Roster, where you’ll find everything you need to ensure the experience runs smoothly—from logistical details to guest-specific insights.
At a glance, the event header displays crucial information like the event title, date and time, assigned guides, capacity, and any add-ons included. This gives your team immediate visibility into the structure of the event, allowing you to confirm that all resources are aligned and nothing is overlooked.
This centralized command center keeps your team fully in sync, improves response time to guest needs, and delivers a more polished, stress-free experience from check-in to departure.
User Access: Administrator roles have access to the view and manage Roster in Xola.
Reservationist roles have access to view and manage the roster, and can view but not modify guide and equipment assignments.
Reservationist Lite roles have access to view and limited actions to manage the roster, and can view but not modify guide, equipment assignments and capacity.
Equipment Manager roles have access to view the roster, assign equipment, export and print the roster in Xola.
Guide Manager roles have access to view the roster assign guides, email, export and print the roster in Xola.
Guide roles can only view Events they are assigned to, export and print the roster in Xola.
To grant access to users, click here.
What's covered in this article:
Roster Summary
At the top of the roster, you will see a summary of the experience title, the date and time of the experience, the assigned guides, the assigned equipment, and the capacity. You can also take the following actions from the summary:

Event Actions
Below the summary are the Event actions you can take. These actions will be applied to all the reservations within an event. All actions can be found at the top of the roster and include:
- Sending a message to all reservations
- Changing the arrival date/time of all reservations
- Canceling all reservations
- Email Roster
- Export Roster
- Print Roster
- Make a purchase
- Adding Event notes

Roster Guest Section
Under the Guest section of the Roster, you can find valuable guest information and take purchase actions. Xola provides you with guest information to review and allows you to sort and customize the information displayed in the Guest section. You can also look at the customer's purchase page by simply clicking on their name.
The very top row under the guest section contains the information points you can see. Under that is a summary row. This row summarizes all the items on the roster for all groups, i.e., how many demographic types you have in this roster and how many signed and unsigned waivers you have. If you hover over the check-in summary row, you’ll see a demographic breakdown of guests who are checked in, pending, or marked as no-shows.
Sorting the Roster
You can sort it by each column in ascending or descending order. Whether you want to see all no-showed guests first or balance due guests, you will be able to sort these columns. Simply click on the column title to sort it.

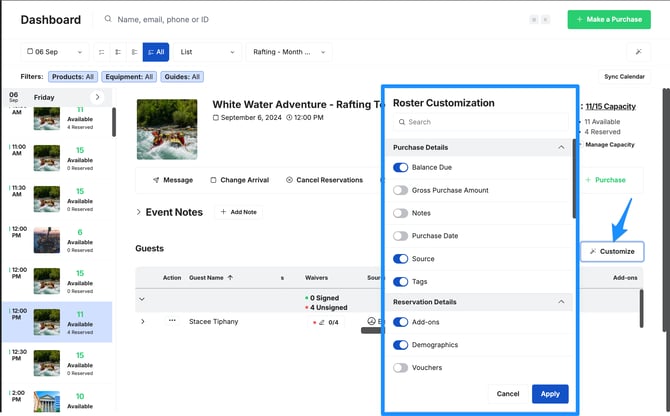
Roster Customization
Roster customization allows you to pick and choose which columns you see and in which order. Additionally, you can save these customized roster views and toggle between them.
To customize the visible columns, click the Customize button to the right:- Toggle on and off the information that you would like to see on your roster.
- Purchase Details
- Balance Due
- Gross Purchase Amount
- Notes
- Purchase Date
- Source
- Tags
- Reservation Details
- Add-ons
- Demographics
- Vouchers
- Gross Reservation Amount
- Reservation Code
- Guest Data
- Check In
- Guest Name
- Phone
- Waivers
- Questionnaire
- Any custom questions you have set up under your Questionnaire settings.
- Purchase Details
- Click Apply.
- Next, to adjust the order in which columns appear, click and hold the three lines next to the column title and drag the column to the desired spot by scrolling left or right.
- You can also pin columns to the left or right, so they stay frozen as you scroll over to other columns in the router. Simply click on the three lines and click 'pin left' or 'pin right'.
- Now, to save the roster customization, click on the button to the left of Customize that says 'Xola Default' > Select Save as New View > Assign a name to the customized view > Click Save.
Tip: Click the star next to the Roster view name to set it as the default view. This means next time you log in, this view will appear.

Purchase Actions
You can take Purchase actions for an individual guest while on the roster. These actions will be applied to a specific reservation within an event. All actions can be found by clicking the three dots to the left of the guest's name under the actions column and include:
- Message: Send an email, SMS, or both
- Add Purchase Notes: Add a Purchase note to the purchase
- Resend Confirmation: Resend the confirmation email to the customer
- Change Arrival: Change the arrival date/time of the reservation
- Modify Guests: Modify the number of guests in the reservation
- Modify add-ons: Add or modify add-ons to the purchase
- Charge: Adding additional charges or discounts to the purchase
- Refund: Refund payment for the purchase
- Switch experience: Switch the purchase from one experience to another experience
- Cancel: Cancel the reservations
- Link Waivers: Link signed waivers to the purchase
- Print Receipt: Print the receipt for the customer

Pro Tip: From the Roster Guest Section, you can take the following actions if you have that information turned on to show in the grid: mark the guest(s) as checked-in or a no-show, link, preview, or unlink the guest(s) waivers, or collect balance dues.
To view everyone attending as a group, click the arrow next to the group name designated by the group![]() icon. This will expand the roster, allowing you to view all attendees. Here, you can view the attendees' names, mark the guest(s) as checked-in or a no-show, or link, preview, or unlink the guest(s)' waivers.
icon. This will expand the roster, allowing you to view all attendees. Here, you can view the attendees' names, mark the guest(s) as checked-in or a no-show, or link, preview, or unlink the guest(s)' waivers.

If the 'Uniquely identify each attendee in the reservation setting' option is toggled off under Products > Experiences > Edit > Guest Management, you can only view the group level; individual guests will not be available, and no drop-down option will be shown.