When setting up a new experience in Xola, you’ll walk through an intuitive, step-by-step workflow designed to help you craft every aspect of your offering with precision and ease. This guided process enables you to define exactly how your experience appears and functions—both to your customers during online checkout and within your back-office operations. From outlining a compelling experience description to configuring schedules, specifying guest requirements, setting pricing rules, and establishing reservation policies, every detail is covered to ensure your experience runs smoothly and delivers a memorable customer journey.
You’ll have full control over visual presentation, availability, product add-ons, customer questionnaires, and terms and conditions—all organized into clear, logical sections. Xola’s setup process not only helps you provide clear and accurate information to your guests but also ensures that behind-the-scenes logistics—like inventory, staff assignments, and reservation management—are handled efficiently. No matter your experience type or operational model, this workflow supports industry best practices and streamlines every step, giving you the tools to offer high-quality, customized experiences that set your business apart.
User Access: Administrator or Curator roles have access to set up and manage experiences in Xola.
To grant access to users, click here.
What's covered in this article:
How to create an Experience
- Navigate to Products > Experiences.
- Select the blue +Create Experience button.
- Next, follow the directions in each tab.
Descriptive Content
This section defines how your experience is presented to customers and how it behaves in the system and through communications.
- Experience Title
- This is the name of the experience you offer customers to reserve online. This could be anything from the name of a walking tour to a canoe rental to the name of an escape room. It will appear during customer checkout, on the Xola back end, and in all email correspondence with a customer.
- Your customers will see this name when they click on this experience's Book Now button on your website.
- Excerpt / Description
-
Excerpt: This is the text that will appear to your customers when they are checking out online. The excerpt has a 350-character limit.
-
Description: This text is used when participating in Xola's optional distribution channels. It will not be displayed to your customers during a standard checkout on your website.
-
- Meeting Location
- This is the location where you would like your customers to meet you before the experience begins. You can also enable a map and drop a pin for your customers to see. This will appear in customer communications.
Tip: Do customers have to park somewhere specific or meet you at a specific spot? Use the text area under Meeting Location to describe where exactly it is your customers should park or meet you.
- Checklist
- Here you can provide your customers who reserve with a list of items they can expect to be provided and inform them of items they need to bring with them.
- Cancellation Policy
- Include your cancellation policy here to keep your customers informed ahead of time on your company’s terms.
- Other Considerations
- Use this space to include any important details not covered in the previously mentioned fields that you want customers to know after they book.
Some examples include:-
The physical intensity of the activity (e.g. will your customers be walking a lot?)
-
If the venue is ADA accessible/compliant
-
Pre-arrival requirements (e.g., obtaining a fishing license)
-
A basic itinerary
-
- Use this space to include any important details not covered in the previously mentioned fields that you want customers to know after they book.
- Attachments
- You can upload file attachments to be sent in the confirmation email, such as a PDF.
- Email Footer
- You can customize the email footer for this specific experience by toggling on Override global email footer.
- Use the text editor to create a custom footer that will appear at the bottom of emails sent through Xola, including confirmations, reminders, and all other messages.

Schedules and Availability
This section details how you shape the schedule, timing, and availability rules for each of your experiences in Xola. Here, you’ll decide when guests can make reservations, how frequently your event occurs, what blackout dates or times apply, and any specific restrictions that ensure your bookings align with your operation’s needs.
- Event Duration
- The amount of time your customer spends on the event. This will be displayed on your emails and can be displayed at your checkout.
Note: This only appears if you have schedules associated with your experience.
- Inventory Duration
- This duration is used internally to manage equipment or guide resources. It tells Xola how long to reserve the equipment, and may differ from the customer-facing event duration.
If you're using Equipment, setting this duration is crucial to avoid double-booking.
- Schedules
- In the Schedules section, you can choose whether customers must select from a predefined list of available dates and times. Most businesses choose to keep this setting toggled on, requiring guests to select an arrival date from a set schedule. If you toggle it off, the experience becomes open-ended and guests will book without choosing a specific date or time.
If you toggle off Guests must choose arrival date from a predefined list, guests won't choose a date/time at checkout. You can then define check-in terms instead.
-
- When the toggle is on, you'll begin by creating one or more schedules. Xola gives you the flexibility to design simple or complex schedules, and even combine them to enable dynamic pricing that adjusts based on the day or time. You can create as many schedules as you need!
- Available Schedules
- To create the times that your experience is available for your customer to reserve, under Available Schedules, click Add Available Schedule.
- In the window that opens, enter Schedule Details:
- Name: Name this schedule so you can easily identify it.
- Dates
- Date Range: The schedule you create will repeat each week on your calendar. Select or deselect individual weekdays under Days of Week. Selected days appear in blue and deselected days appear in white.
- Specific Dates: This allows you to hand-select individual days to which this schedule will apply.
- Time Slots
- This is where you will choose the start times that can be booked for this experience. You can create as many time slots as you would like. When one gets booked, Xola will automatically check your availability for the rest of the day and adjust your schedule accordingly.
- If your experience does not have set start times, toggle on No Fixed Times. Your customers will select a date at checkout and no time.
- Price Variation
- Here, you can designate if there is a difference in price for this particular schedule.
Example: If you charge more for trips on the weekend, make a weekly recurring schedule with Saturday and Sunday selected in blue > + Add Price Variation > + Create Price Variation > Enter the details according to the amount you would like the price to change on the weekends.

- Blackout Schedules
- If there are days you are not able to run your experience, you can create Blackout Schedules, by clicking Add Blackout Schedules.
- In the window that opens, enter Blackout Details:.
- Name: Name this schedule so you can easily identify it.
- Dates
- Date Range: Select the days of the week for which you'd like to make close-off availability.
- Specific Date: Select the calendar dates for which you'd like to make close-off availability.
- Time Ranges: Select the time range in which the Blackout Dates will close off availability.
Note: Events with active reservations in this blackout schedule will be retained.


Days and times that have been designated as Blackout Schedules will not show any availability on your website or in the back office for your staff.
After creating your schedules, you can edit them by clicking the ![]() icon or delete them by selecting the
icon or delete them by selecting the ![]() icon. Additionally, use the tabs above the schedules to view which schedules are active, expired, or all.
icon. Additionally, use the tabs above the schedules to view which schedules are active, expired, or all.

Toggle on Early Arrival to let your customers know what time they should arrive. The amount of time that you designate will be included in the Confirmation Email when someone completes a purchase.
- Guest Limits
-
Per Reservation: determines the minimum and maximum number of guests allotted per purchase.
-
The minimum is the minimum number of guests per purchase. (i.e. if the minimum is 1, this would allow single tickets to be purchased for the experience)
-
The maximum is the maximum number of guests allowed per purchase.
-
-
Per Event Limit: determines the minimum and maximum number of guests required for the event.
- The minimum is the minimum number of guests required to run each event.
- The maximum is the maximum capacity allotted for each event.
- If an experience does reach the Per Event Minimum, all pending purchases for this experience will be automatically accepted (unless Auto-Accept is turned off in your Settings). Credit cards will be charged and confirmation emails will be sent out to those customers.
- If an event does not meet the Per Event Minimum by the designated time, Xola will notify you via email. At that point, you can reach out to the customer to reschedule or manually accept the purchases.
-

- Availability Restrictions
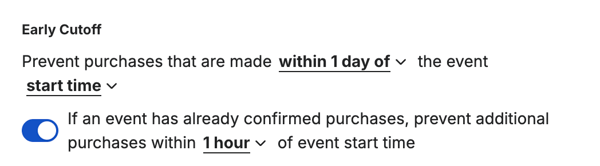
- Early Cutoff: The Early Cutoff prevents purchases from being made via checkout within a specified period after an event is scheduled to start or end.
For example, if you need to know how many people are booked for an event at least a day in advance to prepare for the experience, you might set an Early Cutoff of within 1 day of the start time. This would prevent someone from visiting your website 1 hour before the event starts and reserving a spot that you are not able to accommodate.

-
-
- On the other hand, you may need to allow customers to purchase tickets up to an hour before the end of an event. In this case, you would set the Early Cut Off to within 1 hour of the event end time. This would allow customers to continue to purchase tickets even after the event has started, up to an hour before the end of the event duration set in Xola.
-

-
-
- Additionally, you can allow purchases until a secondary cutoff time is reached for events with at least one confirmed purchase. This setting allows you to continue accepting new customers for events that are already scheduled to occur.
-
This only appears if you have schedules associated with your experience.
-
- Future Cutoff: The Future Cutoff allows you to prevent purchases with a start time that is too far in the future. This is a useful setting if your schedule does not have a set end date.
For example, you may not want to allow customers to place a reservation that is set to take place one calendar year from now, in case something changes for your business operationally between now and then (i.e. your schedule or product offerings).
-
-
- Enable by toggling on Future Cutoff
- Enter a value for how far in the future you would like to prevent purchases from being made via the checkout.
- You can also allow reservationists to override the future cutoff in the back office. This means that when the reservationist is making a back office purchase, they will be given a toggle to select a date beyond the future cutoff if needed. Learn more here.
-

This only appears if you have schedules associated with your experience.
- Business Hours
- In this field, you can enter your business hours in addition to any other related text you'd like to include. This text will show in the email communications to your customers.
Photos
- Add Photos
- Navigate to the experience for which you'd like to add or update the photo.
- Click on Photos from the left-hand menu.
- Click the Upload Image button to add photos to your experience. Each listing can have a maximum of 10 .jpg and .png images, each with a maximum size of 5 MB.
Note: Recommended size for the image is 1024x768.

- Set Primary Photo (and Delete)
- As soon as you upload a second photo, you'll be asked if you want to set this photo as the primary.
- If you want to delete the photo from Xola, click the Edit button and then the red Delete button.

Tip: Xola can only display one of your photos on back office and checkout even though you can upload multiple. However, you can switch Primary Photos as much as you like!
Pricing
To learn more about Pricing, click here.
Add-ons
Add-ons are extra items that you sell alongside a reservation. These can be anything from GoPro cameras and water bottles to lunch or a bottle of champagne. It really depends on your business.
Add-ons can be customer-facing (available to purchase during online checkout) or private (can only be added to a reservation if it is a back office purchase or modification).
- Click on the Add-ons tab in the left-hand menu.
- Click +Create Add-on.
- Here you can choose a global add-on in the drop-down to add, or you can create a new add-on that will only apply to this experience.
- If adding a new add-on, click +New Add-on:
- Name
- Add the Description of the add-on.
- This will show in checkout and is not mandatory.
- Add the Products that the add will apply to.
- You don't need to add it to other products; this can be done later if necessary. If you prefer it to apply only to the product you're currently working on, you can skip this step. Once you hit save, it will be saved in the product you're in.
- Add a Picture for the Add-on.
- Click the Upload Photos button to add photos to your Add-on. You can add a .jpg and .png images to each Add-on with a maximum size of 5 MB.
- Choose a type:
- Quantity: Can be added to a reservation incrementally, similar to demographics.
- Checkbox: Can be added to a reservation in a binary fashion. If checked during the reservation process, the add-on will be added.
- Dropdown list: Create a list of options to choose from at the time of reserving (each with different prices, if you'd like). Only one option can be chosen.
- You can drag and reorder the list to appear in the order you would like, by clicking the three lines and dragging it.
- You can choose which dropdown add-on you would like to be the default item shown during checkout.
- This will show the customer your default add-on, instead of showing the words "Choose an option"
- Set a Price:
- Quantity add-ons can have a single price "per quantity". The add-on's final price will depend on the quantity chosen.
- Checkbox add-ons and dropdown list options can be priced either as a discrete dollar amount or as a percentage of the reservation demographic total (before other add-ons and before any applicable taxes and fees).
- Private Add-ons: If you do not want this add-on to appear during online checkout, toggle on Add-on is only available for back office purchases. This add-on will only show in back office purchases or when modifying a purchase.
- Required: You have the option to make quantity and dropdown type add-ons "required", meaning customers must choose an option in order to proceed with their reservation. Reservationists may skip these.
- Click Save.
- Reorder: You can drag and reorder the add-ons to appear in the order you would by clicking and holding down the three lines on the left side of the add-on and dragging it to your desired order.
- To edit or delete an add-on, click either the
 icon for editing or the
  icon to delete.
Add-ons + Taxes & Fees
You can decide whether or not to apply Taxes & Fees to Add-ons by navigating to Settings > Taxes & Fees. Click here for more on configuring your Taxes & Fees.
Questionnaire
Questionnaires collect additional information from your customers after they complete checkout. What is included in the Questionnaire is completely customizable, and it can be set up as Global or Product-Specific. A Xola user can skip a questionnaire in the back office (it can always be updated in the customer purchase), but customers must complete it if they book through your website checkout.
Note: To skip the questionnaire by default when making a purchase in the back office, toggle on Skip required field validations for back office purchases.

-
The following details how to set up a Questionnaire in Experience -Specific Questionnaire, meaning you'll have one Questionnaire that prompts for just one experience. For details on how to set up a Global Questionnaire, click here.
- If you just want to turn off the questionnaire from the global setting, it's as simple as toggling the override of the Global Questionnaire at the top, and then do not toggle anything else.
-
To override the Global Questionnaire to create an Experience - Specific Questionnaire:, toggle on Enable questionnaire for this experience. Next, set up your questions:
Predefined Questions
- There are predefined questions you can choose from to build your questionnaire that cover a variety of general themes like Date of Birth, Medical Conditions, Addresses, Marketing Consent, etc.
- When customizing the question, you can add additional content, a link, and even change the question response type (e.g., from short text to dropdown items).
-
When to Ask:
-
Before Payment: This question will be asked before the customer gets to the payment screen on checkout.
- Per Guest questions (shows the organizer and demographics for each question):

- Organizer only questions (only asks the organizer of the reservation in a section called Additional Information):

- Per Guest questions (shows the organizer and demographics for each question):
-
After Payment: This question will be asked after the customer has completely checked out.

-
Waiver: This question will be asked when the customer fills out the waiver attached to the experiences.
-
-
-
- To learn more about setting up Xola Waivers, click here.
-
- Settings
-
- Required: Required for guest to fill out.
- Ask Only Organizer: Only the organizer (person who is making the reservation), is asked the question.
- Collect For (only shows when you toggle on Ask during Waiver signing):
- Adults: Will show on the adult waiver
- Minors: Will show on the Minor section of the waiver.
- Roster Settings
- Include in roster export: This question will show in all roster exports.
- Add this question to all of my saved roster views: This question will show on your saved roster views.

For the Marketing Consent question, you can ask this Before or After payment or in Xola Waivers. You can also set the question to be toggled on as opt in by default.

Pickup Location Question
For the Pickup Location question, you can either select Short text, which lets the guest type in their answer, or choose Dropdown and select Pickup Location. The Pickup location option connects directly to the Pickup Locations you’ve configured under Global Settings > Pickup Location.
Pricing Structure: Choose whether pricing should be Per guest or Per group. This selection will automatically apply to the pricing you’ve already configured for each pickup location.
Be sure to click the +Add button to include the pickup location choices you want guests to see.

To see how this looks to your customer on checkout, click here.
Custom Questions
- There are custom questions you can create, such as:
- Short text: The customer types in response.
- Long Text: The customer types in response.
- Checkbox: The customer checks a box
- Dropdown: Create and edit your own dropdown menu for customers to choose from.
Dropdown should not exceed 110 characters; if you exceed this, the characters will be cut off.
- When customizing the question, you can add additional content, a link, and even change the question response type (e.g., from short text to dropdown items).
-
When to Ask:
-
Before Payment: This question will be asked before the customer gets to the payment screen on checkout.
- Per Guest questions (shows the organizer and demographics for each question):
- Organizer only questions (only asks the organizer of the reservation in a section called Additional Information):
- Per Guest questions (shows the organizer and demographics for each question):
-
After Payment: This question will be asked after the customer has completely checked out.
-
Waiver: This question will be asked when the customer fills out the waiver attached to the experiences.
-
-
-
-
To learn more about setting up Xola Waivers, click here.
-
-
- Settings
-
- Required: Required for guest to fill out.
- Ask Only Organizer: Only the organizer (person who is making the reservation), is asked the question.
- Collect For (only shows when you toggle on Ask during Waiver signing):
- Adults: Will show on the adult waiver
- Minors: Will show on the Minor section of the waiver.
- Roster Settings
- Include in roster export: This question will show in all roster exports.
- Add this question to all of my saved roster views: This question will show on your saved roster views.
Terms
You may have Terms and Conditions (T&Cs) that you want your guests to read and/or agree to before booking and arriving for your experience. In Xola's Global Settings, you're able to paste in not only your T&Cs in that heavy legalese, but you can even include a reader-friendly version that's easier for us plebeians to understand.
The best thing about Xola Terms and Conditions? You can require your customers to agree to them before completing their reservation. The customer will have to check a checkbox agreeing to T&C before they will be able to reserve.
The following details how to set up Terms and Conditions in Global Settings, meaning you'll have one set of T&Cs that apply to all of your products. For details on how to set up Global T&Cs, click here.
To override the Global Terms for one or more specific product(s):
- Toggle Override global terms and conditions.
- Customize Terms.
- Once you save your Terms, the customer will have to check a checkbox agreeing to the terms and conditions before they complete the purchase.
Note: Customers will be forced to agree to the terms and conditions set, regardless of the Force customer to agree in order to complete the purchase toggle being enabled.

Self Service
Click here to learn more about Self-Service.
Waitlist
Click here to learn more about Waitlists.
Resources
Guides
You have the option to display information about guides that have been assigned to a given event in the Confirmation and Reminder emails to your customers. This is a great way to give your customers an idea of who will be playing a part in the experience that they have booked, before the day of the event. This is an especially useful feature if your experiences involve meeting in a remote location or if Guides / Activity leaders play an integral role in providing your experiences.
Guide information displayed in customer emails is set at the experience level. So, to turn this on for a given experience:
- Navigate to Products > Experiences > Edit > Resources.
- Toggle on Guide Information.
- Refer to guides as: Determine what you would like the section header in your emails to read.
For example, if you are an escape room, you likely do not refer to these staff members as “Guides”. You could put in the text “Game Master(s)”.
Note: If you sometimes have more than one guide assigned to a given event, we recommend that you pluralize your guide descriptor to account for this. Example: “Guide(s)”
Once configured, Confirmation and Reminder emails for events that have a guide assigned to them will now contain a section with:
- The “refer to guides as” label referenced earlier in this article
- Guide Name
- Guide Picture
- Guide Bio

Here’s an example of what the email section will look like:

- Next, you can enable the Unassigned Event Alert feature, which lets you configure email notifications if an event with confirmed reservations lacks an assigned guide, set to trigger a certain amount of time in advance.

Equipment
For more information on Event and Inventory Duration, please see the above section.
Early Equipment Return
Your inventory duration is the amount of time for which to hold that resource for an event. For example, if your inventory duration is set to 4 hours and a customer books an experience at 10 am, that next experience will not be free to purchase again until 2 pm.
But what about if that customer returns at 1 pm?
Xola's Early Inventory Return feature allows you to incorporate that piece of inventory back into the available resources for allocation to other customers.
Early Return Process
- When a customer arrives for their purchase, click the green checkmark in the roster view to check them in. When you do this, Xola will hold inventory for the total number of people in that party.
- When the customer returns early, click on the roster view for their trip. Next to the green checkmark by the customer's name, click the green return arrow.
- Clicking the green return arrow will free up inventory for the total number of guests in that party.
This only appears if you have schedules associated with your experience.
Automatic Equipment Assignment Rules
To define a specific order in which equipment is assigned to events, follow these steps:
-
-
Currently, this is done on the global level, but it can be overridden at the experience level here.
- Toggle on Override global automatic equipment assignment rules.
-
In the Custom Assignment Order section, pick how you want the equipment assigned:
- Assign largest equipment first: Equipment with the highest capacity will be assigned before equipment with lower capacity. Choose this option to encourage more purchases within the same event.
- Assign smallest equipment first: Equipment with the lowest capacity will be assigned before equipment with higher capacity. Choose this option to encourage purchases across different events.
- Assign equipment in custom order: Equipment will be assigned in the order configured as applicable to the product.
-
If you choose Assign equipment in custom order, drag and drop equipment items into your desired sequence.
-
This order determines the priority of equipment assigned to Events.
-
After arranging the equipment, click Save to apply the new assignment order across your workspace.
-
Note: When you change the equipment assignment order, these updates will apply to all new purchases. Existing equipment assignments will remain unchanged.
Reviews
For more information on the kinds of Review requests Xola offers, click here. To override the Global Reviews for one or more specific product(s):
- Toggle Override global review settings.
- Select one of the following review options to be sent to your customers
- If you would like reviews to be sent to organizers and non-organizer contacts that are collected via digital waivers and split payment, make sure to toggle on
Collect reviews from each member of the group (if their contact details are available)
- Click Save.
Xola allows you to not send reviews to individual customers by going to the purchases tab and toggling off collect customer review under the contact information. For some OTA's (i.e. GYG) Xola automatically has the review request toggled off per their policies.
Guest Management
Attendees:
In Xola, you can choose whether or not to display an Attendees section for an experience.
When the Attendees Section is Enabled:
-
Each guest is listed on the reservation.
-
Guests are identified through either:
-
A questionnaire with guest-level questions, or
-
A waiver.
-
-
All attendees appear in the Roster and Purchases tab.
When the Attendees Section is Disabled:
-
Only the main organizer of the reservation is listed.
-
Individual guests will not appear in the Roster and Purchases tab.
How to Disable the Attendees Section:
To remove the Attendees section for an experience:
-
Make sure there are no guest-level questions in the questionnaire. This includes any global questions you may have.
-
Turn waivers off for the experience.
- Toggle off Uniquely identify each attendee in the reservation.
Once these settings are applied, only the main organizer will be displayed on reservations.
Check-In
For more information on Check-ins and No Shows, click here. To override the Global Check-in preferences for one or more specific product(s):
- Toggle Override global check-in settings.
- Require check-in: When this feature is enabled guests who are marked as checked-in will receive the review and follow-up emails, but those who are not marked as checked-in will not get these emails.
- You also have the options to set Check-In Validity and enable multiple check-ins. For more information on Enhanced Check-In Preferences, click here.
Tickets
Xola allows you to customize how QR codes are generated for each reservation. You can choose whether to issue one QR code per group or one per individual guest. This flexibility helps streamline your check-in process based on how you manage guest entry. To learn more about Xola Redemption App and how to use it, click here.
- Choose how you want the QR code to appear to the guest:
- One ticket per group/party: This will give one QR code per group. I.e., if you have a group of 5, they will only have to present the 1 QR code, and the whole group of 5 will be checked in at once.
- One ticket per guest: This will give one QR code per guest. I.e., if you have a group of 5, they will have to present 5 QR codes, and 1 QR code will check in 1 guest.
Note: QR codes will be sent via email and SMS if you have that feature turned on the account.
Purchaser
Under this preference, you can choose whether or not to collect the purchaser's name when your reservationist is making a back office purchase. Click the drop-down menu, and select from the following options:
- Required
- Optional (with confirmation)
- Optional (no confirmation)
- Not Collected

How to Manage Existing Experiences
Once you’ve created an experience, you can manage it by navigating to Products > Experiences. Here, you’ll find tools to edit, preview, duplicate, hide, or delete the experience. Below are the available actions:
-
Edit: Hover over the experience, and click the Edit button to make changes.
- Click on the
 icons for the following:
-
Preview Email: Preview of the confirmation email, based on the content you've entered in the experience.
-
Preview Checkout: See a preview of the single-item checkout in a new window, based on your checkout preferences.
-
Duplicate: Click the duplicate button to copy the experience. You can choose which sections to include in the duplication, such as Schedules, Add-ons, Tickets, Check-in, Questionnaire, etc., by toggling them on or off.
-
Hide/Unhide: Hiding an experience will prevent it from being surfaced to OTAs during mapping. However, if it's linked to a button, it will still appear in your online checkout.
-
Delete: This permanently removes the experience from your Xola account. However, if the experience has existing reservations, it will remain visible on your dashboard and in reports.
-