Xola’s Packages feature empowers you to create compelling multi-experience offerings that blend convenience for your customers with simplicity for your business. With Packages, you can group two or more individual experiences into a single, curated product—perfect for encouraging larger purchases, promoting special itineraries, and increasing overall revenue. This setup gives customers a flexible way to enjoy everything you offer, all in one seamless reservation process.
From the customer’s view, purchasing a package is straightforward—a single reservation and one easy payment cover all combined activities, eliminating the need for separate transactions. Every step, from selection to checkout, feels unified and intuitive. On your end, package sales are managed just like standard reservations: the purchase and fulfillment experience remains familiar and efficient within your back office.
You benefit from streamlined logistics, easy roster management, and built-in flexibility to customize packages, set unique pricing, and automate promotional discounts. Packages in Xola are designed to boost both guest satisfaction and operational efficiency, all while expanding your business’s possibilities.
User Access: Administrator or Curator roles have access to set up and manage Packages in Xola.
Administrator, Reservationist Lite or Reservationist roles roles can make, view, and modify Package reservations in Xola.
Equipment Manager, Guide Manager or Guide roles can only view Package reservations on the Roster.
To grant access to users, click here.
What's covered in this article:
How to Create a Package
Since packages combine multiple experiences into one product offering, some parts of packaged purchases are derived from the "base experience," and some are overridden at the package level.
When you create a new Package, you'll enter new information for the parts of the Package that need to be combined when presenting your multiple experiences to customers as one packaged offering.
To create a new Package, follow these steps:
- Navigate to Products > Packages.
- Select the blue +Create Package button.
Basic Information
- Title: The title is the name for the Package that your customers see when they go through the purchase workflow
- Excerpt: Create a brief excerpt, a short sentence or two, that represents the Package for the customer during the reservation process.
- Description: The description section describes the Package that people purchase through some third-party platforms such as Viator or other OTAs.
Products & Restrictions
- Select your Demographics Restriction.
- Demographics may vary across products in a package: This will allow guests to choose different amounts and demographics for each package experience.
- All products in the package must share common demographics: The guest count for the first experience can be adjusted at checkout. The rest of the experiences in the package will match the first experience's guest count.

- Select which Products you want to make up the package offering.
- If you want to reorder the experience and how they show to the customer in the Package, just click the
 icon and drag and drop them in the order you would like.
- If you want to reorder the experience and how they show to the customer in the Package, just click the
- Start time restriction: This setting will limit the start times that customers purchasing the package via checkout can select. There are two options available when configuring this:
- Start times for events in package purchases must be on the same day.
- Start times for events in package purchases must be within...: If this option is chosen, you'll need to input a value that effectively creates a window of time within which start times for a package purchase must fall.
For example, if you enter 4 hours, a customer could have one start time for Experience A at noon and another for Experience B at 4:00 PM, but could not book Experience B at 5:00 PM.
- Blackout Schedules: If you choose to create and save a blackout schedule, package purchases will not be available for that date range. The individual experiences that make up a package will not be affected.
- Duration between events: This value will be factored in when a customer goes to purchase a package from your website.
For example, if you enter in 30 minutes as your Duration between Events, start times for events within a package purchase made via checkout will be required to have at least 30 minutes buffering them.
Conditions
- Cancellation Policy: This field is displayed in confirmation and reminder emails.
- Other Considerations: Items that you want your customers to know about once they purchase this package. This field is displayed in confirmation and reminder emails.
- Select Next.

Package Pricing
Now it’s time to set the pricing for your package.
Configuration Terms
- Basic: You can configure a percentage-based discount that is applied for this package and can optionally choose whether that same discount applies to add-ons.
- Advanced: You can configure demographic-specific discounts for each experience in the package as well as add-on discounts.
- You can configure a percentage-based, dollar-based or choose a final price as the adjustment to the demographics for each experience in the package.
Note: Any discounts set up will stack on top of any price variations you have established elsewhere (if applicable), such as tiered pricing, schedule-based pricing variations, etc.
Add-On Pricing: If any of the experiences that make up the package have Add-ons configured, they will appear on this page.
Similar to demographics, you can configure a percentage-based, dollar-based, or choose a final price as the adjustment. You can also add/remove an Add-on to/from the package offering.
Deposits: If you’d like to allow customers to place a down deposit when purchasing this package via checkout, follow these steps:
- Enable deposit payments.
- Specify how far in advance the event's start time must be to allow a deposit.
- Enter the required deposit amount. You have the option to collect between:
- A dollar amount per person
- A dollar amount per booking
- A percentage of the checkout price
Note: Customers who book online will always have the option to pay their checkout amount in full, as opposed to just the deposit amount.
Package Photos
You must upload a photo for each package you make. This photo will be displayed to customers at checkout when they make a package purchase. The primary photo for each experience is also displayed to customers; however, individual experience photos are displayed a bit less prominently than your package’s primary photo (see package checkout).
Click the Upload Image button to add photos to your Package. Each Package can have a maximum of 10 .jpg and .png images, each with a maximum size of 5 MB.
Note: Recommended size for the image is 1024x768.

Questionnaire
Questionnaires collect additional information from your customers after they complete checkout. What is included in the Questionnaire is completely customizable. A Xola user can skip a questionnaire in the back office (it can always be updated in the customer purchase), but customers must complete it if they book through your website checkout.
Note: To skip the questionnaire by default when making a purchase in the back office, toggle on Skip required field validations for back office purchases.

-
The following details how to set up a Questionnaire in Experience - Specific Questionnaire, meaning you'll have one Questionnaire that prompts for just one experience. For details on how to set up a Global Questionnaire, click here.
-
To override the Global Questionnaire for Experience - Specific Questionnaire, toggle on Override global questionnaire.
Predefined Questions
- There are predefined questions you can choose from to build your questionnaire that cover a variety of general themes like Date of Birth, Medical Conditions, Addresses, Marketing Consent, etc.
- When customizing the question, you can add additional content, a link, and even change the question response type (e.g., from short text to dropdown items).
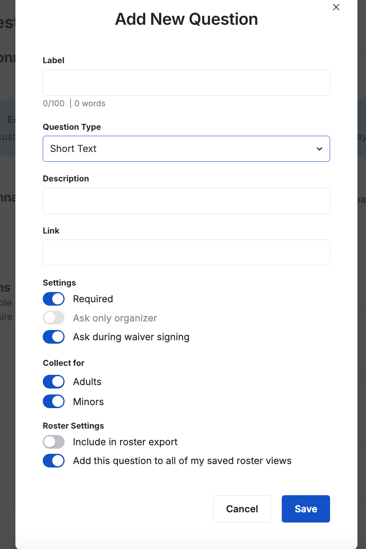
- Settings
- Required: Required for guest to fill out.
- Ask Only Organizer: Only the organizer (person who is making the reservation), is asked the question.
- Ask during Waiver Signing: Will show up in the Xola Waiver you created.
- To learn more about setting up Xola Waivers, click here.
- Collect For (only shows when you toggle on Ask during Waiver signing):
- Adults: Will show on the adult waiver.
- Minors: Will show on the Minor section of the waiver.
- Roster Settings
- Include in roster export: This question will show in all roster exports.
- Add this question to all of my saved roster views: This question will show on your saved roster views.
For the Marketing Consent question, you can ask this Before or After payment or in Xola Waivers. You can also set the question to be toggled on as opt in by default.

Custom Questions
- There are custom questions you can create, such as:
- Short text: The customer types in response.
- Long Text: The customer types in response.
- Checkbox: The customer checks a box.
- Dropdown: Create and edit your own dropdown menu for customers to choose from.
Dropdown should not exceed 110 characters; if you exceed this, the characters will be cut off.
- When customizing the question, you can add additional content, a link, and even change the question response type (e.g., from short text to dropdown items).
- Settings
- Required: Required for guest to fill out.
- Ask Only Organizer: Only the organizer (person who is making the reservation), is asked the question.
- Ask during Waiver Signing: Will show up in the Xola Waiver you created.
- To learn more about setting up Xola Waivers, click here.
- Collect For (only shows when you toggle on Ask during Waiver signing):
- Adults: Will show on the adult waiver.
- Minors: Will show on the Minor section of the waiver.
- Roster Settings
- Include in roster export: This question will show in all roster exports.
- Add this question to all of my saved roster views: This question will show on your saved roster views.
Terms
You may have Terms and Conditions (T&Cs) that you want your guests to read and/or agree to before booking and arriving for your experience. In Xola's Global Settings, you're able to paste in not only your T&Cs in that heavy legalese, but you can even include a reader-friendly version that's easier for us plebeians to understand.
The best thing about Xola Terms and Conditions? You can require your customers to agree to them before completing their reservation. The customer will have to check a checkbox agreeing to T&C before they will be able to reserve.
The following details how to set up Terms and Conditions in Global Settings, meaning you'll have one set of T&Cs that apply to all of your products. For details on how to set up Global T&Cs, click here.
To override the Global Terms for one or more specific product(s):
- Toggle Override global terms and conditions.
- Customize Terms.
- Once you save your Terms, the customer will have to check a checkbox agreeing to the terms and conditions before they complete the purchase.
Note: Customers will be forced to agree to the terms and conditions set, regardless of the Force customer to agree in order to complete the purchase toggle being enabled.

Taxes and Fees for Packages
Currently, taxes and fees for Package purchases are charged separately for each experience based on that event's configuration. As a result, the total Taxes and Fees for Package purchases will equal the amount you'd see if both experiences were bought separately, after any applicable discounts.
How to Manage Existing Packages
Once you’ve created a Package, you can manage it by navigating to Products > Packages. Here, you’ll find tools to edit, preview, duplicate, hide, or delete the experience. Below are the available actions:
-
Edit: Hover over the Package and click the Edit button to make changes.
- Click on the
 icons for the following:
-
Edit: Allow you to make changes to the Package.
- Manage Photos: Click on this to add or manage photos on this Package.
-
Delete: This permanently removes the Package from your Xola account. However, if the Package has existing reservations, it will remain visible on your dashboard and in reports.
-
How to Purchase a Package
In the Back Office
- From the Dashboard or Purchases tab, click the green +Purchase button and choose a Package.
- Select the Package the customer would like to reserve.
Experience Details
- Guest Quantity: Choose the number of guests attending the first experience. If you have different demographic types, you can enter the number for each demographic.
- Date and Time: Choose the date and time in which the guests are coming for the experience.
- When choosing a new timeslot, you can also:
- Choose a date in the past by toggling on Show past availability.
- Choose a date outside your future cutoff by toggling on Show future dates past.
- When choosing a new timeslot, you can also:
- Add a Timeslot: If you need to add a timeslot, you can click on the +Add a time button. To learn more about this feature, click here.
Purchase Modifications
After you have filled out the experience details, you can choose to modify the purchase by choosing:
- Add-ons: Choose which add-ons you would like to add to the reservation if you have add-ons set up.
- Custom Line Items: Toggle on and click +Line Item, and you can create on-the-fly discounts or charges, which can be taxed if needed.
- Taxes and Fees: Click on the
 icon under the Payment Summary on the right-hand side to remove any taxes or fees you have set up under Settings.
You can not remove Xola's service fee.
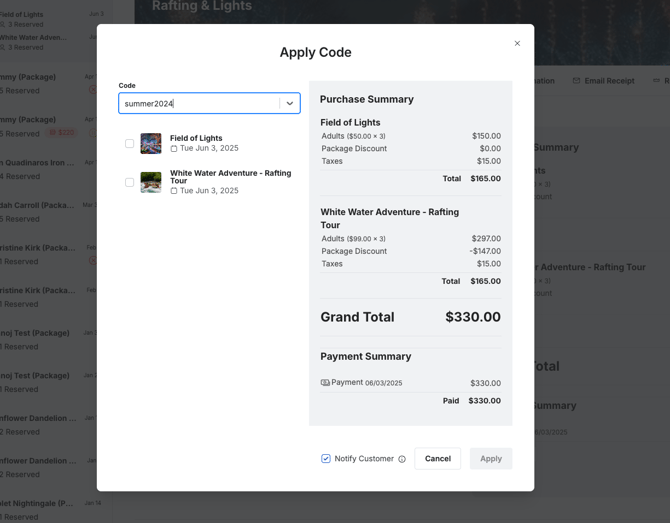
- Codes: Add a coupon or agent code by locating the code field under the purchase summary on the right. Click on the dropdown or enter the code you would like to use. Select the code you would like to use and click Apply.

Attendee Info
After this, you can fill out the Attendee Info. The attendee info section will help your staff know who is coming for the experience, here you can:
- Fill out the name of each guest attending
- If using our waiver feature, as guests fill out the waivers, the names will automatically populate into this section on the Purchases Tab.
- The questionnaire answers if you are using this feature.
- If it is a per-person questionnaire, you can click on the
 icon next to each guest and fill out the questionnaire for each attendee.
 - If it is per reservation, you can click on the icon next to the main attendee and fill out the questionnaire.
- If it is a per-person questionnaire, you can click on the
- If you want to skip this, you can toggle on Ignore questionnaire validation errors for now.
- Hit Next, and fill out the information for the next experience in the package.
Organizer Details
After completing all the above for all the experiences in your Package, hit Next. Now you can enter the Organizer Details:
If you want to look up a past guest to book, click on the Search Customer button next to the Guest name to search for your guests. This will automatically populate the guest's name, email, and phone number. It will also automatically fill in credit card details if they have previously used a credit card.
- Customer Name
- Customer Email
- Customer Phone
Payment Details
Next, choose your payment workflow:
-
- Now: Take immediate payment.
- Later: This will reserve your customer's spot without collecting payment. When ready, you can find their purchase in the Purchases tab to collect the balance.
- Collect a Deposit
- Split Payment
If taking immediate payment, select the payment method:
- Credit Card
- Cash
- Check: If your customer is paying by check, we recommend noting the check number in the comment section.
- Invoice: This allows you to send your customer an Invoice for the purchase that can be paid at a different time.
- Other: This can be any third-party payment method your business accepts, like PayPal, Bitcoin, or Venmo. You can set these under Settings > Payments.
Pro Tip: Notice the Do not charge card now toggle under the payment method section. This will store your customer's card information but will not charge the customer. You can later go into the customer's purchase to collect the balance.

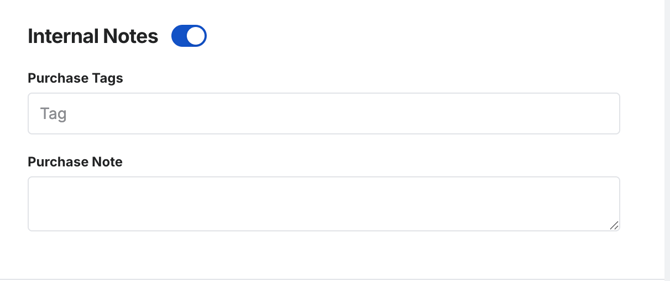
Internal Notes
Optionally add a Tag or internal note for your staff.
- Tag: A tag is a word or phrase added to a purchase that can be used for searching and filtering in the Purchases tab. When you type the tag into the search bar, it will bring up all purchases that have been tagged as such.
- Purchase Note: This will appear on the event's roster in the Purchase Notes section.
- Click Pay.
Note: Package purchases are handled as one single transaction for customers.

Checkout
Packages can be added to your website via checkout buttons or combined in Multi-item checkout just like normal experiences. See this article for more information on how to configure checkout buttons.
Once you’ve added a Package to a checkout button, follow these steps to make a Package purchase via checkout:
-
- Open checkout for the Package that you’d like to purchase.
- Enter Purchase Details.
- Enter guest quantity.
- Select date and time for each event.
- Enter the Add-on quantity for each event (if applicable)
-
- Fill out contact info.
- Select Continue.
- Enter any gift, affiliate, or coupon codes.
- Enter credit card details.
-
- Agree to Terms and Conditions (If configured in your account)
- Fill out the Questionnaire (If configured in your account)
- Sign an electronic Waiver (If configured in your account)
Note: If you are using Custom Conversion Tracking, only the first transaction in a completed checkout using Packages will be accounted for. Click here to learn more about Custom Conversion Tracking.
Emails
When a Package purchase is made, customers will receive one Purchase Confirmation Email that contains:
- Itemized payment summary
- Time, date, checklist and meeting location for each individual event purchased
- Package Other Considerations
- Package Cancellation Policy
- Package Terms and Conditions
- Your company's contact info
How to Modify Package Purchases
Packages will show in your purchases tab, similar to all purchases. You will have a main tile that shows the package as a whole, and if you click the down arrow, you will see the individual experiences that make up the package. You can manage the package the same way you do other purchases. To learn more about the Purchases Tab, click here.
Change Arrival
This works the same way for package purchases as it does for normal purchases. You can find more details on how to modify a Purchase's Arrival here.
Since multiple experiences make up a Package purchase, you will modify the arrival of one experience at a time.

Change Guest Quantity
- To change the guest quantity in a package, you must first select one of the experiences within the package purchase and then select Guests in the action ribbon at the top.
- This process works the same way for package purchases as for normal purchases. You can find more details on how to change the guest count for a purchase here.
Since multiple experiences make up a Package purchase, you will modify the guest quantity one experience at a time.

Modify Add-ons
This works the same way for package purchases as it does for normal purchases. You can find more details on Modifying Add-ons for a purchase here.
Since multiple experiences make up a Package purchase, you will modify the add-ons one experience at a time.

Refunding a Package
This works the same way for package purchases as it does for normal purchases. You can find more details on refunding for a purchase here.
Since multiple experiences make up a Package purchase, you will refund one experience at a time.

Add a Charge / Custom Line Items
This works the same way for package purchases as it does for normal purchases. You can find more details on how to add a Charge for a purchase here.
Since multiple experiences make up a Package purchase, you will add charges one experience at a time.

Switch Experience
Switch experience is not currently available for Package purchases.
Add or Remove a Code from a Purchase
This works the same way for package purchases as it does for normal purchases. You can find more details on how to add and remove a code for a purchase here.
Since multiple experiences make up a Package purchase, you will add and remove codes one experience at a time.