The Xola Dashboard is your central command hub for managing every aspect of your scheduled experiences in real time. With this powerful interface, you can track upcoming reservations, view current event statuses, and easily spot open spots, waitlisted events, or fully booked experiences—all from a single, intuitive screen.
Designed to streamline day-to-day operations, the Dashboard empowers your team to assign guides, manage equipment logistics, monitor check-ins, and keep a pulse on everything happening at your venue—as it happens.
With product color-coding and advanced filters, you can tailor your view to what matters most: focus on a specific product line, hone in on a guide’s schedule, or track events requiring specific resources like gear or transportation. Quickly adjust event rosters, edit guest counts, update capacities, and even communicate with customers via email or SMS—all without ever leaving the Dashboard.
The Dashboard supports multiple viewing modes—List, Day, Week, Month, and Equipment—allowing you to zoom in on today’s tasks, plan for the week ahead, or identify trends across the month. You can also manage group and individual waitlists, collect final balances, and ensure your staff is prepared with up-to-date event details.
Whether it’s handling last-minute changes, reviewing upcoming rosters, or ensuring on-the-ground coordination, the Xola Dashboard is your all-in-one toolkit for delivering smooth, organized, and unforgettable guest experiences.
User Access: Administrator, Reservationist Lite, Reservationist, Equipment Manager or Guide Manager roles have access to the Dashboard in Xola.
Guide roles can only view Events they are assigned to on the Dashboard.
To grant access to users, click here.
What's covered in this article:
- Quick Dashboard Search Bar
- Dashboard Views
- Filters
- Default / Saved Views
- Customize Dashboard Appearance
Quick Dashboard Search Bar
At the top of your screen, there is a search bar that enables you to quickly find a customer using their name, email, phone number, tag, or ID. This feature allows you to view a reservation and its details, as well as take actions related to that reservation, without needing to search through the purchases tab or dashboard.
Once a customer is searched and selected, you can take the following actions from the Quick Dashboard Search Bar:
- Check-in customer
- Check in the group by clicking on the green
 button next to the group name at the top.
 - Check in the individual members of a group by clicking the green
 button next to the individual's name in the dropdown.
- Check in the group by clicking on the green
- No-show customer
- Mark the group as a no-show by clicking on the red
 button next to the group name at the top
 - You can mark individual members of the group as no-shows by clicking on the down arrow next to the group's name and then clicking the red button next to the individual's name.
- Mark the group as a no-show by clicking on the red
- Modify purchase: Click the three dots
- Reservation Details: See what guides are assigned, equipment assigned, number reserved, balance due, Waivers signed, and notes.

Unlike the Purchases tab, the Dashboard search only finds reservations that day or in the future and will not pull up a reservation from the past. To locate customers with past reservations, use the search feature in the Purchases tab.
Dashboard Views
You will see a drop-down menu that controls the view in which your events are displayed in the Dashboard. If there are no Saved Views in the Dashboard, it will default to the current day in the List view, showing Reserved time slots. The available views to choose from are:

List
The Dashboard List View will show you all your events in a vertically cascading list for any selected day.
Under your filter options, the bar displays the date, day, and the number of available and reserved spots for the whole day. You can also perform day-level actions through the three dots in the List View. Click on the three dots to access these options:
- Message Day's Guest: Send an email, SMS, or both to all guests with valid contact info booked for the Day.
- Export Day's Roster: Export the day's roster to a CSV or Excel file.
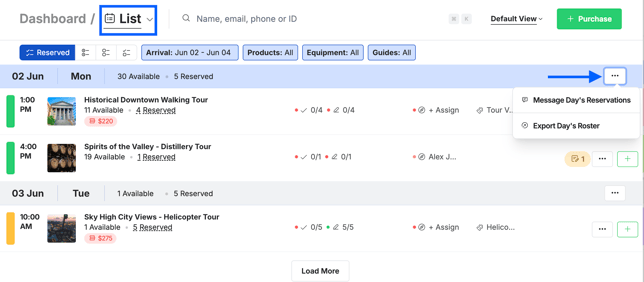
Next, you can look at the individual events under the day. Here, you can see the time the event is taking place, the name of the product, and how many are available and reserved.
Note: If you hover over the reserved field during the event, you will see a demographic breakdown for that event.
Depending on what features you have turned on in Xola, you may be able to see other options on your Dashboard like:
- Check-in: You can see how many guests are checked in for the event.
- Waivers: You can see how many guests signed the waivers for the event.
- Assign Guides: You can see who is assigned as a guide or assign a guide if needed.
- If a guide(s) is already assigned, you can hover over the guide's name and see who is assigned easily. You can also hide unavailable guides, to see clearly who can be assigned to the event.
- Assign Equipment: You can see what equipment is assigned or manually modify equipment if needed.
- Add-ons: Hover over the add-on icon to see what add-ons you have for the event.
- Collect a Balance Icon: Easily see what event has a balance that needs to be collected.
- Notes Icon: Easily see what events have notes on them. You can even click the notes icon to see all the notes in one place. Here you can edit or delete Event and Purchase notes.
- Private Reservation Icon: Easily see if a reservation is Private.
Now you can perform actions for the entire event and all associated reservations via the three dots in List View. Here, you can:
- Send Message: Send an email, SMS, or both to all guests with valid contact info booked on the event
- Add Event Notes: Add an event note to the roster
- Change Arrival: Change the arrival of all or some of the reservations for this event
- Cancel Reservations: Cancel all or some of the reservations on this event
- Export, Print, or Email the Roster
- Adjust Capacity
- Assign Guides: Assign one or more available guides to the event
- Unassign Guides: Remove all assigned guides from the event

Next, you can Make a Purchase via the green + on the List View.
If you want to view the roster, hover over an event and click anywhere (excluding the three dots or the purchase button).
Day
The Day View displays events for a single, specific day. To toggle into your Day View, click the drop-down menu at the top of the Dashboard.
To navigate to another day, click the Arrival date picker on the filter bar and select the target date, or use the arrows to the left and right of the date.

Depending on what features you have turned on in Xola, you may be able to see other options on your events like:
- Check-in: You can see how many guests are checked in for the event.
- Waivers: You can see how many guests signed the waivers for the event.
- Assign Guides: You can see who is assigned as a guide or assign a guide if needed.
- Assign Equipment: You can see what equipment is assigned or manually modify equipment if needed.
- Add-ons: Hover over the add-on icon to see what add-ons you have for the event.
- Collect a Balance Icon: Easily see what event has a balance that needs to be collected.
- Notes Icon: Easily see what events have notes on them. You can even click the notes icon to see all the notes in one place. Here you can edit or delete Event and Purchase notes.
- Private Reservation Icon: Easily see if a reservation is Private.
Now you can perform actions for the entire event and all associated reservations via the three dots in Day View. Here, you can:
- Send Message: Send an email, SMS, or both to all guests with valid contact info booked on the event
- Add Event Notes: Add an event note to the roster
- Change Arrival: Change the arrival of all or some of the reservations for this event
- Cancel Reservations: Cancel all or some of the reservations on this event
- Export, Print, or Email the Roster
- Adjust Capacity
- Assign Guides: Assign one or more available guides to the event
- Unassign Guides: Remove all assigned guides from the event
The number of events you have in a day may affect the size of the tiles and how much information is displayed on them. To see more details about the event, please go to the roster.
Some actions can be done in bulk. To do this, hold down the Command key and click to select multiple events. Then, click on the three dots at the bottom. Here you can:
- Send Message: Send an email, SMS, or both to all guests with valid contact info booked on the event
- Add Event Notes: Add an event note to all the Event rosters
- Assign Guides: Assign one or more available guides to the all selected events
- Unassign Guides: Remove all assigned guides from the selected events
Next, you can Make a Purchase via the green + on the event.
To view the roster, click on the event. This will open a Roster drawer, allowing you to make changes. To return to the dashboard, click the 'X' at the top of the drawer, and you will be taken back to the dashboard.
Week
The Week View displays a week-long overview of your upcoming events. To toggle into your Week View, click the drop-down menu at the top of the Dashboard.
To navigate to another week, click the Arrival date picker on the filter bar and select the target date range, or use the arrows to the left and right of the date.

You can also perform day-level actions through the three dots in the Week View. Hover around the date on the week view, click on the three dots next to the day to access these options:
- Message Day's Guest: Send an email, SMS, or both to all guests with valid contact info booked for the Day.
- Export Day's Roster: Export the day's roster to a CSV or Excel file
Depending on what features you have turned on in Xola, you may be able to see other options on your events like:
- Check-in: You can see how many guests are checked in for the event.
- Waivers: You can see how many guests signed the waivers for the event.
- Add-ons: Hover over the add-on icon to see what add-ons you have for the event.
- Collect a Balance Icon: Easily see what event has a balance that needs to be collected.
- Notes Icon: Easily see what events have notes on them. You can even click the notes icon to see all the notes in one place. Here you can edit or delete Event and Purchase notes.
- Private Reservation Icon: Easily see if a reservation is Private.
The number of events you have in a day may affect the size of the tiles and how much information is displayed on them. To see more details about the event, please go to the roster.
To view the roster, click on the event. This will open a Roster drawer, allowing you to make changes. To return to the dashboard, click the 'X' at the top of the drawer, and you will be taken back to the dashboard.
Some actions can be done in bulk. To do this, hold down the Command (Mac) or CTRL (Windows) and click to select multiple events. Then, click on the three dots at the bottom. Here you can:
- Send Message: Send an email, SMS, or both to all guests with valid contact info booked on the events
- Add Event Notes: Add an event note to all the Event rosters
- Assign Guides: Assign one or more available guides to the all selected events
- Unassign Guides: Remove all assigned guides from the selected events

Month
The Month View displays a month-long overview of upcoming events and reservations in a calendar format. To toggle into your Month View, click the drop-down menu at the top of the Dashboard.
To navigate to another month, click the Arrival date picker on the filter bar and select the target date range, or use the arrows on either side of the month name.

Depending on what features you have turned on in Xola, you may be able to see other options on your events like:
- Collect a Balance Icon: Easily see what event has a balance that needs to be collected.
- Notes Icon: Easily see what events have notes on them. You can even click the notes icon to see all the notes in one place. Here you can edit or delete Event and Purchase notes.
- Private Reservation Icon: Easily see if a reservation is Private.
To view the roster, click on the event. This will open a Roster drawer, allowing you to make changes. To return to the dashboard, click the 'X' at the top of the drawer, and you will be taken back to the dashboard.
Some actions can be done in bulk. To do this, hold down the Command (Mac) or CTRL (Windows) and click to select multiple events. Then, click on the three dots at the bottom. Here you can:
- Send Message: Send an email, SMS, or both to all guests with valid contact info booked on the events
- Add Event Notes: Add an event note to all the Event rosters
- Assign Guides: Assign one or more available guides to the all selected events
- Unassign Guides: Remove all assigned guides from the selected events

Equipment
You can filter your dashboard to show you the equipment you have set up. A drop-down menu controls the view in which your events are displayed in the Dashboard. Choose the Equipment view to see each piece of equipment and the events it is assigned to.
To navigate to another day, click the Arrival date picker on the filter bar and select the date, or use the arrows to the left and right of the date.

You can also use the other arrows on the bar that state the equipment name to scroll to see all your different equipment.
Depending on what features you have turned on in Xola, you may be able to see other options on your events like:
- Check-in: You can see how many guests are checked in for the event.
- Waivers: You can see how many guests signed the waivers for the event.
- Assign Guides: You can see who is assigned as a guide or assign a guide if needed.
- Assign Equipment: You can see what equipment is assigned or manually modify equipment if needed.
- Add-ons: Hover over the add-on icon to see what add-ons you have for the event.
- Collect a Balance Icon: Easily see what event has a balance that needs to becollected.
- Notes Icon: Easily see what events have notes on them. You can even click the notes icon to see all the notes in one place. Here you can edit or delete Event and Purchase notes.
- Private Reservation Icon: Easily see if a reservation is Private.
Note: The number of events you have in a day may affect the size of the tiles and how much information is displayed on them. To see more details about the event, please go to the roster.
To view the roster, click on the event. This will open a Roster drawer, allowing you to make changes. To return to the dashboard, click the 'X' at the top of the drawer, and you will be taken back to the dashboard.
Some actions can be done in bulk. To do this, hold down the Command (Mac) or CTRL (Windows) and click to select multiple events. Then, click on the three dots at the bottom. Here you can:
- Send Message: Send an email, SMS, or both to all guests with valid contact info booked on the events
- Add Event Notes: Add an event note to all the Event rosters
- Assign Guides: Assign one or more available guides to the all selected events
- Unassign Guides: Remove all assigned guides from the selected events
To learn more about Equipment, click here.

Filters
This next row is where you filter your dashboard by date, reserved or available events, products, guides, equipment, and more! You can also save your filtered views to go back to at any time.
Reserved, Waitlisted, Available, All
Beside the date picker, you'll see four side-by-side buttons that let you filter the Dashboard based on the status of your events:
-
Reserved: Shows only events that have confirmed reservations.
-
Waitlist: Displays events where customers are currently on the waitlist.
-
Available: Highlights events that still have open spots for reservations.
-
All: Gives you a full view of every event—reserved and available.
The waitlisted filter will only show if you have the waitlisted feature enabled. Click here to learn more.
Product, Equipment, and Guide Filters
Just beside the date picker, you’ll find filters to narrow down your view by product, guide, and equipment:
-
Products: Choose which products you want to display on the dashboard.
-
Guides: Filter events by specific guides to see who’s scheduled for what. even see what event have no guides assigned.
-
Equipment: Show only equipment assigned to selected events, or exclude certain items as needed.

Default View/ Saved Views
If you frequently look at a specific view in the Dashboard, you can save it for easy later access. You can also favorite the view you would like to load as a default whenever you log into Xola.
To save a view:
- Set your desired view and filters using the options near the top of the screen when looking at the Dashboard.
- Click the Default View drop-down menu at the top right by the green Purchase button, which will show a list of your Saved Views (if you do not have any Saved Views, this window will simply show "Default View."
- Click Save as New to save the view.
- Name the view and click Save.
Once you have saved one or more views, you can favorite the view you would like to load first when signing into Xola. To do this, click the Default View drop-down menu to see your saved views and select the star next to the title to set it as your favorite.
Note: Saved and Default views are specific to your user login, so you can have different views saved that other log-ins will not see.

Customize Dashboard Appearance
You can also assign colors to specific products so they are easily identifiable when viewing the Dashboard by selecting the Color Preferences option, under the Default View option. Click the button that looks like a magic wand and says Customize Colors. You can add availability colors to let you easily view your availability. You can also choose which color corresponds to which experience and how colors are displayed.

