With the Xola Mobile App, your reservation system is literally at your fingertips—anytime, anywhere. Whether you’re checking in guests, guiding a tour, or managing offsite events, this app keeps you connected and in control of your business no matter where you are. Easily create and edit reservations, process payments, check in guests, and communicate with customers—all from your iOS or Android device.
The app empowers your team with real-time updates and instant access to your live dashboard, giving you full visibility into reservations, schedules, and payments. Accept secure, contactless payments using Tap to Pay or paired hardware, manage daily operations like waiver collection and waitlist additions, assign guides, and adjust bookings on the fly.
By staying synced across all devices and accessing live insights, your team can deliver a seamless guest experience, streamline operations, and keep your business running smoothly from anywhere.
User Access: Administrator, Reservationist Lite, Reservationist, Accountant, Guide, Guide Manager or Curator roles can access the Mobile App. Each role has its own unique view and set of available features in the app. Explore the sections below to learn what capabilities are provided for each user type.
To grant access to users, click here.
What's covered in this article:
- How to install the Xola Mobile App
- What the Administrator Role Can Do
- What the Reservationist Role Can Do
- What the Reservationist Lite Role Can Do
- What the Accountant Role Can Do
- What the Guide Manager Role Can Do
- What the Guide Role Can Do
- What the Curator Role Can Do
How to install the Xola Mobile App
iPhone
For iPhone, start by navigating to the Apple App Store on your phone and searching "Xola". It will be listed as Xola Phone. Once located, select the Get button to begin downloading. Once downloaded and installed, open the app and log in with your normal username and password.
Android
For Android, start by navigating to the Google Play Store on your phone and searching "Xola". It will be listed as Xola Phone. Once located, select the Install button to begin the download. Once downloaded and installed, open the App and log in with your normal username and password.
 What the Administrator Role Can Do
When Administrators login into the Xola Mobile App, they will see the following:
.png?width=279&height=590&name=Untitled%20design%20(25).png)
 Dashboard
The Dashboard Tab is your home base to see all Reserved or Available time slots for the day. From here you can also filter your views to include Availability, Products, Guides and Equipment!
At the top of your Dashboard you will see a ![]() icon. Clicking on this icon, will being up our redemption app, where you can scan the customers QR Code to check them in for an event.
icon. Clicking on this icon, will being up our redemption app, where you can scan the customers QR Code to check them in for an event.
Here is how the QR scanning works:
-
Tap Scan Code.
-
The app may ask for camera access - tap Allow.
-
-
Ask the guest to show their QR code from their phone or printed confirmation email.
-
Hover your phone over the QR code to scan.
.2025-08-18%2011_58_19.gif?width=279&height=590&name=Untitled%20design%20(5).2025-08-18%2011_58_19.gif)
Manually Look Up a Guest Without a QR Code
If a guest doesn't have access to their QR code or didn’t receive their confirmation email, you can still check them in manually:
-
On the main Screen, tap the Manual Lookup button at the bottom of the screen.
-
Enter the guest’s name, email, phone number or purchase ID to find their reservation.
-
Once located, tap into the reservation to view details and complete check-in just like you would after a QR scan.
This is a great fallback for guests who arrive without their confirmation or are unable to retrieve it on-site.
After Scanning a QR Code
Once a reservation is scanned, you’ll see a detailed view of the reservation with the following options:
-
Check In the reservation
-
Reject the check-in
Note: Rejecting a guest does not permanently block the check-in. You can still check them in later.
-
View Attendees’ Names
-
View Party Size & Check-In History
-
See Add-Ons Purchased
-
Unsigned Waivers (if applicable)
-
-
Tap the red Unsigned Waivers link to generate a QR code that guests can scan to complete their waiver. Once signed, waivers will automatically link to the reservation.
-
When done, tap Scan Now to scan the next guest, or return to the main menu.
If a Guest Is Late or Already Checked In
-
If a guest is late or early, Xola will alert you when you scan their code.
.png?width=279&height=590&name=Untitled%20design%20(12).png)
-
If a guest has already been checked in, you’ll see a message noting their prior check-in.
.png?width=279&height=590&name=Untitled%20design%20(13).png)
At the top of your Dashboard you will also see a ![]() icon, this is where you can leave us product feedback, that goes directly to Xola's product team to review!
icon, this is where you can leave us product feedback, that goes directly to Xola's product team to review!
.png?width=279&height=590&name=Untitled%20design%20(10).png)
Make a Purchase
Next to that you will see a green + Purchase button. Click the green + Purchase button and choose a product. A product can be an Experience, Package or Gift. Below are the details for making a purchase of an Experience.
Reservation Details
Once you select the product the customer wants to purchase, you'll be directed to the Product Details page, where you can enter the following:
- Privacy Settings: Choose whether the reservation is public or private if it is an experience with public and private options. If you do not have this option, the reservation will default to its privacy settings.
- Guest Quantity: Choose the number of guests attending the experience. If you have different demographic types, you can enter the number for each demographic.
- Availability: Choose the date and time in which the guests are coming for the experience. When choosing a new timeslot, you can also:
- Choose a date in the past by toggling on Show Past Availability.
- Add a Timeslot: If you need to add a timeslot, you can click on the '+add new timeslot' button. This will open up a new timeslot for all guest to reserve on.
- Add-ons: Choose which add-ons you would like to add to the reservation if you have add-ons set up.
-
Attendee Info:
The attendee info section will help your staff know who is coming for the experience, here you can:
- Fill out the name of each guest attending
- If using our waiver feature, as guests fill out the waivers, the names will automatically populate into this section on the Purchases Tab.
- The questionnaire answers if you are using this feature.
- If it is a per-person questionnaire, you can click on the
 icon next to each guest and fill out the questionnaire for each attendee.
 - If it is per reservation, you can click on the icon next to the main attendee and fill out the questionnaire.
- If it is a per-person questionnaire, you can click on the
- If you want to skip this, you can toggle on the 'ignore questionnaire validation errors for now'
- Fill out the name of each guest attending

Purchase Details
After you have filled out the product details, you can choose to modify the purchase by clicking on the ![]() icon and choosing:
icon and choosing:
- Modify: Make changes to the reservation details you just entered.
- Taxes and Fees: Remove any taxes or fees you have set up.
You can not remove Xola's Service fee.
- Codes: Add a coupon or agent code. Click on Add Code and select the code you would like to use and click Apply Code.
- Custom Line Items: Click the Add Custom Line Item and you can create on-the-fly discounts or charges, which can be taxed if needed.
- Delete: Delete the item in the cart.
After this, you can choose to Add Another Item, or move to the next step. If you add another item, you will repeat the steps above.

Customer Details
Organizer is attending:
- Toggled on: This means the organizer is attending, and the main attendee in the section will default to the organizer's name.
- Toggled off: This means the organizer is not attending. You can fill out the name of the main attendee so that your staff knows who will be attending the experience, in the attendee section from before.
Now you can enter the Organizer Details:
Tip: If you want to look up a past guest to book, click on the ![]() icon next to the Guest name to search for your guests. This will automatically populate the guest's name, email, and phone number. It will also automatically fill in credit card details if they have previously used a credit card.
icon next to the Guest name to search for your guests. This will automatically populate the guest's name, email, and phone number. It will also automatically fill in credit card details if they have previously used a credit card.

Payment Details
Next, choose your payment workflow:
- Now: Take immediate payment
- Later: This will reserve your customer's spot without collecting payment. When ready, you can find their purchase in the Purchases tab to collect the balance.
- Collect a Deposit: Take a small payment now, and choose a due date for the remaining balance later.
- Split Payment: Split the payment between multiple guests in the party.
If taking immediate payment, select the payment method:
- POS: Hardware paired to your device or Tap to Pay if set up. To learn more click here.
- Saved Credit Card: Any Card that is saved if you used the search customer function in the customer details section.
- New Credit Card: Manually enter new credit card details.
- Cash
- Check: If your customer is paying by check, we recommend noting the check number in the comment section.
- Invoice: This allows you to send your customer an Invoice for the purchase that can be paid at a different time.
- Other: This can be any third-party payment method your business accepts, like PayPal, Bitcoin, or Venmo.
Pro Tip: Notice the Do not charge card now toggle under the payment method section. This will store your customer's card information but will not charge the customer. You can later go into the customer purchase to collect the balance.
Internal Notes
Optionally add a Tag or internal note for your staff.
- Tag: A tag is a word or phrase added to a purchase that can be used for searching and filtering in the Purchases tab. When you type the tag into the search bar, it will bring up all purchases that have been tagged as such.
- Purchase Note: This will appear on the event's roster in the Purchase Notes section.
To complete the purchase, click Pay. After accepting payment, you will be taken to the Purchases tab page.

Dashboard Filters
You can filter your dashboard by date, reserved or available events, products, guides, equipment, and more! Simply click on the date picker to filter by any date.

Availability
Beside the date picker, you'll see four side-by-side buttons that let you filter the Dashboard based on the status of your events:
-
Reserved: Shows only events that have confirmed reservations.
-
Waitlist: Displays events where customers are currently on the waitlist.
-
Available: Highlights events that still have open spots for reservations.
-
All: Gives you a full view of every event—reserved and available.
Product, Equipment, and Guide Filters
Just beside the date picker, you’ll find filters to narrow down your view by product, guide, and equipment:
-
Products: Choose which products you want to display on the dashboard.
- Equipment: Show only equipment assigned to selected events, or exclude certain items as needed.
-
Guides: Filter events by specific guides to see who’s scheduled for what. even see what event have no guides assigned.

List View
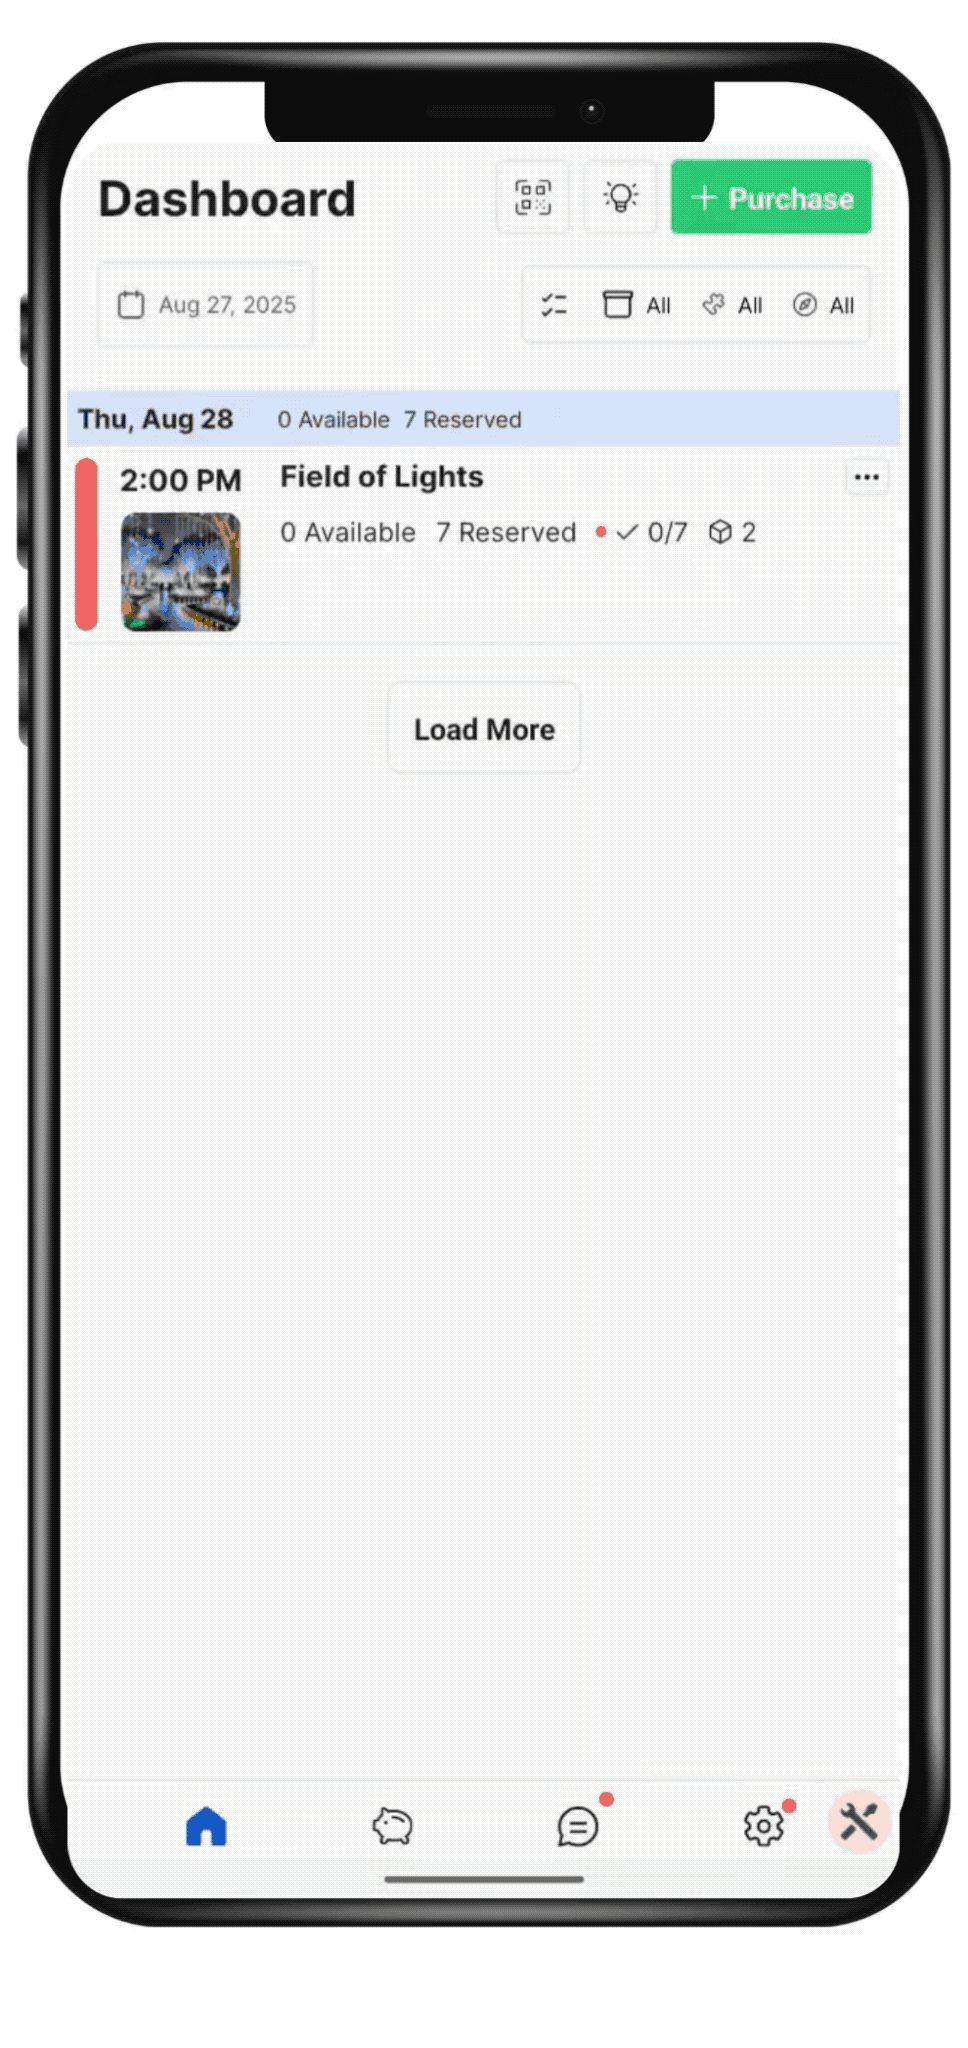
The Dashboard List View will show you all your events in a vertically cascading list for any selected day. Under your filter options, the bar displays the date, day, and the number of available and reserved spots for the whole day.
Next, you can look at the individual events under the day. Here, you can see the time the event is taking place, the name of the product, and how many are available and reserved.
Depending on what features you have turned on in Xola, you may be able to see other options on your Dashboard like:
- Check-in: You can see how many guests are checked in for the event.
- Assign Guides: You can see who is assigned as a guide.
- Assign Equipment: You can see what equipment is assigned.
- Add-ons: You can see what add-ons you have for the event.
- Balance Due Icon
 : Easily see what events have reservations that have balance due to collect.
 - Notes Icon
 : Easily see what events have notes on them.
 - Private Reservation Icon
 : Easily see if a reservation is Private.

Now you can perform actions for the entire event and all associated reservations via the ![]() icon in List View.
icon in List View.
- Click
 icon to make a purchase for this event.
 - Click
 icon to waitlist a group for this event, if no spots are available.
 - Click
 icon to add, view or delete Event and Purchase Notes.
 - Click
 icon to:
-
- Send Message: Choose from a message template, or write your own email or SMS to send to all guests for this event.
- Add Event Notes: Add, view or delete Event and Purchase Notes.
- Change Arrival: Change the arrival date or time for all or some of the reservations for this event.
- Cancel Reservations: Cancel all or some of the reservations on this event. Once you cancel, you will not be able to modify the reservation any further. You can only resend email or add notes.
- Purchase: Make a purchase for this event.
- Join Waitlist: Waitlist a group for this event, if no spots are available.
- Adjust Capacity: Adjust the amount of open spots on the event.
- Assign Guides: Assign one or more available guides to the event
- Modify Schedule: Make changes to the experience schedule.
Roster
-2.png?width=279&height=622&name=Untitled%20design%20(3)-2.png)
To view your roster from the dashboard, simply click on the timeslot. This will open the roster for you to view.
At the top of the roster, you will see a summary of the title of the experience, the date and time of the experience.
Next, click ![]() icon to:
icon to:
- Change Arrival: Change the arrival date or time for all or some of the reservations for this event.
- Add Event Notes: Add, view or delete Event and Purchase Notes.
- Purchase: Make a purchase for this event.
- Join Waitlist: Waitlist a group for this event, if no spots are available.
Next to that you will see a green + Purchase button. Click this to make a purchase for this event.
Under Reservation Items you will see Capacity for the event, how many guest are checked in or marked as a no show for the event, any add-ons purchased for the event, Pickup Locations, waivers signed, questionnaires, and all notes. You can also take the following actions by clicking on the item:- Adjust the Event capacity:
- Use the + and - buttons to adjust the capacity up or down or click on the number to simply enter your capacity and hit apply.
- Cap Event: The event's capacity will be adjusted to reflect the number of reservations that have already been made, and no new reservations will be accepted. If all reservations for the event are canceled, it will still be visible on your dashboard, allowing you to reopen it at a later time.
- Blackout: A blackout schedule will be created for this event. Reservations will no longer be accepted, and the event will not be displayed on the dashboard if all reservations are canceled.
- Questionnaire: Click on Questionnaire, and you can view, add or edit any questionnaires that are with the group.
- Notes: Click on Notes, and you can view or edit any Event, Purchase or Customer Note. You can also add any Event notes, or delete any event or purchases notes from this page.
Next, you can see the Event Items, here you can see guides assigned, the equipment that is assigned. You can also take the following actions from clicking on the item:
- Assigning or unassigning guides: Click on Guides, and then click on the guide you want to assign on unassign, and click close.
- Managing Equipment: Click on the Equipment, and then click on the equipment you want to assign on unassign, leave a reason for the adjustment, and click confirm.
Under this you will see the Guests list section of the Roster, here you can see each reservation that is attending this event.
You can sort the guests in this section by clicking on the ![]() icon. Here you can filter by:
icon. Here you can filter by:
-
By Organizer Name (A-Z)
- By Organizer Name (Z-A)
- By Purchase Date (Oldest First)
- By Purchase Date (Newest First)
You will also be able to:
- See the customers information, such as name, email and phone number.
- See the Demographics reserved
- You can also check in the whole group or mark them as a no-show.
- Mark as checked in: Click on the
 icon.
icon. - Mark as No Show: Click on the
 icon
icon
- Mark as checked in: Click on the
- Click on
 icon and you can link waivers if none are linked, or see which waivers are linked. You can click on the
  to unlink a waiver or
  icon to view the waiver.
 - Click on
 icon , and you can view, add or edit any questionnaires that are with the group or on the guest level.
 - Any balance dues show the icon.
- Click on the customers name, and you will be taken to the purchase section to review the purchase.
You will notice next to the waivers and questionnaire the ![]() icon, here you can take reservation actions such as:
icon, here you can take reservation actions such as:
- Go to the Reservation Screen: Takes you to the purchases tab and you can view all the reservation details in full.
- Message: Choose from a message template, or write your own email or SMS to send to all guests for this event.
- Add a Purchase Note: You can add any Purchase Notes.
- Change Arrival: Change the arrival date or time for this group.
- Modify Guests: Add or remove any guests from this reservation.
- Modify Add-ons: Add an add-ons on a purchase. (may not appear if you do not have add-ons for a product)
- Charge: Add a custom charge to a purchase. Be sure to include a descriptive comment so it’s clear what the charge is for—this will appear under the payment summary for easy reference. You can specify whether or not the charge should include tax. After you’ve added the charge, simply click the green Collect Balance button to process the payment and finalize the transaction.
- Refund: Issue a full or partial refund to the customer, using the original payment method or another selected option. In the Mobile App, you have three methods available:
- Reduce Booking Value and Return Payment: This option reduces the customer's total purchase value and sends full or partial payment back to the customer.
- Return Payment Only: Returns payment to one customer in order to collect that money either in a new form of payment or from another paying customer. Using the Return Payment feature will always open a balance on the purchase for the amount returned.
- Change Guest Quantity: Reduces or increases guest count and gives you the option to refund the full or partial price of the ticket or collect the balance.
- Switch Experience: Switch the experience with another experience. Click on the experience you want to change the customer into, then pick the date and time for the experience.
- Cancel Reservation: Cancel a reservation. Once you cancel, you will not be able to modify the reservation any further. You can only resend email or add notes.
- Link Waiver: You can link waivers if none are linked, or see which waivers are linked.
If you want to take individual action on each guest click on the Show all guest under the group and then you can take individual actions on each guest in the group. Actions you can take are:
- Check in or Mark as no show
- : Make Waiver Corrections, Unlink Waiver, or Preview Waiver
- : Update or view Questionnaire answers
 : All reservation actions listed above.
.gif?width=272&height=590&name=Untitled%20design%20(12).gif)
 Purchases
The Purchases Tab in Xola gives you a way to search for all customers' reservations, making it the command center for tracking and managing every transaction. Click on ![]() icon and you can pull up any purchase—past, present, or upcoming—using a wide range of filters such as customer name, email, phone number, tag or ID.
icon and you can pull up any purchase—past, present, or upcoming—using a wide range of filters such as customer name, email, phone number, tag or ID.
If you do not use the search function, all purchases appear on the screen in your Purchases tab, and is a scrollable library of all your customer purchases. It is sorted in order of most recent reservations, so your newest reservations are always located at the top. From here, you’ll see the customer name, the photo of the product purchased, the total amount of guests reserved, and the date and time of their experience, how much was paid and if there is a balance due or excess payment.
.png?width=279&height=590&name=Untitled%20design%20(26).png)
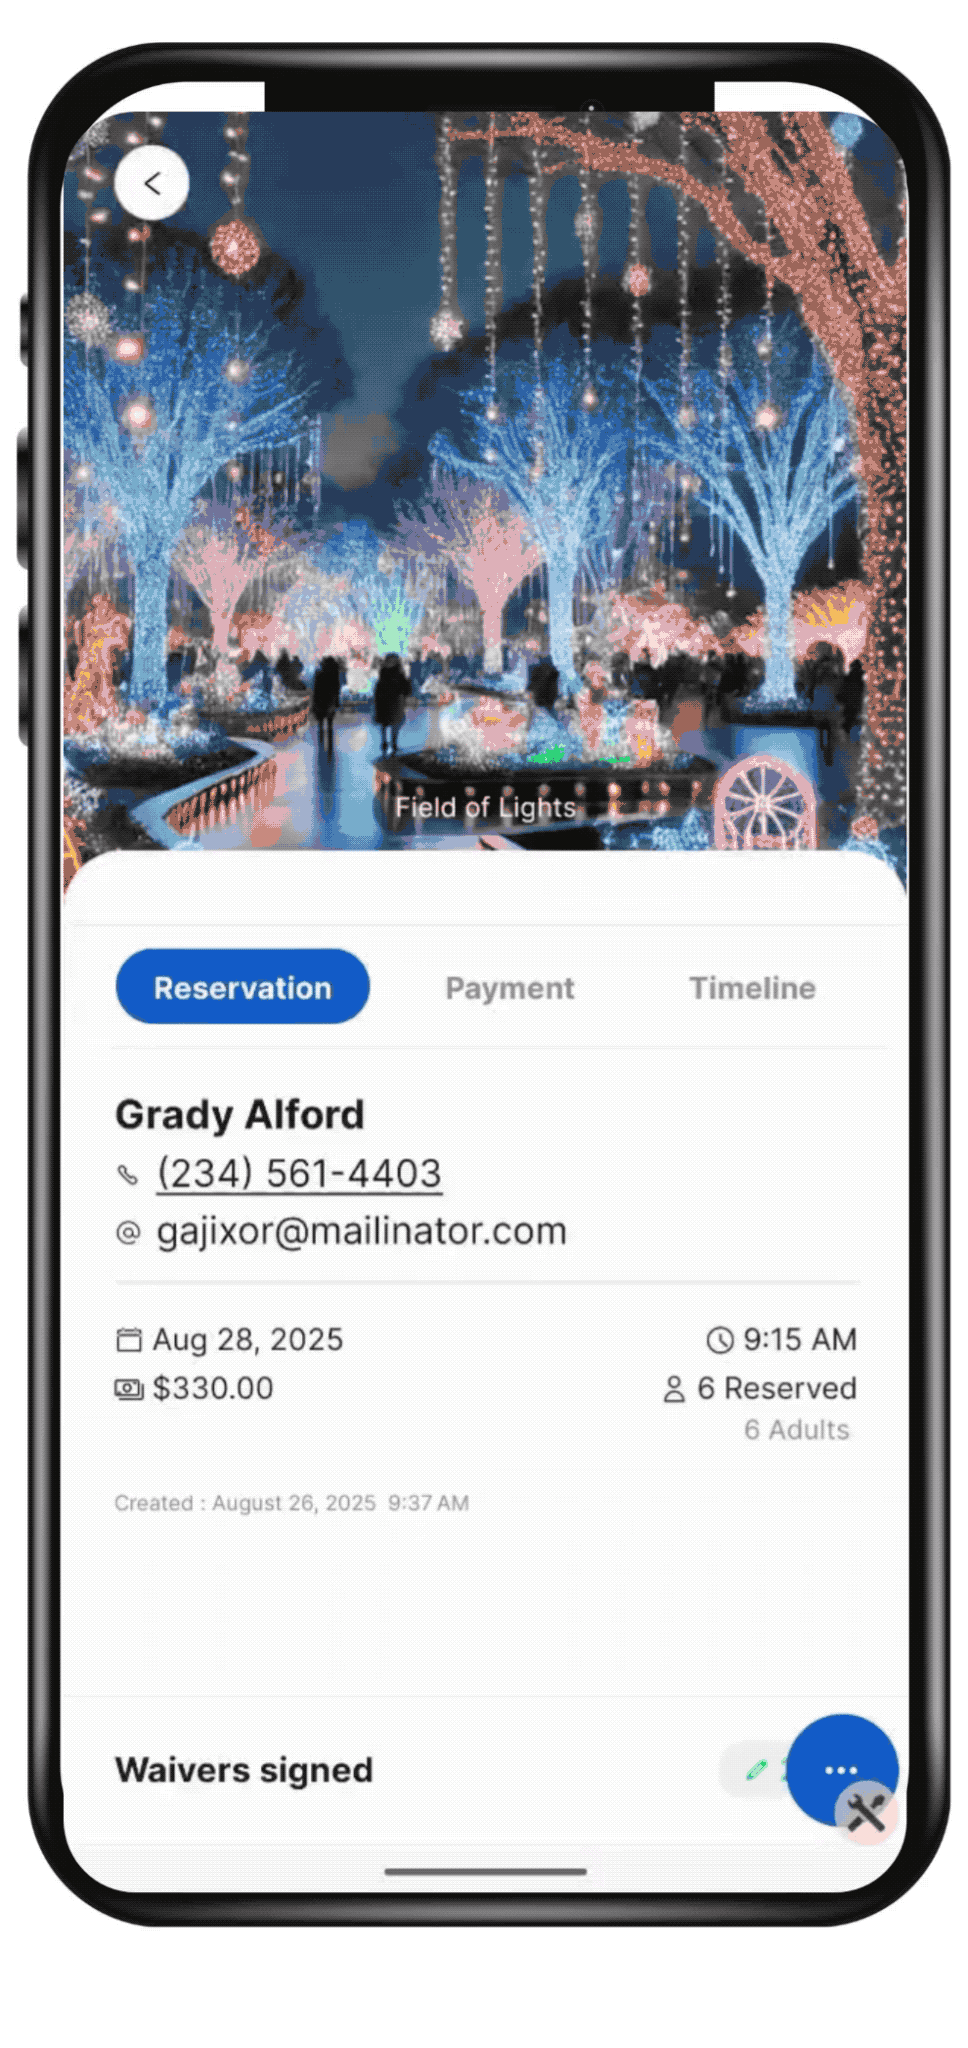
If you click on the purchase from this page, it will bring up the entire purchase details. Here you can see three different tabs:
Reservation tab:
Under the Reservation tab, you will see the customers name, phone number and email. Next you can see, the date and time of arrival, how much has been paid, the number of demographics reserved, and the confirmation ID.
.png?width=279&height=590&name=Untitled%20design%20(20).png)
You may see different purchase icons in this section. These icons can be:
![]() : This icon means the purchase has been canceled.
: This icon means the purchase has been canceled.
![]() : This icon means the purchase has not been accepted and is still pending. You can then accept or decline the pending reservation.
: This icon means the purchase has not been accepted and is still pending. You can then accept or decline the pending reservation.
![]() : This icon means there is a balance to collect from the customer. Click the balance due button to collect the balance.
: This icon means there is a balance to collect from the customer. Click the balance due button to collect the balance.
![]() : This icon means there is a refund that needs to be given to the customer. Click the Return Excess Payment button to refund the customer.
: This icon means there is a refund that needs to be given to the customer. Click the Return Excess Payment button to refund the customer.
![]() : This icon means the reservation is Private and no other groups will be on this event.
: This icon means the reservation is Private and no other groups will be on this event.
Scroll past this, and you can see how many waivers have been signed. Click on Waivers and you will get a list of those who have signed the waiver.
- You can also click on the
 icon on the bottom right and perform the following waiver actions:
-
- Link/Unlink waiver: Pick waivers to link or unlink manually.
- Sign Waiver: Allow guest to sign the waiver on your device. This waiver will be linked to the reservation.
Next, you can view any purchase notes that have been left on the reservation.
If you click on the Open Roster button, it will take you to the Roster for the event the customer is reserved for. This way, you can make any changes you need to the roster.
Under the Questionnaire section you can view the questionnaire answers, and make any changes to them. You can add questionnaire answers from guest if need by click on the Add button at the top.
Next is the tags, a tag is a word or phrase added to a purchase that can be used to search and filter in the Purchases tab. To add a tag to a purchase, in the Add tag field, type in your tag and hit enter.
Payment tab
See at a glance the full payment history for each reservation, including the total amount paid, all payment methods used, and any outstanding balances. The Payment tab also breaks down applied discounts, promotional codes, surcharges, and any service fees associated with the purchase.
.png?width=279&height=590&name=Untitled%20design%20(21).png)
Timeline tab
The Timeline is a history of every transaction and modification made to a purchase. It gives you complete transparency into all the changes made to customer purchases, from the initial point of sale to the post-trip!
Transactions (charges and refunds) are recorded in the Timeline. Each record contains a timestamp and the name of the Xola user who made the change, making it easy to know who did what and when.
.png?width=279&height=590&name=Untitled%20design%20(22).png)
Communication tab
The Communications tab provides a complete history of all interactions between your team and the customer for this reservation, including emails and SMS messages sent through Xola and any replies from the guest.
The Email and/or SMS will show up in the message chain below.
- Customers' responses to emails will pass through Xola and be added to the message chain.
- Customer responses to text messages will not appear for you in Xola.
Messages that exceed 160 characters will be sent as 2 separate texts. If a customer calls the contact number from the SMS message, they will receive a recording that instructs them to contact the Company that they reserved with (you!). If you're interested in hearing that automated message, you can call 415-800-1140.
From this tab, you can also send a new email or SMS directly to the customer. Just click on the email or SMS button. Write the message and click the ![]() icon to send.
icon to send.

In most of the tabs you will notice the ![]() icon on the bottom right, here you can modify the purchase by:
icon on the bottom right, here you can modify the purchase by:
 : Issue a full or partial refund to the customer, using the original payment method or another selected option. In the Mobile App, you have three methods available:
- Reduce Booking Value and Return Payment: This option reduces the customer's total purchase value and sends full or partial payment back to the customer.
- Return Payment Only: Returns payment to one customer in order to collect that money either in a new form of payment or from another paying customer. Using the Return Payment feature will always open a balance on the purchase for the amount returned.
- Change Guest Quantity: Reduces or increases guest count and gives you the option to refund the full or partial price of the ticket or collect the balance.
 : Add a custom charge to a purchase. Be sure to include a descriptive comment so it’s clear what the charge is for—this will appear under the payment summary for easy reference. You can specify whether or not the charge should include tax. After you’ve added the charge, simply click the green Collect Balance button to process the payment and finalize the transaction.
 : Remove or add codes to a purchase. To add a code, click on Add and enter the exact code and hit apply. To remove a code, simply click Remove next the code.
  : Change the reservation from Private to Shared or Shared to Private. (may not appear if you do not have Private/Shared event on for a product).
 : Change the arrival date or time for all or some of the reservations for this event.
 : Resend the confirmation email to the organizer.
  : Add an add-ons on a purchase. (may not appear if you do not have add-ons for a product)
  : Switch the experience with another experience. Click on the experience you want to change the customer into, then pick the date and time for the experience.
  : View or add any Event or Purchase Notes. If you need to edit or delete a note, simply click on the note and proceed with the action.
 : Change the demographics or guest count for a purchase. Use the + or - sign next to the demographics to change the guest counts.
  : Cancel a reservation. Once you cancel, you will not be able to modify the reservation any further. You can only resend email or add notes.
  : Rebook the organizer into another experience. The organizers details like name, email, phone number, and any credit card on file will be populated.

 Inbox
Inbox
Notifications
This queue serves as your central hub for important action notifications that require your attention, helping you stay on top of critical tasks without missing a beat.
Several types of notifications appear in this queue, including balance due alerts, pending purchases, and communications from your customers that need your prompt response.
Types of Purchases in the Pending Action Queue:
- Balance Due Purchase: A purchase with an open balance will remain in the Pending Action Queue until the balance has been fully collected. Click on the purchase to access the purchase detail page, and click on Collect Balance to settle up.
- Refund Due: A purchase with a refund due will remain in the Pending Action Queue until the refund has been given to the customer or a booking value is decreased. Click on the purchase to access the purchase detail page.
- Invoice Due Purchase: Like balance due and deposit purchases, purchases with open invoices will remain in the Pending Action Queue until the rest of the balance has been fully collected. Click on the purchase to access the purchase details, and click on Collect Balance to settle up.
- Pending Confirmation: If purchases for certain products are on manual acceptance or the trip minimum hasn't yet been met, they will remain in the Pending Action Queue until they are accepted or declined. From the Pending Action Queue, click on the purchase to access the purchase detail page, and then accept or decline the purchase.
- No-Shows: When a customer is marked as a No-Show and has a balance due, they are immediately sent into the Pending Action Queue. The purchase will remain here until the balance has been collected or until the customer has been booked into another experience.
- Deposit Purchase: Like balance-due purchases, purchases with open deposits will remain in the Pending Action Queue until the rest of the balance has been fully collected. Click on the purchase to access the purchase details, and click on Collect Balance to settle up.
-
Unread Messages: When a customer replies to any of the messages that are sent to them. If you click on the record, it will take you to the purchase to see the message, and you can respond to the customer from there.
Filtering
You can filter your pending action queue to show you the information you would like. For example to take a look at all of the reservations that have a balance due, you could sort the Pending Actions Queue by Balance Due. If you need to see who has not paid their invoice, you can sort by Invoice Due.

Announcements
Announcements are Xola’s way of keeping you in the loop about meaningful updates and essential news that impact your business. Here you’ll find notifications about newly released features, enhancements to the platform, upcoming product changes, service alerts, and proactive tips designed to help you get even more value from your Xola experience. We use Announcements to share anything we believe will boost your success or support your day-to-day operations—think of it as your direct line to everything happening at Xola. Check this section regularly to stay informed and empowered as you grow your business with us.
.png?width=279&height=590&name=Untitled%20design%20(24).png)
 Analytics
The Transactions Analytics Report in Xola offers a clear view of your financial performance by bringing revenue and transaction data together in one place. Use it to quickly see business trends, track daily operations, and analyze transactions. The Customer Analytics report shows how many customers made purchases during a specific date range and highlights engagement patterns by product, day, or season.
Use the filters at the top to customize your view:
- Transactions: Give you data on each transaction for the given date range chosen.
- Customers: Gives you data on the customers for the given date range chosen.
Transactions:
-
-
Date Range: Choose a date range by which to filter.
- Listing Filter: Filter transactions based on the Products that you offer.
- Recognized Earnings vs Cash Flow Filter: Use this filter option to toggle between Recognized Earnings and Cash Flow. By default, the Analytics report will always be set to Cash Flow. Here's what each term means:
- Recognized Earnings: This view shows revenue earned based on when the service (such as a tour or activity) was delivered. It aligns with accrual accounting principles and is helpful when you want to match revenue to the date the experience occurred, not when the payment was received.
- Cash Flow: This view displays revenue based on when the payment was received, regardless of when the service was provided. It reflects actual money movement in and out of your business.
-
Understanding the Chart View
The Chart View in the Analytics Transaction Report provides a visual overview of your business performance over a selected date range. It lets you quickly spot trends and patterns in your revenue, helping you make informed decisions.
At the top of the Chart View, you'll see a line graph that tracks revenue activity over time. Spikes in the graph typically represent periods of high transaction volume or increased sales, giving you a clear picture of when your business was most active.
Beneath the graph, you'll find a summary of your key financial figures for the selected period:
-
Transactions: Total number of completed transactions
-
Charges: Total amount charged to customers
-
Refunds: Total amount refunded
-
Collected: Charges minus refunds
-
Credit Card Fees (CC Fees): Processing fees incurred from your payment processor
-
Partner Fees: Total Xola service fees assessed on purchases
Note: If your guests pay the Xola Service Fee, this amount may not be visible.
-
Taxes and Fees: Total taxes and additional fees collected
Note: This does not include the Xola Service Fee.
- Income: Total earnings after deductions
(Collections – Credit Card Fees – Service Fees – Taxes and Fees)
These metrics update automatically based on the filters and date range you select.
Below the financial summary, you'll see three donut charts that provide a breakdown of:
-
Payment Methods — How customers paid (e.g., credit card, cash, check)
-
Channels — Where purchases were made (e.g., Back Office, Checkout, Kiosk)
-
Listings — Performance of each product or experience

Customers:
- Use the filters at the top of the report to narrow down your view:
- Date Range: When choosing a date range, there are two options available:
- Date of Purchase: This will show how many customers made a purchase for an experience within the selected date range.
- Date of Event: This will show how many customers are booked for an event that occurs within the selected date range. Using this filter will allow you to choose date ranges that span into the future.
- Listings: You can filter the report by products, with a specific focus on experiences. If 8 or fewer experiences are selected, the chart will display individual bars for each product. Hovering over these bars will provide a breakdown of the total customer count for both the individual product and for the entire day.
- Date Range: When choosing a date range, there are two options available:
Bar Chart with Customer Breakdown
- Quantity: How many customers total
- Date: The date of the Purchase or Event
Additional Charts Below the Chart
- Demographics: Shows the percentage of each demographic group across all purchases within the selected date range.
- Listings: Displays the total number of reservations made for each experience within the selected date range.

 Settings
-1.png?width=265&height=590&name=Untitled%20design%20(5)-1.png)
Account
Tap on Account to change you password, or to log out of your Mobile App account.
-1.png?width=279&height=590&name=Untitled%20design%20(3)-1.png)
Payment Hardware
Depending on certain features being enabled on your account, this is where you can configure and pair the Chipper BBPOS or M2 hardware so that you may take advantage of payments straight from your mobile device! You can even choose to use Tap to Pay feature to collect payment.
First choose your Payment Device Type:
- No payment device: Means you will collect credit card details manually.
- Bluetooth payment devices: Means you will use a Chipper BBPOS or M2 reader to collect payment from the guest.
- Tap-to-pay (phone): Means you will use the Tap-to-Pay feature to collect payment and no hardware device needed.
Bluetooth Payment Device Set Up:
- Power on the Bluetooth device.
- When ready to connect, the device’s light will flash blue every 1-3 seconds.
- You are now ready to pair the device.
- Under Payment Device Type, select Bluetooth payment device.
- Once the bluetooth device is discovered, the name of the device (ex: CHB000000000000) will be displayed under the Nearby Devices column.
- Tap the Connect button to the right of the device name.
- A Bluetooth Pairing Request message will appear; select Pair.
- A green message on your phone screen confirms the device is successfully connected.
- A yellow dot will be next to the Settings icon in the Xola Phone app until standby mode is activated.
- Once connected and ready the device status will be indicated by a green dot next to the Settings icon on the lower right corner of the app.
- Under Payment Device Type, select Bluetooth payment device.
If you successfully complete the above steps, you are now ready to take payments. A new payment option will be available when making a purchase in the back office.
On the payment screen, ensure the ![]() icon is selected as the Method. You will have 5 minutes to process a card. If it fails, you can try another card or use a different payment method. All purchases made via your Chip & Pin hardware will be tagged EMV.
icon is selected as the Method. You will have 5 minutes to process a card. If it fails, you can try another card or use a different payment method. All purchases made via your Chip & Pin hardware will be tagged EMV.
Note: Only one Payment device (such as the Chipper BBPOS or M2) can be paired and any given time to a device.

Tap-To-Pay Setup:
Use Tap-to-Pay on your phone with Near Field Communication (NFC) support to accept in-person contactless payments without additional payment hardware. Tap-to-Pay includes support for Visa Mastercard, American Express contactless cards, and NFC-based mobile wallets (Apple Pay, Google Pay, and Samsung Pay). Discover support is also included in the US only.
Device Requirements & Eligibility
Tap to Pay is currently supported in the US and the United Kingdom on iPhone and Android devices.
Tap to Pay on iPhone requires:
- An iPhone XS or later running iOS 16.0 or later in the United States.
- An iPhone XS or later running iOS 16.4 or later in the United Kingdom.
Tap to Pay on Android must run Android 11 or above and:
- Contain a functioning NFC antenna and chipset
- Must not be rooted and the device bootloader is locked and unchanged
- Use Google Mobile Services and have the Google Play Store app installed
- Have a hardware-backed keystore
- Support generating key pairs using a variety of key algorithms, including RSA and AES from the Android keystore
Click here to find out if your location and device are supported.
How to Enable:
- Select Tap-to-Pay
- Select the Tap-to-Pay (Phone) option to enable your phone's built-in tap-to-pay feature.
- App Notifications and Permissions
- The app will then begin scanning your phone's hardware to pair with the built-in tap-to-pay feature. During this process, you may see several notifications regarding the status of the hardware scanning and pairing. Be prepared to grant any additional permissions if prompted by the app to ensure seamless pairing.
- Confirmation of Device Pairing
- Apple Devices: You will see a connection notice indicating that the pairing was successful.
- Android Devices: The name listed under Connected Devices will vary based on your phone's make, model, and Android version. Look for a name that indicates tap-to-pay functionality is active.
- In both cases when the device is successfully paired, a green dot will appear above the gear icon in the bottom menu.

Using Tap to Pay at Checkout:
If you successfully complete the above steps, you are now ready to take payments. A new payment option will be available when making a purchase in the back office.
When you reach the Payment Details section, scroll down to Method. If tap-to-pay has been enabled, it will appear in this field by default. To Confirm Payment, tap the green Confirm & Pay button. Your device will then transition to its native tap-to-pay interface, displaying specific instructions on where to place the customer's credit card for scanning.
- Apple: The card should be held against the top of the iPhone horizontally as shown

- NFC wallets need to be positioned in the same place.
After the card is successfully scanned, the app will redirect you back to the checkout confirmation screen. Here, a message will inform you whether the transaction was successful.

ƒ
Scan QR Code
Use the built-in QR Code scanning feature to check in guests quickly and efficiently. Simply tap the Scan QR Code button to activate your device’s camera. Ask your guests to present their confirmation email or ticket, either on their phone or printed, and point your camera at the QR code. The system will scan the code instantly, confirm the reservation, and update the guest's check-in status in real time. This seamless process not only speeds up guest entry but also ensures accurate records, helping you deliver a smooth start to every guest’s experience. To learn more click here.
Leave Feedback
Tap on Leave Feedback to leave the Xola product team direct feedback about the app.
.png?width=279&height=590&name=Untitled%20design%20(5).png)
About Tap to Pay
Tap on About Tap to Pay learn more about the Tap to Pay feature we offer on the Mobile App.
.png?width=279&height=590&name=Untitled%20design%20(4).png)
Listings
Tap on Listings to create and modify global blackout schedules, or experience schedules.

Global Listing Settings:
Under this section you can create and modify Global Blackout Dates
- To create a new blackout schedule, hit Add New
- Name: Name this schedule so you can easily identify it.
- Repeats
- Weekly: The schedule you create will repeat each week on your calendar. Select or deselect individual weekdays under Repeat on. Selected days have a blue checkmark.
- Specific Dates: This allows you to hand-select individual days to which this schedule will apply.Click on the Add new under Dates to select the days on a calendar.
- Time Ranges: Select the time range in which the Blackout Dates will close off availability.
Note: Events with active reservations in this blackout schedule will be retained.
After creating your blackout schedules, you can edit them by clicking the name or delete them by selecting the schedule and hitting the red Delete button at the top. Additionally, you can see the schedules that are active or inactive .
Listings:
Under this section you can create and modify individual experience schedules:
- Click on an experience
- Click on Description
- Click on Schedules
- To create the times that your experience is open or blackout for your customer, click Add New at the top of the page.
- In the window that opens, enter Schedule Details:
- Name: Name this schedule so you can easily identify it.
- Availability:
- Open: This is available timeslots for your customer to make reservations on.
- Blackout: This is unavailable timeslots, that will block your customer from making reservations.
-
- Repeats
- Weekly: The schedule you create will repeat each week on your calendar. Select or deselect individual weekdays under Repeat on. Selected days have a blue checkmark.
- Specific Dates: This allows you to hand-select individual days to which this schedule will apply.Click on the Add new under Dates to select the days on a calendar.
- Repeats
-
- Time Slots
- This is where you will choose the start times that can be booked for this experience. You can create as many time slots as you would like. When one gets booked, Xola will automatically check your availability for the rest of the day and adjust your schedule accordingly.
- If your experience does not have set start times, toggle on No Fixed Times. Your customers will select a date at checkout and no time.
- Price Variation
- Here, you can designate if there is a difference in price for this particular schedule.
- Time Slots
Days and times that have been designated as Blackout Schedules will not show any availability on your website or in the back office for your staff.
After creating your schedules, you can edit them by clicking the name or delete them by selecting the schedule and hitting the red Delete button at the top. Additionally, you can see the schedules that are active or inactive.
What the Reservationist Role Can Do
When Reservationists login into the Xola Mobile App, they will see the following:
.png?width=279&height=590&name=Untitled%20design%20(16).png) Dashboard
Dashboard
The Dashboard Tab is your home base to see all Reserved or Available time slots for the day. From here you can also filter your views to include Availability, Products, Guides and Equipment!
At the top of your Dashboard you will see a ![]() icon. Clicking on this icon, will being up our redemption app, where you can scan the customers QR Code to check them in for an event.
icon. Clicking on this icon, will being up our redemption app, where you can scan the customers QR Code to check them in for an event.
Here is how the QR scanning works:
-
Tap Scan Code.
-
The app may ask for camera access - tap Allow.
-
-
Ask the guest to show their QR code from their phone or printed confirmation email.
-
Hover your phone over the QR code to scan.
Manually Look Up a Guest Without a QR Code
If a guest doesn't have access to their QR code or didn’t receive their confirmation email, you can still check them in manually:
-
On the main Screen, tap the Manual Lookup button at the bottom of the screen.
-
Enter the guest’s name, email, phone number or purchase ID to find their reservation.
-
Once located, tap into the reservation to view details and complete check-in just like you would after a QR scan.
This is a great fallback for guests who arrive without their confirmation or are unable to retrieve it on-site.
After Scanning a QR Code
Once a reservation is scanned, you’ll see a detailed view of the reservation with the following options:
-
Check In the reservation
-
Reject the check-in
Note: Rejecting a guest does not permanently block the check-in. You can still check them in later.
-
View Attendees’ Names
-
View Party Size & Check-In History
-
See Add-Ons Purchased
-
Unsigned Waivers (if applicable)
-
-
Tap the red Unsigned Waivers link to generate a QR code that guests can scan to complete their waiver. Once signed, waivers will automatically link to the reservation.
-
When done, tap Scan Now to scan the next guest, or return to the main menu.
If a Guest Is Late or Already Checked In
-
If a guest is late or early, Xola will alert you when you scan their code.
-
If a guest has already been checked in, you’ll see a message noting their prior check-in.
At the top of your Dashboard you will also see a ![]() icon, this is where you can leave us product feedback, that goes directly to Xola's product team to review!
icon, this is where you can leave us product feedback, that goes directly to Xola's product team to review!
Make a Purchase
Next to that you will see a green + Purchase button. Click the green + Purchase button and choose a product. A product can be an Experience, Package or Gift. Below are the details for making a purchase of an Experience.
Reservation Details
Once you select the product the customer wants to purchase, you'll be directed to the Product Details page, where you can enter the following:
- Privacy Settings: Choose whether the reservation is public or private if it is an experience with public and private options. If you do not have this option, the reservation will default to its privacy settings.
- Guest Quantity: Choose the number of guests attending the experience. If you have different demographic types, you can enter the number for each demographic.
- Availability: Choose the date and time in which the guests are coming for the experience. When choosing a new timeslot, you can also:
- Choose a date in the past by toggling on Show Past Availability.
- Add a Timeslot: If you need to add a timeslot, you can click on the '+add new timeslot' button. This will open up a new timeslot for all guest to reserve on.
- Add-ons: Choose which add-ons you would like to add to the reservation if you have add-ons set up.
-
Attendee Info:
The attendee info section will help your staff know who is coming for the experience, here you can:
- Fill out the name of each guest attending
- If using our waiver feature, as guests fill out the waivers, the names will automatically populate into this section on the Purchases Tab.
- The questionnaire answers if you are using this feature.
- If it is a per-person questionnaire, you can click on the icon next to each guest and fill out the questionnaire for each attendee.
- If it is per reservation, you can click on the icon next to the main attendee and fill out the questionnaire.
- If it is a per-person questionnaire, you can click on the
- If you want to skip this, you can toggle on the 'ignore questionnaire validation errors for now'
- Fill out the name of each guest attending
Purchase Details
After you have filled out the product details, you can choose to modify the purchase by clicking on the ![]() icon and choosing:
icon and choosing:
- Modify: Make changes to the reservation details you just entered.
- Taxes and Fees: Remove any taxes or fees you have set up.
You can not remove Xola's Service fee.
- Codes: Add a coupon or agent code. Click on Add Code and select the code you would like to use and click Apply Code.
- Custom Line Items: Click the Add Custom Line Item and you can create on-the-fly discounts or charges, which can be taxed if needed.
- Delete: Delete the item in the cart.
After this, you can choose to Add Another Item, or move to the next step. If you add another item, you will repeat the steps above.
Customer Details
Organizer is attending:
- Toggled on: This means the organizer is attending, and the main attendee in the section will default to the organizer's name.
- Toggled off: This means the organizer is not attending. You can fill out the name of the main attendee so that your staff knows who will be attending the experience, in the attendee section from before.
Now you can enter the Organizer Details:
Tip: If you want to look up a past guest to book, click on the ![]() icon next to the Guest name to search for your guests. This will automatically populate the guest's name, email, and phone number. It will also automatically fill in credit card details if they have previously used a credit card.
icon next to the Guest name to search for your guests. This will automatically populate the guest's name, email, and phone number. It will also automatically fill in credit card details if they have previously used a credit card.
Payment Details
Next, choose your payment workflow:
- Now: Take immediate payment
- Later: This will reserve your customer's spot without collecting payment. When ready, you can find their purchase in the Purchases tab to collect the balance.
- Collect a Deposit: Take a small payment now, and choose a due date for the remaining balance later.
- Split Payment: Split the payment between multiple guests in the party.
If taking immediate payment, select the payment method:
- POS: Hardware paired to your device or Tap to Pay if set up. To learn more click here.
- Saved Credit Card: Any Card that is saved if you used the search customer function in the customer details section.
- New Credit Card: Manually enter new credit card details.
- Cash
- Check: If your customer is paying by check, we recommend noting the check number in the comment section.
- Invoice: This allows you to send your customer an Invoice for the purchase that can be paid at a different time.
- Other: This can be any third-party payment method your business accepts, like PayPal, Bitcoin, or Venmo.
Pro Tip: Notice the Do not charge card now toggle under the payment method section. This will store your customer's card information but will not charge the customer. You can later go into the customer purchase to collect the balance.
Internal Notes
Optionally add a Tag or internal note for your staff.
- Tag: A tag is a word or phrase added to a purchase that can be used for searching and filtering in the Purchases tab. When you type the tag into the search bar, it will bring up all purchases that have been tagged as such.
- Purchase Note: This will appear on the event's roster in the Purchase Notes section.
To complete the purchase, click Pay. After accepting payment, you will be taken to the Purchases tab page.
Dashboard Filters
You can filter your dashboard by date, reserved or available events, products, guides, equipment, and more! Simply click on the date picker to filter by any date.
Availability
Beside the date picker, you'll see four side-by-side buttons that let you filter the Dashboard based on the status of your events:
-
Reserved: Shows only events that have confirmed reservations.
-
Waitlist: Displays events where customers are currently on the waitlist.
-
Available: Highlights events that still have open spots for reservations.
-
All: Gives you a full view of every event—reserved and available.
Product, Equipment, and Guide Filters
Just beside the date picker, you’ll find filters to narrow down your view by product, guide, and equipment:
-
Products: Choose which products you want to display on the dashboard.
- Equipment: Show only equipment assigned to selected events, or exclude certain items as needed.
-
Guides: Filter events by specific guides to see who’s scheduled for what. even see what event have no guides assigned.
List View
The Dashboard List View will show you all your events in a vertically cascading list for any selected day. Under your filter options, the bar displays the date, day, and the number of available and reserved spots for the whole day.
Next, you can look at the individual events under the day. Here, you can see the time the event is taking place, the name of the product, and how many are available and reserved.
Depending on what features you have turned on in Xola, you may be able to see other options on your Dashboard like:
- Check-in: You can see how many guests are checked in for the event.
- Assign Guides: You can see who is assigned as a guide.
- Assign Equipment: You can see what equipment is assigned.
- Add-ons: You can see what add-ons you have for the event.
- Balance Due Icon: Easily see what events have reservations that have balance due to collect.
- Notes Icon : Easily see what events have notes on them.
- Private Reservation Icon : Easily see if a reservation is Private.
Now you can perform actions for the entire event and all associated reservations via the ![]() icon in List View.
icon in List View.
- Click icon to make a purchase for this event.
- Click icon to waitlist a group for this event, if no spots are available.
- Click icon to add, view or delete Event and Purchase Notes.
- Click icon to:
-
- Send Message: Choose from a message template, or write your own email or SMS to send to all guests for this event.
- Add Event Notes: Add, view or delete Event and Purchase Notes.
- Change Arrival: Change the arrival date or time for all or some of the reservations for this event.
- Cancel Reservations: Cancel all or some of the reservations on this event. Once you cancel, you will not be able to modify the reservation any further. You can only resend email or add notes.
- Purchase: Make a purchase for this event.
- Join Waitlist: Waitlist a group for this event, if no spots are available.
- Adjust Capacity: Adjust the amount of open spots on the event.
- Modify Schedule: Make changes to the experience schedule.
Roster
-2.png?width=279&height=622&name=Untitled%20design%20(2)-2.png)
To view your roster from the dashboard, simply click on the timeslot. This will open the roster for you to view.
At the top of the roster, you will see a summary of the title of the experience, the date and time of the experience.
Next, click ![]() icon to:
icon to:
- Change Arrival: Change the arrival date or time for all or some of the reservations for this event.
- Add Event Notes: Add, view or delete Event and Purchase Notes.
- Purchase: Make a purchase for this event.
- Join Waitlist: Waitlist a group for this event, if no spots are available.
Next to that you will see a green + Purchase button. Click this to make a purchase for this event.
Under Reservation Items you will see Capacity for the event, how many guest are checked in or marked as a no show for the event, any add-ons purchased for the event, Pickup Locations, waivers signed, questionnaires, and all notes. You can also take the following actions by clicking on the item:
- Adjust the Event capacity:
- Use the + and - buttons to adjust the capacity up or down or click on the number to simply enter your capacity and hit apply.
- Cap Event: The event's capacity will be adjusted to reflect the number of reservations that have already been made, and no new reservations will be accepted. If all reservations for the event are canceled, it will still be visible on your dashboard, allowing you to reopen it at a later time.
- Blackout: Reservationist do not have permissions to blackout events.
- Questionnaire: Click on Questionnaire, and you can view, add or edit any questionnaires that are with the group.
- Notes: Click on Notes, and you can view or edit any Event, Purchase or Customer Note. You can also add any Event notes, or delete any event or purchases notes from this page.
Next, you can see the Event Items, here you can see guides assigned, the equipment that is assigned.
Under this you will see the Guests list section of the Roster, here you can see each reservation that is attending this event.
You can sort the guests in this section by clicking on the ![]() icon. Here you can filter by:
icon. Here you can filter by:
-
By Organizer Name (A-Z)
- By Organizer Name (Z-A)
- By Purchase Date (Oldest First)
- By Purchase Date (Newest First)
You will also be able to:
- See the customers information, such as name, email and phone number.
- See the Demographics reserved
- You can also check in the whole group or mark them as a no-show.
- Mark as checked in: Click on the icon.
- Mark as No Show: Click on the icon
- Mark as checked in: Click on the
- Click on icon and you can link waivers if none are linked, or see which waivers are linked. You can click on the to unlink a waiver or icon to view the waiver.
- Click on icon , and you can view, add or edit any questionnaires that are with the group or on the guest level.
- Any balance dues show the icon.
- Click on the customers name, and you will be taken to the purchase section to review the purchase.
You will notice next to the waivers and questionnaire the ![]() icon, here you can take reservation actions such as:
icon, here you can take reservation actions such as:
- Go to the Reservation Screen: Takes you to the purchases tab and you can view all the reservation details in full.
- Message: Choose from a message template, or write your own email or SMS to send to all guests for this event.
- Add a Purchase Note: You can add any Purchase Notes.
- Change Arrival: Change the arrival date or time for this group.
- Modify Guests: Add or remove any guests from this reservation.
- Modify Add-ons: Add an add-ons on a purchase. (may not appear if you do not have add-ons for a product)
- Charge: Add a custom charge to a purchase. Be sure to include a descriptive comment so it’s clear what the charge is for—this will appear under the payment summary for easy reference. You can specify whether or not the charge should include tax. After you’ve added the charge, simply click the green Collect Balance button to process the payment and finalize the transaction.
- Refund: Issue a full or partial refund to the customer, using the original payment method or another selected option. In the Mobile App, you have three methods available:
- Reduce Booking Value and Return Payment: This option reduces the customer's total purchase value and sends full or partial payment back to the customer.
- Return Payment Only: Returns payment to one customer in order to collect that money either in a new form of payment or from another paying customer. Using the Return Payment feature will always open a balance on the purchase for the amount returned.
- Change Guest Quantity: Reduces or increases guest count and gives you the option to refund the full or partial price of the ticket or collect the balance.
- Switch Experience: Switch the experience with another experience. Click on the experience you want to change the customer into, then pick the date and time for the experience.
- Cancel Reservation: Cancel a reservation. Once you cancel, you will not be able to modify the reservation any further. You can only resend email or add notes.
- Link Waiver: You can link waivers if none are linked, or see which waivers are linked.
If you want to take individual action on each guest click on the Show all guest under the group and then you can take individual actions on each guest in the group. Actions you can take are:
- Check in or Mark as no show
- : Make Waiver Corrections, Unlink Waiver, or Preview Waiver
- : Update or view Questionnaire answers
- : All reservation actions listed above.
.gif?width=271&height=590&name=Untitled%20design%20(13).gif)
Purchases
The Purchases Tab in Xola gives you a way to search for all customers' reservations, making it the command center for tracking and managing every transaction. Click on ![]() icon and you can pull up any purchase—past, present, or upcoming—using a wide range of filters such as customer name, email, phone number, tag or ID.
icon and you can pull up any purchase—past, present, or upcoming—using a wide range of filters such as customer name, email, phone number, tag or ID.
If you do not use the search function, all purchases appear on the screen in your Purchases tab, and is a scrollable library of all your customer purchases. It is sorted in order of most recent reservations, so your newest reservations are always located at the top. From here, you’ll see the customer name, the photo of the product purchased, the total amount of guests reserved, and the date and time of their experience, how much was paid and if there is a balance due or excess payment.
.png?width=279&height=590&name=Untitled%20design%20(18).png)
If you click on the purchase from this page, it will bring up the entire purchase details. Here you can see three different tabs:
Reservation tab:
Under the Reservation tab, you will see the customers name, phone number and email. Next you can see, the date and time of arrival, how much has been paid, the number of demographics reserved, and the confirmation ID.
You may see different purchase icons in this section. These icons can be:
![]() : This icon means the purchase has been canceled.
: This icon means the purchase has been canceled.
![]() : This icon means the purchase has not been accepted and is still pending. You can then accept or decline the pending reservation.
: This icon means the purchase has not been accepted and is still pending. You can then accept or decline the pending reservation.
![]() : This icon means there is a balance to collect from the customer. Click the balance due button to collect the balance.
: This icon means there is a balance to collect from the customer. Click the balance due button to collect the balance.
![]() : This icon means there is a refund that needs to be given to the customer. Click the Return Excess Payment button to refund the customer.
: This icon means there is a refund that needs to be given to the customer. Click the Return Excess Payment button to refund the customer.
![]() : This icon means the reservation is Private and no other groups will be on this event.
: This icon means the reservation is Private and no other groups will be on this event.
Scroll past this, and you can see how many waivers have been signed. Click on Waivers and you will get a list of those who have signed the waiver.
-
- You can also click on the icon on the bottom right and perform the following waiver actions:
- Link/Unlink waiver: Pick waivers to link or unlink manually.
- Sign Waiver: Allow guest to sign the waiver on your device. This waiver will be linked to the reservation.
- You can also click on the
Next, you can view any purchase notes that have been left on the reservation.
If you click on the Open Roster button, it will take you to the Roster for the event the customer is reserved for. This way, you can make any changes you need to the roster.
Under the Questionnaire section you can view the questionnaire answers, and make any changes to them. You can add questionnaire answers from guest if need by click on the Add button at the top.
Next is the tags, a tag is a word or phrase added to a purchase that can be used to search and filter in the Purchases tab. To add a tag to a purchase, in the Add tag field, type in your tag and hit enter.
Payment tab
See at a glance the full payment history for each reservation, including the total amount paid, all payment methods used, and any outstanding balances. The Payment tab also breaks down applied discounts, promotional codes, surcharges, and any service fees associated with the purchase.
Timeline tab
The Timeline is a history of every transaction and modification made to a purchase. It gives you complete transparency into all the changes made to customer purchases, from the initial point of sale to the post-trip!
Transactions (charges and refunds) are recorded in the Timeline. Each record contains a timestamp and the name of the Xola user who made the change, making it easy to know who did what and when.
Communication tab
The Communications tab provides a complete history of all interactions between your team and the customer for this reservation, including emails and SMS messages sent through Xola and any replies from the guest.
The Email and/or SMS will show up in the message chain below.
- Customers' responses to emails will pass through Xola and be added to the message chain.
- Customer responses to text messages will not appear for you in Xola.
Messages that exceed 160 characters will be sent as 2 separate texts. If a customer calls the contact number from the SMS message, they will receive a recording that instructs them to contact the Company that they reserved with (you!). If you're interested in hearing that automated message, you can call 415-800-1140.
From this tab, you can also send a new email or SMS directly to the customer. Just click on the email or SMS button. Write the message and click the ![]() icon to send.
icon to send.
In most of the tabs you will notice ![]() icon on the bottom right, here you can modify the purchase by:
icon on the bottom right, here you can modify the purchase by:
- : Issue a full or partial refund to the customer, using the original payment method or another selected option. In the Mobile App, you have three methods available:
- Reduce Booking Value and Return Payment: This option reduces the customer's total purchase value and sends full or partial payment back to the customer.
- Return Payment Only: Returns payment to one customer in order to collect that money either in a new form of payment or from another paying customer. Using the Return Payment feature will always open a balance on the purchase for the amount returned.
- Change Guest Quantity: Reduces or increases guest count and gives you the option to refund the full or partial price of the ticket or collect the balance.
- : Add a custom charge to a purchase. Be sure to include a descriptive comment so it’s clear what the charge is for—this will appear under the payment summary for easy reference. You can specify whether or not the charge should include tax. After you’ve added the charge, simply click the green Collect Balance button to process the payment and finalize the transaction.
- : Remove or add codes to a purchase. To add a code, click on Add and enter the exact code and hit apply. To remove a code, simply click Remove next the code.
- : Change the reservation from Private to Shared or Shared to Private. (may not appear if you do not have Private/Shared event on for a product).
- : Change the arrival date or time for all or some of the reservations for this event.
- : Resend the confirmation email to the organizer.
- : Add an add-ons on a purchase. (may not appear if you do not have add-ons for a product)
- : Switch the experience with another experience. Click on the experience you want to change the customer into, then pick the date and time for the experience.
- : View or add any Event or Purchase Notes. If you need to edit or delete a note, simply click on the note and proceed with the action.
- : Change the demographics or guest count for a purchase. Use the + or - sign next to the demographics to change the guest counts.
- : Cancel a reservation. Once you cancel, you will not be able to modify the reservation any further. You can only resend email or add notes.
- : Rebook the organizer into another experience. The organizers details like name, email, phone number, and any credit card on file will be populated.
Inbox
Notifications
This queue serves as your central hub for important action notifications that require your attention, helping you stay on top of critical tasks without missing a beat.
Several types of notifications appear in this queue, including balance due alerts, pending purchases, and communications from your customers that need your prompt response.
Types of Purchases in the Pending Action Queue:
- Balance Due Purchase: A purchase with an open balance will remain in the Pending Action Queue until the balance has been fully collected. Click on the purchase to access the purchase detail page, and click on Collect Balance to settle up.
- Refund Due: A purchase with a refund due will remain in the Pending Action Queue until the refund has been given to the customer or a booking value is decreased. Click on the purchase to access the purchase detail page.
- Invoice Due Purchase: Like balance due and deposit purchases, purchases with open invoices will remain in the Pending Action Queue until the rest of the balance has been fully collected. Click on the purchase to access the purchase details, and click on Collect Balance to settle up.
- Pending Confirmation: If purchases for certain products are on manual acceptance or the trip minimum hasn't yet been met, they will remain in the Pending Action Queue until they are accepted or declined. From the Pending Action Queue, click on the purchase to access the purchase detail page, and then accept or decline the purchase.
- No-Shows: When a customer is marked as a No-Show and has a balance due, they are immediately sent into the Pending Action Queue. The purchase will remain here until the balance has been collected or until the customer has been booked into another experience.
- Deposit Purchase: Like balance-due purchases, purchases with open deposits will remain in the Pending Action Queue until the rest of the balance has been fully collected. Click on the purchase to access the purchase details, and click on Collect Balance to settle up.
-
Unread Messages: When a customer replies to any of the messages that are sent to them. If you click on the record, it will take you to the purchase to see the message, and you can respond to the customer from there.
Filtering
You can filter your pending action queue to show you the information you would like. For example to take a look at all of the reservations that have a balance due, you could sort the Pending Actions Queue by Balance Due. If you need to see who has not paid their invoice, you can sort by Invoice Due.
Announcements
Announcements are Xola’s way of keeping you in the loop about meaningful updates and essential news that impact your business. Here you’ll find notifications about newly released features, enhancements to the platform, upcoming product changes, service alerts, and proactive tips designed to help you get even more value from your Xola experience. We use Announcements to share anything we believe will boost your success or support your day-to-day operations—think of it as your direct line to everything happening at Xola. Check this section regularly to stay informed and empowered as you grow your business with us.
Settings
-1.png?width=265&height=590&name=Untitled%20design%20(6)-1.png)
Account
Tap on Account to change you password, or to log out of your Mobile App account.
Payment Hardware
Depending on certain features being enabled on your account, this is where you can configure and pair the Chipper BBPOS or M2 hardware so that you may take advantage of payments straight from your mobile device! You can even choose to use Tap to Pay feature to collect payment.
First choose your Payment Device Type:
- No payment device: Means you will collect credit card details manually.
- Bluetooth payment devices: Means you will use a Chipper BBPOS or M2 reader to collect payment from the guest.
- Tap-to-pay (phone): Means you will use the Tap-to-Pay feature to collect payment and no hardware device needed.
Bluetooth Payment Device Set Up:
- Power on the Bluetooth device.
- When ready to connect, the device’s light will flash blue every 1-3 seconds.
- You are now ready to pair the device.
- Under Payment Device Type, select Bluetooth payment device.
- Once the bluetooth device is discovered, the name of the device (ex: CHB000000000000) will be displayed under the Nearby Devices column.
- Tap the Connect button to the right of the device name.
- A Bluetooth Pairing Request message will appear; select Pair.
- A green message on your phone screen confirms the device is successfully connected.
- A yellow dot will be next to the Settings icon in the Xola Phone app until standby mode is activated.
- Once connected and ready the device status will be indicated by a green dot next to the Settings icon on the lower right corner of the app.
- Under Payment Device Type, select Bluetooth payment device.
If you successfully complete the above steps, you are now ready to take payments. A new payment option will be available when making a purchase in the back office.
On the payment screen, ensure the ![]() icon is selected as the Method. You will have 5 minutes to process a card. If it fails, you can try another card or use a different payment method. All purchases made via your Chip & Pin hardware will be tagged EMV.
icon is selected as the Method. You will have 5 minutes to process a card. If it fails, you can try another card or use a different payment method. All purchases made via your Chip & Pin hardware will be tagged EMV.
Note: Only one Payment device (such as the Chipper BBPOS or M2) can be paired and any given time to a device.
Tap-To-Pay Setup:
Use Tap-to-Pay on your phone with Near Field Communication (NFC) support to accept in-person contactless payments without additional payment hardware. Tap-to-Pay includes support for Visa Mastercard, American Express contactless cards, and NFC-based mobile wallets (Apple Pay, Google Pay, and Samsung Pay). Discover support is also included in the US only. To learn more click here.
Scan QR Code
Use the built-in QR Code scanning feature to check in guests quickly and efficiently. Simply tap the Scan QR Code button to activate your device’s camera. Ask your guests to present their confirmation email or ticket, either on their phone or printed, and point your camera at the QR code. The system will scan the code instantly, confirm the reservation, and update the guest's check-in status in real time. This seamless process not only speeds up guest entry but also ensures accurate records, helping you deliver a smooth start to every guest’s experience. To learn more click here.
Leave Feedback
Tap on Leave Feedback to leave the Xola product team direct feedback about the app.
About Tap to Pay
Tap on About Tap to Pay learn more about the Tap to Pay feature we offer on the Mobile App.
What the Reservationist Lite Role Can Do
When Reservationist Lites login into the Xola Mobile App, they will see the following:
Dashboard
The Dashboard Tab is your home base to see all Reserved or Available time slots for the day. From here you can also filter your views to include Availability, Products, Guides and Equipment!
At the top of your Dashboard you will see a ![]() icon. Clicking on this icon, will being up our redemption app, where you can scan the customers QR Code to check them in for an event.
icon. Clicking on this icon, will being up our redemption app, where you can scan the customers QR Code to check them in for an event.
Here is how the QR scanning works:
-
Tap Scan Code.
-
The app may ask for camera access - tap Allow.
-
-
Ask the guest to show their QR code from their phone or printed confirmation email.
-
Hover your phone over the QR code to scan.
Manually Look Up a Guest Without a QR Code
If a guest doesn't have access to their QR code or didn’t receive their confirmation email, you can still check them in manually:
-
On the main Screen, tap the Manual Lookup button at the bottom of the screen.
-
Enter the guest’s name, email, phone number or purchase ID to find their reservation.
-
Once located, tap into the reservation to view details and complete check-in just like you would after a QR scan.
This is a great fallback for guests who arrive without their confirmation or are unable to retrieve it on-site.
After Scanning a QR Code
Once a reservation is scanned, you’ll see a detailed view of the reservation with the following options:
-
Check In the reservation
-
Reject the check-in
Note: Rejecting a guest does not permanently block the check-in. You can still check them in later.
-
View Attendees’ Names
-
View Party Size & Check-In History
-
See Add-Ons Purchased
-
Unsigned Waivers (if applicable)
-
-
Tap the red Unsigned Waivers link to generate a QR code that guests can scan to complete their waiver. Once signed, waivers will automatically link to the reservation.
-
When done, tap Scan Now to scan the next guest, or return to the main menu.
If a Guest Is Late or Already Checked In
-
If a guest is late or early, Xola will alert you when you scan their code.
-
If a guest has already been checked in, you’ll see a message noting their prior check-in.
At the top of your Dashboard you will also see a ![]() icon, this is where you can leave us product feedback, that goes directly to Xola's product team to review!
icon, this is where you can leave us product feedback, that goes directly to Xola's product team to review!
Make a Purchase
Next to that you will see a green + Purchase button. Click the green + Purchase button and choose a product. A product can be an Experience, Package or Gift. Below are the details for making a purchase of an Experience.
Reservation Details
Once you select the product the customer wants to purchase, you'll be directed to the Product Details page, where you can enter the following:
- Privacy Settings: Choose whether the reservation is public or private if it is an experience with public and private options. If you do not have this option, the reservation will default to its privacy settings.
- Guest Quantity: Choose the number of guests attending the experience. If you have different demographic types, you can enter the number for each demographic.
- Availability: Choose the date and time in which the guests are coming for the experience. When choosing a new timeslot, you can also:
- Choose a date in the past by toggling on Show Past Availability.
- Add a Timeslot: If you need to add a timeslot, you can click on the '+add new timeslot' button. This will open up a new timeslot for all guest to reserve on.
- Add-ons: Choose which add-ons you would like to add to the reservation if you have add-ons set up.
-
Attendee Info:
The attendee info section will help your staff know who is coming for the experience, here you can:
- Fill out the name of each guest attending
- If using our waiver feature, as guests fill out the waivers, the names will automatically populate into this section on the Purchases Tab.
- The questionnaire answers if you are using this feature.
- If it is a per-person questionnaire, you can click on the icon next to each guest and fill out the questionnaire for each attendee.
- If it is per reservation, you can click on the icon next to the main attendee and fill out the questionnaire.
- If it is a per-person questionnaire, you can click on the
- If you want to skip this, you can toggle on the 'ignore questionnaire validation errors for now'
- Fill out the name of each guest attending
Purchase Details
After you have filled out the product details, you can choose to modify the purchase by clicking on the ![]() icon and choosing:
icon and choosing:
- Modify: Make changes to the reservation details you just entered.
- Taxes and Fees: Remove any taxes or fees you have set up.
You can not remove Xola's Service fee.
- Codes: Add a coupon or agent code. Click on Add Code and select the code you would like to use and click Apply Code.
- Custom Line Items: Click the Add Custom Line Item and you can create on-the-fly discounts or charges, which can be taxed if needed.
- Delete: Delete the item in the cart.
After this, you can choose to Add Another Item, or move to the next step. If you add another item, you will repeat the steps above.
Customer Details
Organizer is attending:- Toggled on: This means the organizer is attending, and the main attendee in the section will default to the organizer's name.
- Toggled off: This means the organizer is not attending. You can fill out the name of the main attendee so that your staff knows who will be attending the experience, in the attendee section from before.
Now you can enter the Organizer Details:
Tip: If you want to look up a past guest to book, click on the ![]() icon next to the Guest name to search for your guests. This will automatically populate the guest's name, email, and phone number. It will also automatically fill in credit card details if they have previously used a credit card.
icon next to the Guest name to search for your guests. This will automatically populate the guest's name, email, and phone number. It will also automatically fill in credit card details if they have previously used a credit card.
Payment Details
Next, choose your payment workflow:
- Now: Take immediate payment
- Later: This will reserve your customer's spot without collecting payment. When ready, you can find their purchase in the Purchases tab to collect the balance.
- Collect a Deposit: Take a small payment now, and choose a due date for the remaining balance later.
- Split Payment: Split the payment between multiple guests in the party.
If taking immediate payment, select the payment method:
- POS: Hardware paired to your device or Tap to Pay if set up. To learn more click here.
- Saved Credit Card: Any Card that is saved if you used the search customer function in the customer details section.
- New Credit Card: Manually enter new credit card details.
- Cash
- Check: If your customer is paying by check, we recommend noting the check number in the comment section.
- Invoice: This allows you to send your customer an Invoice for the purchase that can be paid at a different time.
- Other: This can be any third-party payment method your business accepts, like PayPal, Bitcoin, or Venmo.
Pro Tip: Notice the Do not charge card now toggle under the payment method section. This will store your customer's card information but will not charge the customer. You can later go into the customer purchase to collect the balance.
Internal Notes
Optionally add a Tag or internal note for your staff.
- Tag: A tag is a word or phrase added to a purchase that can be used for searching and filtering in the Purchases tab. When you type the tag into the search bar, it will bring up all purchases that have been tagged as such.
- Purchase Note: This will appear on the event's roster in the Purchase Notes section.
To complete the purchase, click Pay. After accepting payment, you will be taken to the Purchases tab page.
Dashboard Filters
You can filter your dashboard by date, reserved or available events, products, guides, equipment, and more! Simply click on the date picker to filter by any date.
Availability
Beside the date picker, you'll see four side-by-side buttons that let you filter the Dashboard based on the status of your events:
-
Reserved: Shows only events that have confirmed reservations.
-
Waitlist: Displays events where customers are currently on the waitlist.
-
Available: Highlights events that still have open spots for reservations.
-
All: Gives you a full view of every event—reserved and available.
Product, Equipment, and Guide Filters
Just beside the date picker, you’ll find filters to narrow down your view by product, guide, and equipment:
-
Products: Choose which products you want to display on the dashboard.
- Equipment: Show only equipment assigned to selected events, or exclude certain items as needed.
-
Guides: Filter events by specific guides to see who’s scheduled for what. even see what event have no guides assigned.
List View
The Dashboard List View will show you all your events in a vertically cascading list for any selected day. Under your filter options, the bar displays the date, day, and the number of available and reserved spots for the whole day.
Next, you can look at the individual events under the day. Here, you can see the time the event is taking place, the name of the product, and how many are available and reserved.
Depending on what features you have turned on in Xola, you may be able to see other options on your Dashboard like:
- Check-in: You can see how many guests are checked in for the event.
- Assign Guides: You can see who is assigned as a guide.
- Assign Equipment: You can see what equipment is assigned.
- Add-ons: You can see what add-ons you have for the event.
- Balance Due Icon: Easily see what events have reservations that have balance due to collect.
- Notes Icon : Easily see what events have notes on them.
- Private Reservation Icon : Easily see if a reservation is Private.
Now you can perform actions for the entire event and all associated reservations via the ![]() icon in List View.
icon in List View.
- Click icon to make a purchase for this event.
- Click icon to waitlist a group for this event, if no spots are available.
- Click icon to add, view or delete Event and Purchase Notes.
- Click icon to:
-
- Add Event Notes: Add, view or delete Event and Purchase Notes.
- Purchase: Make a purchase for this event.
- Waitlist: Waitlist a group for this event, if no spots are available.
- Change Arrival: Change the arrival date or time for all or some of the reservations for this event.
- Modify Schedule: Make changes to the experience schedule.
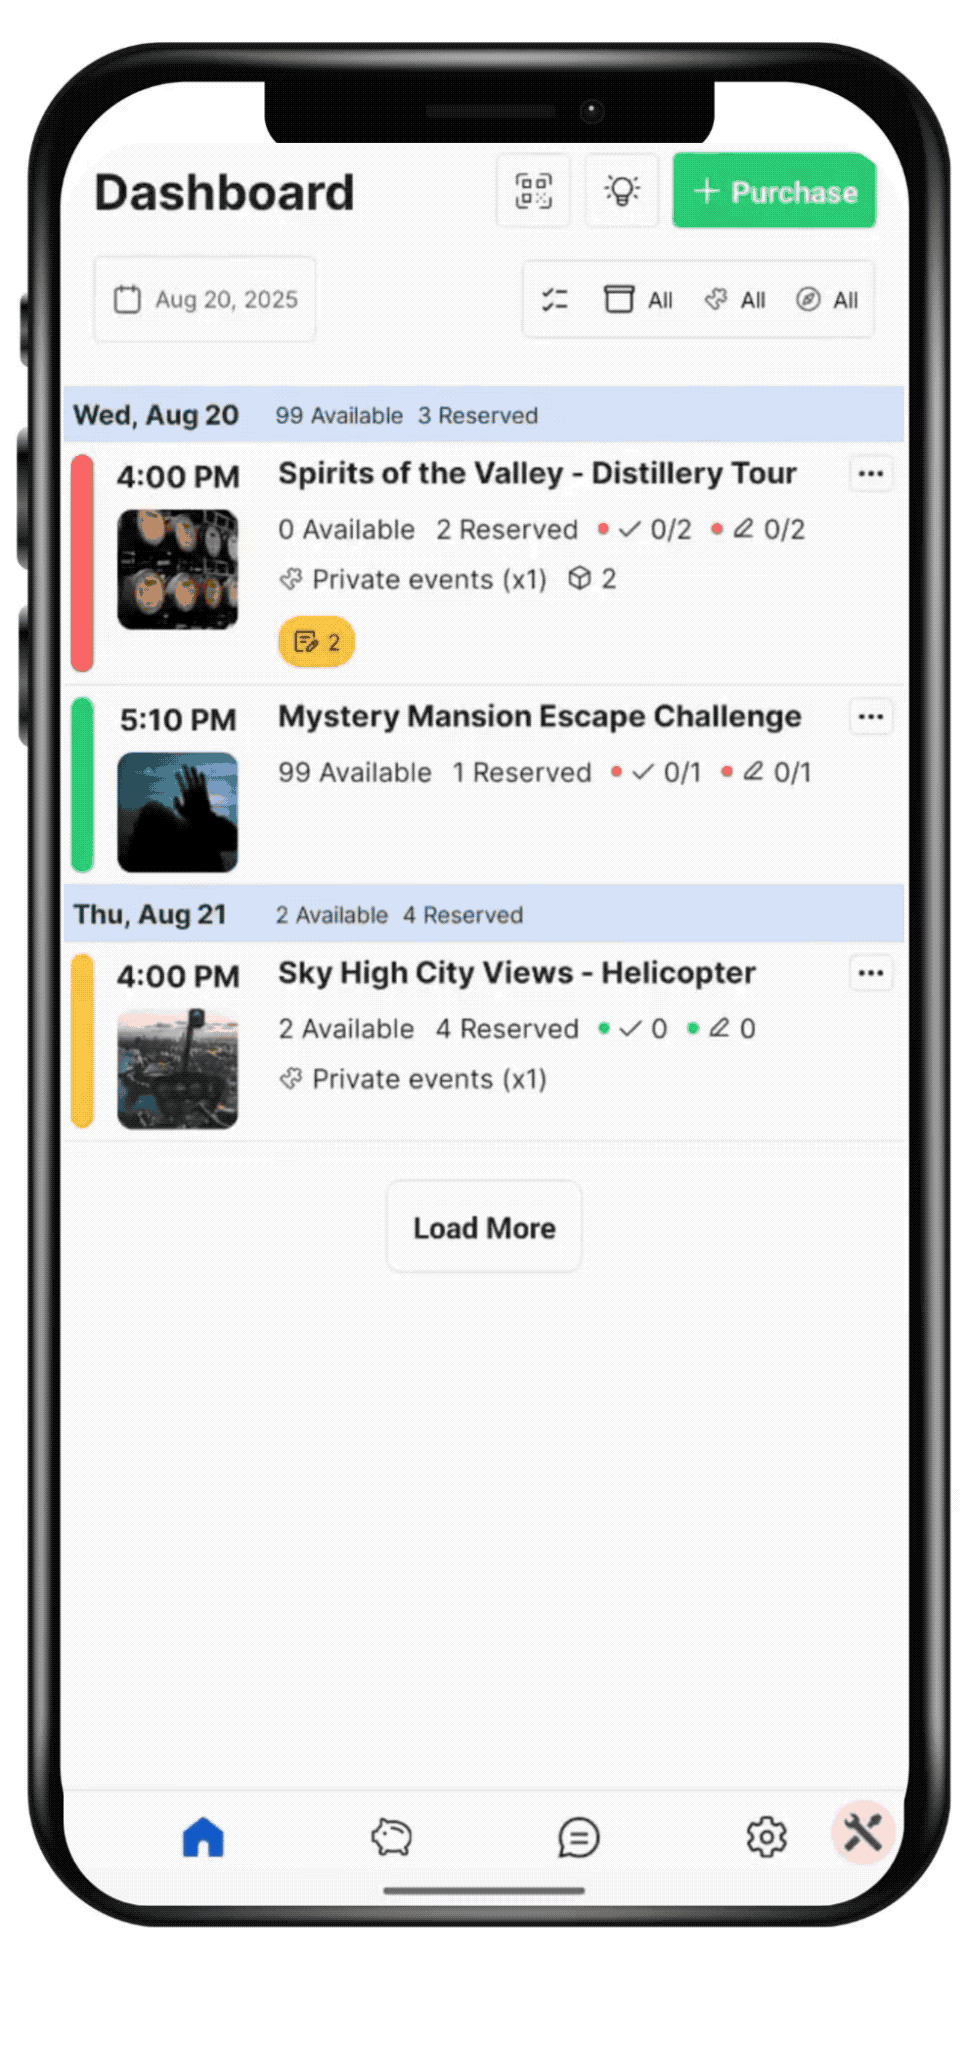
Roster
To view your roster from the dashboard, simply click on the timeslot. This will open the roster for you to view.
At the top of the roster, you will see a summary of the title of the experience, the date and time of the experience.
Next, click ![]() icon to:
icon to:
- Change Arrival: Change the arrival date or time for all or some of the reservations for this event.
- Add Event Notes: Add, view or delete Event and Purchase Notes.
- Purchase: Make a purchase for this event.
- Join Waitlist: Waitlist a group for this event, if no spots are available.
Next to that you will see a green + Purchase button. Click this to make a purchase for this event.
Under Reservation Items you will see Capacity for the event, how many guest are checked in or marked as a no show for the event, any add-ons purchased for the event, Pickup Locations, waivers signed, questionnaires, and all notes. You can also take the following actions by clicking on the item:
- Questionnaire: Click on Questionnaire, and you can view, add or edit any questionnaires that are with the group.
- Notes: Click on Notes, and you can view or edit any Event, Purchase or Customer Note. You can also add any Event notes, or delete any event or purchases notes from this page.
Next, you can see the Event Items, here you can see guides assigned, the equipment that is assigned.
Under this you will see the Guests list section of the Roster, here you can see each reservation that is attending this event.
You can sort the guests in this section by clicking on the ![]() icon. Here you can filter by:
icon. Here you can filter by:
-
By Organizer Name (A-Z)
- By Organizer Name (Z-A)
- By Purchase Date (Oldest First)
- By Purchase Date (Newest First)
You will also be able to:
- See the customers information, such as name, email and phone number.
- See the Demographics reserved
- You can also check in the whole group or mark them as a no-show.
- Mark as checked in: Click on the icon.
- Mark as No Show: Click on the icon
- Mark as checked in: Click on the
- Click on icon and you can link waivers if none are linked, or see which waivers are linked. You can click on the to unlink a waiver or icon to view the waiver.
- Click on icon , and you can view, add or edit any questionnaires that are with the group or on the guest level.
- Any balance dues show the icon.
- Click on the customers name, and you will be taken to the purchase section to review the purchase.
You will notice next to the waivers and questionnaire the ![]() icon, here you can take reservation actions such as:
icon, here you can take reservation actions such as:
- Go to the Reservation Screen: Takes you to the purchases tab and you can view all the reservation details in full.
- Message: Choose from a message template, or write your own email or SMS to send to all guests for this event.
- Add a Purchase Note: You can add any Purchase Notes.
- Change Arrival: Change the arrival date or time for this group.
- Modify Guests: Add or remove any guests from this reservation.
- Modify Add-ons: Add an add-ons on a purchase. (may not appear if you do not have add-ons for a product)
- Charge: Add a custom charge to a purchase. Be sure to include a descriptive comment so it’s clear what the charge is for—this will appear under the payment summary for easy reference. You can specify whether or not the charge should include tax. After you’ve added the charge, simply click the green Collect Balance button to process the payment and finalize the transaction.
- Switch Experience: Switch the experience with another experience. Click on the experience you want to change the customer into, then pick the date and time for the experience.
- Link Waiver: You can link waivers if none are linked, or see which waivers are linked.
If you want to take individual action on each guest click on the Show all guest under the group and then you can take individual actions on each guest in the group. Actions you can take are:
- Check in or Mark as no show
- : Make Waiver Corrections, Unlink Waiver, or Preview Waiver
- : Update or view Questionnaire answers
- : All reservation actions listed above.
.gif?width=271&height=590&name=Untitled%20design%20(14).gif)
Purchases
The Purchases Tab in Xola gives you a way to search for all customers' reservations, making it the command center for tracking and managing every transaction. Click on ![]() icon and you can pull up any purchase—past, present, or upcoming—using a wide range of filters such as customer name, email, phone number, tag or ID.
icon and you can pull up any purchase—past, present, or upcoming—using a wide range of filters such as customer name, email, phone number, tag or ID.
If you do not use the search function, all purchases appear on the screen in your Purchases tab, and is a scrollable library of all your customer purchases. It is sorted in order of most recent reservations, so your newest reservations are always located at the top. From here, you’ll see the customer name, the photo of the product purchased, the total amount of guests reserved, and the date and time of their experience, how much was paid and if there is a balance due or excess payment.
If you click on the purchase from this page, it will bring up the entire purchase details. Here you can see three different tabs:
Reservation tab:
Under the Reservation tab, you will see the customers name, phone number and email. Next you can see, the date and time of arrival, how much has been paid, the number of demographics reserved, and the confirmation ID.
You may see different purchase icons in this section. These icons can be:
![]() : This icon means the purchase has been canceled.
: This icon means the purchase has been canceled.
![]() : This icon means the purchase has not been accepted and is still pending. You can then accept or decline the pending reservation.
: This icon means the purchase has not been accepted and is still pending. You can then accept or decline the pending reservation.
![]() : This icon means there is a balance to collect from the customer. Click the balance due button to collect the balance.
: This icon means there is a balance to collect from the customer. Click the balance due button to collect the balance.
![]() : This icon means there is a refund that needs to be given to the customer. Reservationist Lite cannot refund customers.
: This icon means there is a refund that needs to be given to the customer. Reservationist Lite cannot refund customers.
![]() : This icon means the reservation is Private and no other groups will be on this event.
: This icon means the reservation is Private and no other groups will be on this event.
Scroll past this, and you can see how many waivers have been signed. Click on Waivers and you will get a list of those who have signed the waiver.
- You can also click on the icon on the bottom right and perform the following waiver actions:
- Link/Unlink waiver: Pick waivers to link or unlink manually.
- Sign Waiver: Allow guest to sign the waiver on your device. This waiver will be linked to the reservation.
Next, you can view any purchase notes that have been left on the reservation.
If you click on the Open Roster button, it will take you to the Roster for the event the customer is reserved for. This way, you can make any changes you need to the roster.
Under the Questionnaire section you can view the questionnaire answers, and make any changes to them. You can add questionnaire answers from guest if need by click on the Add button at the top.
Next is the tags, a tag is a word or phrase added to a purchase that can be used to search and filter in the Purchases tab. To add a tag to a purchase, in the Add tag field, type in your tag and hit enter.
Payment tab
See at a glance the full payment history for each reservation, including the total amount paid, all payment methods used, and any outstanding balances. The Payment tab also breaks down applied discounts, promotional codes, surcharges, and any service fees associated with the purchase.
Timeline tab
The Timeline is a history of every transaction and modification made to a purchase. It gives you complete transparency into all the changes made to customer purchases, from the initial point of sale to the post-trip!
Transactions (charges and refunds) are recorded in the Timeline. Each record contains a timestamp and the name of the Xola user who made the change, making it easy to know who did what and when.
Communication tab
The Communications tab provides a complete history of all interactions between your team and the customer for this reservation, including emails and SMS messages sent through Xola and any replies from the guest.
The Email and/or SMS will show up in the message chain below.
- Customers' responses to emails will pass through Xola and be added to the message chain.
- Customer responses to text messages will not appear for you in Xola.
Messages that exceed 160 characters will be sent as 2 separate texts. If a customer calls the contact number from the SMS message, they will receive a recording that instructs them to contact the Company that they reserved with (you!). If you're interested in hearing that automated message, you can call 415-800-1140.
From this tab, you can also send a new email or SMS directly to the customer. Just click on the email or SMS button. Write the message and click the ![]() icon to send.
icon to send.
In most of the tabs you will notice ![]() icon on the bottom right, here you can modify the purchase by:
icon on the bottom right, here you can modify the purchase by:
- : Add a custom charge to a purchase. Be sure to include a descriptive comment so it’s clear what the charge is for—this will appear under the payment summary for easy reference. You can specify whether or not the charge should include tax. After you’ve added the charge, simply click the green Collect Balance button to process the payment and finalize the transaction.
- : Remove or add codes to a purchase. To add a code, click on Add and enter the exact code and hit apply. To remove a code, simply click Remove next the code.
- : Change the reservation from Private to Shared or Shared to Private. (may not appear if you do not have Private/Shared event on for a product).
- : Change the arrival date or time for all or some of the reservations for this event.
- : Resend the confirmation email to the organizer.
- : Add an add-ons on a purchase. (may not appear if you do not have add-ons for a product)
- : Switch the experience with another experience. Click on the experience you want to change the customer into, then pick the date and time for the experience.
- : View or add any Event or Purchase Notes. If you need to edit or delete a note, simply click on the note and proceed with the action.
- : Change the demographics or guest count for a purchase. Use the + or - sign next to the demographics to change the guest counts.
- : Cancel a reservation. Once you cancel, you will not be able to modify the reservation any further. You can only resend email or add notes.
- : Rebook the organizer into another experience. The organizers details like name, email, phone number, and any credit card on file will be populated.

Inbox
Notifications
This queue serves as your central hub for important action notifications that require your attention, helping you stay on top of critical tasks without missing a beat.
- Balance Due Purchase: A purchase with an open balance will remain in the Pending Action Queue until the balance has been fully collected. Click on the purchase to access the purchase detail page, and click on Collect Balance to settle up.

Announcements
Announcements are Xola’s way of keeping you in the loop about meaningful updates and essential news that impact your business. Here you’ll find notifications about newly released features, enhancements to the platform, upcoming product changes, service alerts, and proactive tips designed to help you get even more value from your Xola experience. We use Announcements to share anything we believe will boost your success or support your day-to-day operations—think of it as your direct line to everything happening at Xola. Check this section regularly to stay informed and empowered as you grow your business with us.
Settings
Account
Tap on Account to change you password, or to log out of your Mobile App account.
Payment Hardware
Depending on certain features being enabled on your account, this is where you can configure and pair the Chipper BBPOS or M2 hardware so that you may take advantage of payments straight from your mobile device! You can even choose to use Tap to Pay feature to collect payment.
First choose your Payment Device Type:
- No payment device: Means you will collect credit card details manually.
- Bluetooth payment devices: Means you will use a Chipper BBPOS or M2 reader to collect payment from the guest.
- Tap-to-pay (phone): Means you will use the Tap-to-Pay feature to collect payment and no hardware device needed.
Bluetooth Payment Device Set Up:
- Power on the Bluetooth device.
- When ready to connect, the device’s light will flash blue every 1-3 seconds.
- You are now ready to pair the device.
- Under Payment Device Type, select Bluetooth payment device.
- Once the bluetooth device is discovered, the name of the device (ex: CHB000000000000) will be displayed under the Nearby Devices column.
- Tap the Connect button to the right of the device name.
- A Bluetooth Pairing Request message will appear; select Pair.
- A green message on your phone screen confirms the device is successfully connected.
- A yellow dot will be next to the Settings icon in the Xola Phone app until standby mode is activated.
- Once connected and ready the device status will be indicated by a green dot next to the Settings icon on the lower right corner of the app.
- Under Payment Device Type, select Bluetooth payment device.
If you successfully complete the above steps, you are now ready to take payments. A new payment option will be available when making a purchase in the back office.
On the payment screen, ensure the ![]() icon is selected as the Method. You will have 5 minutes to process a card. If it fails, you can try another card or use a different payment method. All purchases made via your Chip & Pin hardware will be tagged EMV.
icon is selected as the Method. You will have 5 minutes to process a card. If it fails, you can try another card or use a different payment method. All purchases made via your Chip & Pin hardware will be tagged EMV.
Note: Only one Payment device (such as the Chipper BBPOS or M2) can be paired and any given time to a device.
Tap-To-Pay Setup:
Use Tap-to-Pay on your phone with Near Field Communication (NFC) support to accept in-person contactless payments without additional payment hardware. Tap-to-Pay includes support for Visa Mastercard, American Express contactless cards, and NFC-based mobile wallets (Apple Pay, Google Pay, and Samsung Pay). Discover support is also included in the US only. To learn more click here.
Scan QR Code
Use the built-in QR Code scanning feature to check in guests quickly and efficiently. Simply tap the Scan QR Code button to activate your device’s camera. Ask your guests to present their confirmation email or ticket, either on their phone or printed, and point your camera at the QR code. The system will scan the code instantly, confirm the reservation, and update the guest's check-in status in real time. This seamless process not only speeds up guest entry but also ensures accurate records, helping you deliver a smooth start to every guest’s experience. To learn more click here.
Leave Feedback
Tap on Leave Feedback to leave the Xola product team direct feedback about the app.
About Tap to Pay
Tap on About Tap to Pay learn more about the Tap to Pay feature we offer on the Mobile App.
What the Accountant Role Can Do
When Accountants login into the Xola Mobile App, they will see the following:
Analytics
The Transactions Analytics Report in Xola offers a clear view of your financial performance by bringing revenue and transaction data together in one place. Use it to quickly see business trends, track daily operations, and analyze transactions. The Customer Analytics report shows how many customers made purchases during a specific date range and highlights engagement patterns by product, day, or season.
Use the filters at the top to customize your view:
- Transactions: Give you data on each transaction for the given date range chosen.
- Customers: Gives you data on the customers for the given date range chosen.
Transactions:
-
- Date Range: Choose a date range by which to filter.
- Listing Filter: Filter transactions based on the Products that you offer.
- Recognized Earnings vs Cash Flow Filter: Use this filter option to toggle between Recognized Earnings and Cash Flow. By default, the Analytics report will always be set to Cash Flow. Here's what each term means:
- Recognized Earnings: This view shows revenue earned based on when the service (such as a tour or activity) was delivered. It aligns with accrual accounting principles and is helpful when you want to match revenue to the date the experience occurred, not when the payment was received.
- Cash Flow: This view displays revenue based on when the payment was received, regardless of when the service was provided. It reflects actual money movement in and out of your business.
Understanding the Chart View
The Chart View in the Analytics Transaction Report provides a visual overview of your business performance over a selected date range. It lets you quickly spot trends and patterns in your revenue, helping you make informed decisions.
At the top of the Chart View, you'll see a line graph that tracks revenue activity over time. Spikes in the graph typically represent periods of high transaction volume or increased sales, giving you a clear picture of when your business was most active.
Beneath the graph, you'll find a summary of your key financial figures for the selected period:
- Transactions: Total number of completed transactions
- Charges: Total amount charged to customers
- Refunds: Total amount refunded
- Collected: Charges minus refunds
- Credit Card Fees (CC Fees): Processing fees incurred from your payment processor
- Partner Fees: Total Xola service fees assessed on purchases
Note: If your guests pay the Xola Service Fee, this amount may not be visible.
- Taxes and Fees: Total taxes and additional fees collected
Note: This does not include the Xola Service Fee.
- Income: Total earnings after deductions
(Collections – Credit Card Fees – Service Fees – Taxes and Fees)
These metrics update automatically based on the filters and date range you select.
Below the financial summary, you'll see three donut charts that provide a breakdown of:
- Payment Methods — How customers paid (e.g., credit card, cash, check)
- Channels — Where purchases were made (e.g., Back Office, Checkout, Kiosk)
- Listings — Performance of each product or experience
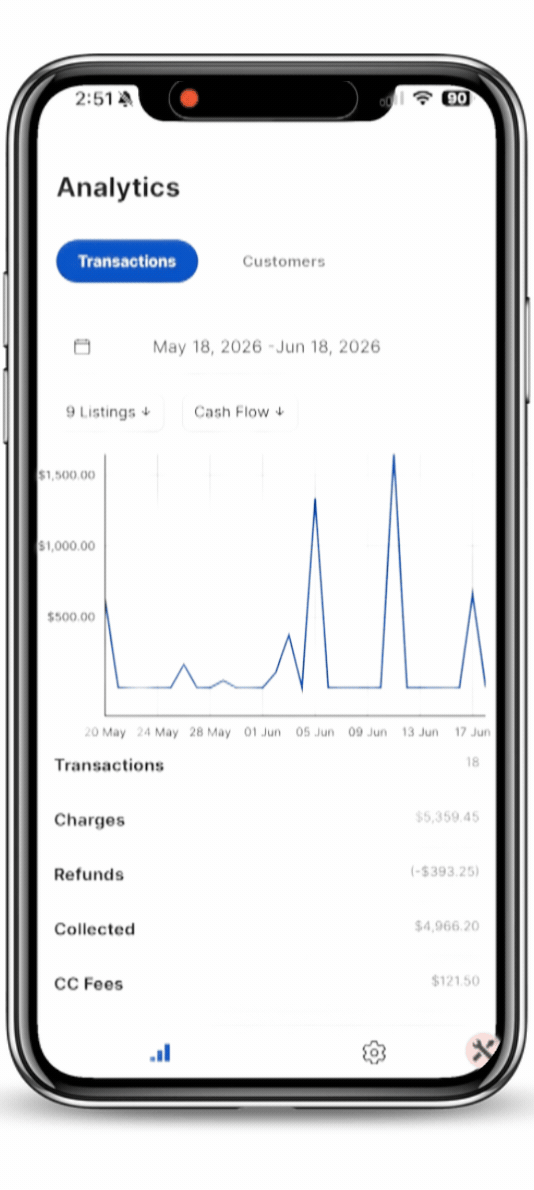
Customers:
- Use the filters at the top of the report to narrow down your view:
- Date Range: When choosing a date range, there are two options available:
- Date of Purchase: This will show how many customers made a purchase for an experience within the selected date range.
- Date of Event: This will show how many customers are booked for an event that occurs within the selected date range. Using this filter will allow you to choose date ranges that span into the future.
- Listings: You can filter the report by products, with a specific focus on experiences. If 8 or fewer experiences are selected, the chart will display individual bars for each product. Hovering over these bars will provide a breakdown of the total customer count for both the individual product and for the entire day.
- Date Range: When choosing a date range, there are two options available:
Bar Chart with Customer Breakdown
- Quantity: How many customers total
- Date: The date of the Purchase or Event
Additional Charts Below the Chart
- Demographics: Shows the percentage of each demographic group across all purchases within the selected date range.
- Listings: Displays the total number of reservations made for each experience within the selected date range.
.gif?width=247&height=550&name=download%20(1).gif)
Settings
-1.jpg?width=247&height=550&name=Untitled%20design%20(1)-1.jpg)
Account
Tap on Account to change you password, or to log out of your Mobile App account.
Leave Feedback
Tap on Leave Feedback to leave the Xola product team direct feedback about the app.
About Tap to Pay
Tap on About Tap to Pay learn more about the Tap to Pay feature we offer on the Mobile App.
What the Guide Manager Role Can Do
When Guide Managers login into the Xola Mobile App, they will see the following:
.png?width=279&height=590&name=Untitled%20design%20(9).png)
Dashboard
The Dashboard Tab is your home base to see all Reserved or Available time slots for the day. From here you can also filter your views to include Availability, Products, Guides, and more!
At the top of your Dashboard you will see a ![]() icon, this is where you can leave us product feedback, that goes directly to Xola's product team to review!
icon, this is where you can leave us product feedback, that goes directly to Xola's product team to review!
Filters
You can filter your dashboard by date, reserved or available events, products, guides, equipment, and more! Simply click on the date picker to filter by any date.

Availability
Beside the date picker, you'll see four side-by-side buttons that let you filter the Dashboard based on the status of your events:
-
Reserved: Shows only events that have confirmed reservations.
-
Waitlist: Displays events where customers are currently on the waitlist.
-
Available: Highlights events that still have open spots for reservations.
-
All: Gives you a full view of every event—reserved and available.
Product, Equipment, and Guide Filters
Just beside the date picker, you’ll find filters to narrow down your view by product, guide, and equipment:
-
Products: Choose which products you want to display on the dashboard.
-
Guides: Filter events by specific guides to see who’s scheduled for what. even see what event have no guides assigned.
-
Equipment: Show only equipment assigned to selected events, or exclude certain items as needed.
List View
The Dashboard List View will show you all your events in a vertically cascading list for any selected day. Under your filter options, the bar displays the date, day, and the number of available and reserved spots for the whole day.
Next, you can look at the individual events under the day. Here, you can see the time the event is taking place, the name of the product, and how many are available and reserved.
Depending on what features you have turned on in Xola, you may be able to see other options on your Dashboard like:
- Check-in: You can see how many guests are checked in for the event.
- Assign Guides: You can see who is assigned as a guide.
- Assign Equipment: You can see what equipment is assigned.
- Add-ons: You can see what add-ons you have for the event.
- Balance Due Icon: Easily see what events have reservations that have balance due to collect.
- Notes Icon : Easily see what events have notes on them.
- Private Reservation Icon : Easily see if a reservation is Private.

Now you can perform actions for the entire event and all associated reservations via the ![]() icon in List View. Next, click Manage in the top right. Here, you can:
icon in List View. Next, click Manage in the top right. Here, you can:
- Assign Guides: Assign one or more available guides to the event
- Unassign Guides: Remove all assigned guides from the event

Roster
-1.png?width=279&height=622&name=Untitled%20design%20(4)-1.png)
To view your roster from the dashboard, simply click on the timeslot. This will open the roster for you to view.
At the top of the roster, you will see a summary of the title of the experience, the date and time of the experience.
Under Reservation Items you will see Capacity for the event, how many guest are checked in or marked as a no show for the event, any add-ons purchased for the event, Pickup Locations, waivers signed, questionnaires, and all notes. You can also take the following actions by clicking on the item:
- Questionnaire: Click on Questionnaire, and you can view any questionnaires that are with the group.
- Notes: Click on Notes, and you can view any Event, Purchase or Customer Note.
Next, you can see the Event Items, here you can see guides assigned, the equipment that is assigned. You can also take the following actions from clicking on the item:
- Assigning or unassigning guides: Click on Guides, and then click on the guide you want to assign on unassign, and click close.
Under this you will see the Guests list section of the Roster, here you can see each reservation that is attending this event.
You can sort the guests in this section by clicking on the ![]() icon. Here you can filter by:
icon. Here you can filter by:
-
By Organizer Name (A-Z)
- By Organizer Name (Z-A)
- By Purchase Date (Oldest First)
- By Purchase Date (Newest First)
You will also be able to:
- See the customers information, such as name, email and phone number.
- See the Demographics reserved
- See if groups are checked in or marked as a no show. You cannot check in or mark groups as a no-show.
- Click on icon and you can view who has signed the waivers. You cannot link waivers if none are linked, or preview waivers that are linked, but you can see the icon or icon.
You may see a warning message saying Forbidden or Access Denied, this just means you have view only access, and cannot make the changes you are trying to make.
.gif?width=271&height=590&name=Untitled%20design%20(15).gif)
Settings
-1.png?width=265&height=590&name=Untitled%20design%20(7)-1.png)
Account
Tap on Account to change you password, or to log out of your Mobile App account.
Leave Feedback
Tap on Leave Feedback to leave the Xola product team direct feedback about the app.
About Tap to Pay
Tap on About Tap to Pay learn more about the Tap to Pay feature we offer on the Mobile App.
What the Guide Role Can Do
Guides will only see events they are assigned to.
When Guides login into the Xola Mobile App, they will see the following:
.png?width=279&height=590&name=Untitled%20design%20(11).png)
Dashboard
The Dashboard Tab is your home base to see all Reserved or Available time slots for the day. From here you can also filter your views to include Availability, Products, and Equipment!
At the top of your Dashboard you will see a ![]() icon. Clicking on this icon, will being up our redemption app, where you can scan the customers QR Code to check them in for an event.
icon. Clicking on this icon, will being up our redemption app, where you can scan the customers QR Code to check them in for an event.
Here is how the QR scanning works:
-
Tap Scan Code.
-
The app may ask for camera access - tap Allow.
-
-
Ask the guest to show their QR code from their phone or printed confirmation email.
-
Hover your phone over the QR code to scan.
Manually Look Up a Guest Without a QR Code
If a guest doesn't have access to their QR code or didn’t receive their confirmation email, you can still check them in manually:
-
On the main Screen, tap the Manual Lookup button at the bottom of the screen.
-
Enter the guest’s name, email, phone number or purchase ID to find their reservation.
-
Once located, tap into the reservation to view details and complete check-in just like you would after a QR scan.
This is a great fallback for guests who arrive without their confirmation or are unable to retrieve it on-site.
After Scanning a QR Code
Once a reservation is scanned, you’ll see a detailed view of the reservation with the following options:
-
Check In the reservation
-
Reject the check-in
Note: Rejecting a guest does not permanently block the check-in. You can still check them in later.
-
View Attendees’ Names
-
View Party Size & Check-In History
-
See Add-Ons Purchased
-
Unsigned Waivers (if applicable)
-
-
Tap the red Unsigned Waivers link to generate a QR code that guests can scan to complete their waiver. Once signed, waivers will automatically link to the reservation.
-
When done, tap Scan Now to scan the next guest, or return to the main menu.
If a Guest Is Late or Already Checked In
-
If a guest is late or early, Xola will alert you when you scan their code.
-
If a guest has already been checked in, you’ll see a message noting their prior check-in.
At the top of your Dashboard you will also see a ![]() icon, this is where you can leave us product feedback, that goes directly to Xola's product team to review!
icon, this is where you can leave us product feedback, that goes directly to Xola's product team to review!
Filters
You can filter your dashboard by date, reserved or available events, products, and equipment. Simply click on the date picker to filter by any date.

Availability
Beside the date picker, you'll see three side-by-side buttons that let you filter the Dashboard based on the status of your events:
-
Reserved: Shows only events that have confirmed reservations.
- All: Gives you a full view of every event—reserved and available.
Product and Equipment Filters
Just beside the date picker, you’ll find filters to narrow down your view by product and equipment:
-
Products: Choose which products you want to display on the dashboard.
-
Equipment: Show only equipment assigned to selected events, or exclude certain items as needed.
.2025-08-18%2012_31_50.gif?width=279&height=590&name=Untitled%20design%20(6).2025-08-18%2012_31_50.gif)
List View
The Dashboard List View will show you all your events in a vertically cascading list for any selected day. Under your filter options, the bar displays the date, day, and the number of available and reserved spots for the whole day.
Next, you can look at the individual events under the day. Here, you can see the time the event is taking place, the name of the product, and how many are available and reserved.
Depending on what features you have turned on in Xola, you may be able to see other options on your Dashboard like:
- Check-in: You can see how many guests are checked in for the event.
- Assign Guides: You can see who is assigned as a guide.
- Assign Equipment: You can see what equipment is assigned.
- Add-ons: You can see what add-ons you have for the event.
- Balance Due Icon: Easily see what events have reservations that have balance due to collect.
- Notes Icon : Easily see what events have notes on them.
- Private Reservation Icon : Easily see if a reservation is Private.

Now you can perform actions for the entire event and all associated reservations via the ![]() icon in List View. Next, click
icon in List View. Next, click ![]() icon. Here, you can:
icon. Here, you can:
- Event Notes: View Event and Purchase notes, or Add Event Notes.
.2025-08-18%2012_53_02.gif?width=279&height=590&name=Untitled%20design%20(7).2025-08-18%2012_53_02.gif)
Roster
.png?width=279&height=622&name=Untitled%20design%20(1).png)
To view your roster from the dashboard, simply click on the timeslot. This will open the roster for you to view.
At the top of the roster, you will see a summary of the title of the experience, the date and time of the experience.
Next, click ![]() icon to:
icon to:
- Add Event Notes: Add, view or delete Event Notes.
Under Reservation Items you will see Capacity for the event, how many guest are checked in or marked as a no show for the event, any add-ons purchased for the event, Pickup Locations, waivers signed, questionnaires, and all notes. You can also take the following actions by clicking on the item:
- Questionnaire: Click on Questionnaire, and you can view any questionnaires that are with the group.
- Notes: Click on Notes, and you can view any Event, Purchase or Customer Note.
Next, you can see the Event Items, here you can see guides assigned, the equipment that is assigned.
Under this you will see the Guests list section of the Roster, here you can see each reservation that is attending this event.
You can sort the guests in this section by clicking on the ![]() icon. Here you can filter by:
icon. Here you can filter by:
-
By Organizer Name (A-Z)
- By Organizer Name (Z-A)
- By Purchase Date (Oldest First)
- By Purchase Date (Newest First)
You will also be able to:
- See the customers information, such as name, email and phone number.
- See the Demographics reserved
- You can also check in the whole group or mark them as a no-show.
- Mark as checked in: Click on the icon.
- Mark as No Show: Click on the icon
- Mark as checked in: Click on the
- Click on icon and you can view who has signed the waivers. You can link waivers if none are linked by clicking on link waivers, and preview waivers that are linked by clicking on theicon. You cannot unlink waiver by clicking on the icon.
-
If you want to take individual action on each guest click on the Show all guest under the group and then you can take individual actions on each guest in the group. Actions you can take are:
- Check in or mark as no show
You may see a warning message saying Forbidden or Access Denied, this just means you have view only access, and cannot make the changes you are trying to make.
.gif?width=271&height=590&name=Untitled%20design%20(16).gif)
Settings
Account
Tap on Account to change you password, or to log out of your Mobile App account.
Scan QR Code
Tap on to scan a QR code form the quest. To learn more on how this works, click here.
Leave Feedback
Tap on Leave Feedback to leave the Xola product team direct feedback about the app.
About Tap to Pay
Tap on About Tap to Pay learn more about the Tap to Pay feature we offer on the Mobile App.
What the Curator Role Can Do
When Curators login into the Xola Mobile App, they will see the following:
-1.png?width=265&height=590&name=Untitled%20design%20(8)-1.png)
Settings
Account
Tap on Account to change you password, or to log out of your Mobile App account.
Leave Feedback
Tap on Leave Feedback to leave the Xola product team direct feedback about the app.
About Tap to Pay
Tap on About Tap to Pay learn more about the Tap to Pay feature we offer on the Mobile App.
Listings
Tap on Listings to create and modify global blackout schedules, or experience schedules.
Global Listing Settings:
Under this section you can create and modify Global Blackout Dates
- To create a new blackout schedule, hit Add New
- Name: Name this schedule so you can easily identify it.
- Repeats
- Weekly: The schedule you create will repeat each week on your calendar. Select or deselect individual weekdays under Repeat on. Selected days have a blue checkmark.
- Specific Dates: This allows you to hand-select individual days to which this schedule will apply.Click on the Add new under Dates to select the days on a calendar.
- Time Ranges: Select the time range in which the Blackout Dates will close off availability.
Note: Events with active reservations in this blackout schedule will be retained.
After creating your blackout schedules, you can edit them by clicking the name or delete them by selecting the schedule and hitting the red Delete button at the top. Additionally, you can see the schedules that are active or inactive .
Listings:
Under this section you can create and modify individual experience schedules:
- Click on an experience
- Click on Description
- Click on Schedules
- To create the times that your experience is open or blackout for your customer, click Add New at the top of the page.
- In the window that opens, enter Schedule Details:
- Name: Name this schedule so you can easily identify it.
- Availability:
- Open: This is available timeslots for your customer to make reservations on.
- Blackout: This is unavailable timeslots, that will block your customer from making reservations.
-
- Repeats
- Weekly: The schedule you create will repeat each week on your calendar. Select or deselect individual weekdays under Repeat on. Selected days have a blue checkmark.
- Specific Dates: This allows you to hand-select individual days to which this schedule will apply.Click on the Add new under Dates to select the days on a calendar.
- Repeats
-
- Time Slots
- This is where you will choose the start times that can be booked for this experience. You can create as many time slots as you would like. When one gets booked, Xola will automatically check your availability for the rest of the day and adjust your schedule accordingly.
- If your experience does not have set start times, toggle on No Fixed Times. Your customers will select a date at checkout and no time.
- Price Variation
- Here, you can designate if there is a difference in price for this particular schedule.
- Time Slots
Days and times that have been designated as Blackout Schedules will not show any availability on your website or in the back office for your staff.
After creating your schedules, you can edit them by clicking the name or delete them by selecting the schedule and hitting the red Delete button at the top. Additionally, you can see the schedules that are active or inactive .