Xola’s Membership Passes give you a powerful way to drive customer loyalty and create exclusive experiences with flexible, customizable membership programs. With Membership Passes, you can let customers buy a membership directly online, unlocking perks like percentage or dollar-amount discounts, priority or members-only access to certain tours, and other unique benefits. Passes can be tailored to suit your exact needs—set up a single-use or reusable membership code, determine which tours or products it applies to, and control who can use it and when.
After purchase, each customer receives a dedicated membership code for simple redemption during future checkouts. You’re in control of every parameter: define seasonal or calendar-based availability, limit redemption to a fixed number of uses, or restrict access to specific products. Blackout dates and expiration controls ensure each pass works exactly as intended, whether you’re running a limited-time special or a year-round VIP club.
Membership Passes aren’t just about rewarding loyal guests—they’re a strategic tool for increasing repeat business, encouraging larger reservations, and giving you the flexibility to experiment with new membership models or exclusive offers. Ultimately, they help you cultivate a repeat audience, strengthen your brand, and add a new revenue stream—all managed effortlessly from your Xola dashboard.
User Access: Administrator or Curator roles have access to set up and manage memberships in Xola.
Administrator, Reservationist Lite or Reservationist roles can make, view, and modify membership reservations in Xola.
Equipment Manager, Guide Manager or Guide roles can only view membership reservations on the Roster.
Accountant roles can access the membership report in Custom Reports.
To grant access to users, click here.
What's covered in this article:
- How to enable Membership Passes
- How to create a Membership Pass
- How to purchase a Membership Pass
- How to Manage Membership Purchases
- How to make a reservation with a Membership Pass
- Communications
- Membership Report
How to enable Membership Passes
- Log into your Xola account.
- Go to App Store.
- Find Membership > Click Install.
How to create a Membership Pass
Once enabled, head to Products > Memberships, then click the Create Membership button to get started.
Description
-
Name: The name of the pass (displayed in checkout and emails).
-
Description: What the pass offers.
-
Price: Set the cost.
-
Refund Policy: Let customers know your terms upfront. (optional)
-
Meeting Location: Let guests know where to show up. (optional)

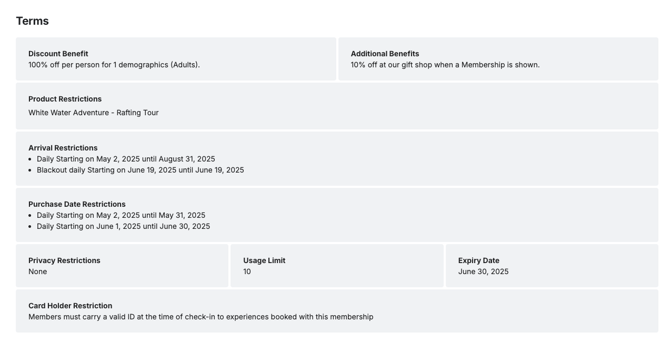
Benefits
-
Discount: Toggle on to apply a dollar or percentage discount.
-
Choose per person or per reservation.
-
If per person: Select which demographics it applies to and how many guests it applies to (limited or unlimited).
-
-
Additional Benefits: List perks like gift shop discounts or exclusive access.

Restrictions
Control when and how the membership code can be used:
Purchase Window
- Limits the dates on which this code can be applied to a purchase.
Example: You want the membership code to be redeemed only during November. Once November ends, you don't want customers to be able to use the code anymore. Here, you would set your start date to November 1 and your end date to November 30.
- Blackout dates: By adding a blackout date, you can specify the dates and times when the code cannot be redeemed.
Arrival Window
- Limits the start date and start time of the events to which this code can be applied.
Example: You want to incentivize customers to reserve trips that occur next summer, so you would set your start date to 1 June and your end date to 31 August. You can specify further by placing restrictions on which day of the week and time of day your code can apply to.
- Blackout dates: By adding a blackout date, you can specify event start dates and times when the code cannot be redeemed.
- Expiry: You are required to set an expiration for your membership pass. It can be 30 days or 365 days, whatever you choose. This pass will expire x days from the day the customer purchases it.
Products
- Select if you would like this code to be applicable to all products, or select individual ones.
- Click the
 icon to choose which products you want the membership code to apply to.
 - Event Type: Toggle which event types you would like the membership to apply to.
Usage Limitation
- Select if you would like to limit the number of reservations that can be made with the membership pass.
- Usage Limit Per Pass
- By toggling on, you define the usage limit, which represents the maximum number of times each code in your membership pass can be utilized.
- Toggling off allows for unlimited usage, permitting the code to be used repeatedly until it expires.
- Member Restriction
- If this is toggled on, the organizer's ID must be validated at check-in ( if the experience supports the check-in concept). The Person checking in the guest will be prompted to check the ID.

Photo
- As part of creating your membership pass, you will need to upload photos. The photo you choose as your Primary Photo will appear as the thumbnail image in the back office. During online checkout, this Primary Photo will be displayed on the checkout page and in your shopping cart images.
- Click the Upload Image button to add photos to your membership. Each membership can have a maximum of 10 .jpg and .png images, each with a maximum size of 5 MB.
Note: Recommended size for the image is 1024x768.

Questionnaire
Questionnaires let you collect additional details from your customers after they complete checkout. The content of each questionnaire is fully customizable.
You can configure questionnaires at two levels:
-
Global level: Applies across all memberships.
- To configure questionnaires globally, go to Products > Membership > Global Setting.
-
Membership level: Override the global settings for a specific membership.
-
To configure a questionnaire for a specific membership:
-
Go to Products > Memberships and open the membership.
-
Click the Questionnaire tab on the left.
-
Toggle on Override global questionnaire to customize it for that membership.
-
-
On either level you will have the following options for the questionnaire:
Note: To skip the questionnaire by default when making a purchase in the back office, toggle on Skip required field validations for back office purchases.
- Click on the +Add New Question button.
Predefined Questions
- There are predefined questions you can choose from to build your questionnaire that cover a variety of general themes like Date of Birth, Medical Conditions, Addresses, Marketing Consent, etc.
- When customizing the question, you can add additional content, a link, and even change the question response type (e.g., from short text to dropdown items).
- Settings
-
- Required: Required for guest to fill out.
- Ask Only Purchaser: Only the organizer (person who is making the reservation), is asked the question.
Custom Questions
- There are custom questions you can create, such as:
- Short text: The customer types in response.
- Long Text: The customer types in response.
- Checkbox: The customer checks a box.
- Dropdown: Create and edit your own dropdown menu for customers to choose from.
Dropdown should not exceed 110 characters; if you exceed this, the characters will be cut off.
- When customizing the question, you can add additional content, a link, and even change the question response type (e.g., from short text to dropdown items).
- Settings
- Required: Required for guest to fill out.
- Ask Only Purchaser: Only the organizer (person who is making the reservation), is asked the question.
Adding Taxes & Fees
- Go to Settings > Taxes & Fees.
- Click +Add.
- Set the name, type (flat $ or %).
- Select Membership Pass by clicking on the
 icon next to the Memberships.
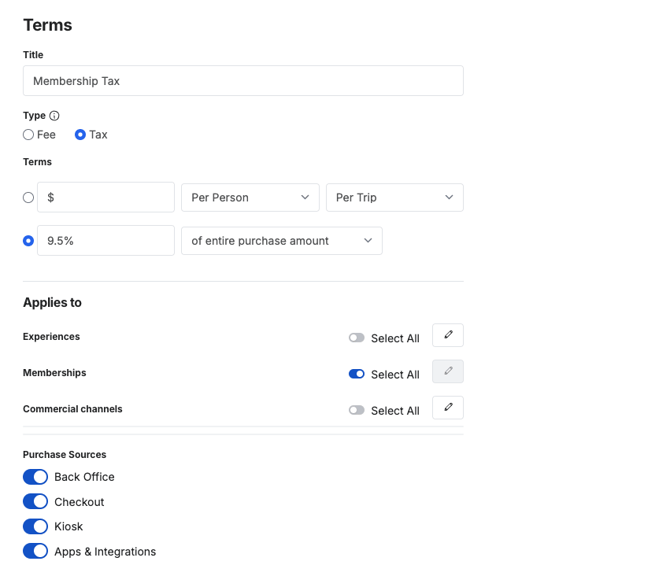
Toggle off Select All by Experiences to ensure this tax isn't applied to the experiences.
How to Manage Existing Memberships
Once you’ve created a Membership, you can manage it by navigating to Products > Memberships. Here, you'll find tools to edit, preview, add photos, or delete the Membership. Below are the available actions:
-
Edit: Hover over the Membership and click the Edit button to make changes.
- Click on the
 icons for the following:
-
Photo: Click on this to add or manage photos on this membership.
-
Preview Checkout: See a preview of the Membership checkout in a new window, based on your checkout preferences.
-
Delete: This permanently removes the Membership from your Xola account. However, if the Membership has existing purchases, they will remain visible in your reports.
-
How to purchase a Membership Pass
Back office
Click the green Purchase button from the Dashboard or Purchases tab and choose the membership pass under the Membership section. Once you select the Membership Pass the customer would like, this will take you to the Reservation page.
Membership Details
- Enter the number of Passes.
- Review the Membership Benefits.
Organizer Details
If you want to look up a past customer to purchase the membership, click on the Search Customer button next to the customer's name to search for your customer. This will automatically populate the customer's name, email, and phone number. It will also automatically fill in credit card details if the customer has previously used a credit card.
- Customer Name
- Customer Email
- Customer Phone
Member Info
The Member Info section will help your staff know who the membership is for. Here you can:
- Fill out the name of each Member Info.
- Fill out the questionnaire answers if you are using this feature.
- If it is a per-pass questionnaire, you can click on the
 icon next to each guest and fill out the questionnaire for each attendee.
 - If it is per purchase, you can click on the icon next to the first member and fill out the questionnaire.
- If you want to skip this, you can toggle on Ignore questionnaire validation errors for now.
Payment Details
Next, choose your payment workflow:
- Now: Take immediate payment
Select the payment method:
- Credit Card
- Cash
- Check: If your customer is paying by check, we recommend noting the check number in the comment section.
- Other: This can be any third-party payment method your business accepts, like PayPal, Bitcoin, or Venmo. You can set these under Settings > Payments.
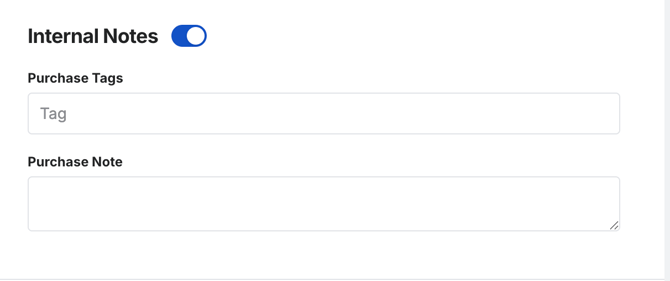
Internal Notes
Optionally add a Tag or internal note for your staff.
- Tag: A tag is a word or phrase added to a purchase that can be used for searching and filtering in the Purchases tab. When you type the tag into the search bar, it will bring up all purchases that have been tagged as such.
- Purchase Note: This will appear on the event's roster in the Purchase Notes section.
Add Another Product
You can select the Add Another Product button if you need to add another product to the same purchase. The customer will receive separate confirmation emails for each experience reserved. This ensures you can make changes to one purchase without affecting another.
To complete the purchase, click Pay.

Checkout
After you create or edit an existing book now button on your site, your customers will be able to purchase a membership pass on your website. To learn more about how to create or edit a button, click here.

How to Manage Membership Purchases
On the Purchases Tab, you can view the reservation details, modify the customer's information, resend the membership email, view questionnaire answers, and even view a payment summary of the membership.
Modify Reservations
You will see the modification bar. Here, you can make the following modifications:
- Refund
- Print Receipt
- Resend Membership Email

Purchase Details
Under the Modification Bar, you will see the membership details. Here you can view:
- Payment Summary:
- See how much the customer paid.
- If there is a Balance Due or Refund Excess Payment, then you will see a button below on the payment summary to prompt the appropriate workflow for you to take.
- Contact Information:
- The contact information of the main organizer of the purchase will be shown in this section.
- Message the organizer by hitting the
 icon next to their information.
 - Edit the contacts name, email or phone number by clicking the
 icon next to the information.
 - See the contacts profile by clicking the
 icon next to the information.
Members Section
This section will be displayed for all memberships. If you have per-pass questionnaires enabled in Xola, the names of each member will appear here when they complete those items. If you do not utilize these features, only the organizer will be listed.
In the Members Section, you can:
- Questionnaire
- To see or edit questionnaire answers, click on the
 icon with the colored dot next to it > Edit or add the information> click Save.
- To see or edit questionnaire answers, click on the
- See the Membership Code for each Member

Tag a Purchase
In Xola, a tag is a word or phrase added to a purchase that can be used to search and filter in the Purchases tab. When you type the tag into the search bar, it will bring up all purchases that have been tagged as such. A tag may be auto-generated by Xola or added in manually after a purchase has been made.
Auto-generated tags
Xola auto-generates tags for purchases in the following circumstances:
- A Membership code is used
- A reservation is rescued via abandoned reservation recovery (“Rescue”)
- A reservation is made on a mobile device (“Mobile”)
- A reservation is made through Book Now buttons on a third-party website (URL of the website)
- Navigate to the Purchases tab and search for the customer purchase.
- In the Add tag field, type in your tag.
- Hit Enter to finish tagging.

Where do tags appear?
Tags appear in the Add a tag field inside a purchase. Your Events and Transactions reports both feature a Tags column that pulls in all tags associated with purchases.
- In this section, you can see, edit, delete, or add:
- Purchase Notes
- Purchase notes are for this particular purchase. These can be notes you need your staff to know about this purchase.
- Customer Notes
- Customer Notes are for a particular customer. They will follow the customer for every reservation you make for them.
- Customer notes can only be deleted in the Customer's Contact profile.
- Click on the +Add note button to add a note.
- Click on the pencil icon
 to edit the note
 - Click on the trash can icon
 to delete the note.
- Purchase Notes
- You will see a note icon with the number of notes
 next to each note when a note is present. Click on the arrow next to the type of note to expand the section to see the notes.

Timeline
The Timeline is a history of every transaction and modification made to a membership.
Transactions (charges and refunds) and usage are recorded in the Timeline. Each record contains a timestamp and the name of the Xola user who made the change, making it easy to know who did what and when.
To filter the timeline only by Communications sent, toggle off Reservation Events and vice versa.
The Email and/or SMS will show up in the message chain below.
- Customers' responses to emails will pass through Xola and be added to the message chain.
- Customer responses to text messages will not appear for you in Xola.
For SMS: Messages that exceed 160 characters will be sent as 2 separate texts. If a customer calls the contact number from the SMS message, they will receive a recording that instructs them to contact the Company that they reserved with (you!). If you're interested in hearing that automated message, you can call 415-800-1140.

How to make a reservation with a Membership Pass
Once a Membership Pass is purchased, the customer will receive an email with the membership code. They can use this code to purchase other experiences you offer.
Back Office
- Click the Purchase button, and select the experience the customer wants to purchase.
- Select the number of guests.
- Selects date/time (if applicable).
- Enter the Organizer details.
- Click on Add a code and enter the Membership code.
If the purchase is outside the restrictions: Xola will display an error that the ‘code cannot be applied to this reservation due to restrictions’ OR if the Membership code is expired or used to the limit: Xola will display an error that the 'code cannot be used for x reason'
If someone calls after a reservation is made, and needs their Membership code added, you can use the 'Have a code' in the purchase, under the Purchases Tab, to add the Membership Code to the existing reservation.
Checkout
- Open checkout for the Experience that they would like to reserve
- Enter Booking Details
- Enter guest quantity
- Select a date and time for each event
- Enter the Add-on quantity for each event
- Fill out Contact Info
- Select Continue
- Enter Membership Code, in the 'Have a Code' section
- Enter Credit Card information (if needed)
- Agree to Terms and Conditions (If configured in your account)
- Fill out the Questionnaire (If configured in your account)
Note: This reservation will show on your purchases tab, like all other purchases. Click here to learn more.
Communications
Email sent to you when Membership Pass is purchased

Email sent to your customer when they purchase a Membership Pass
Receipt

Code details

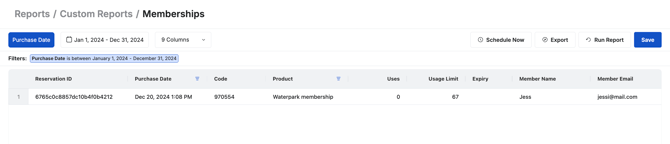
Membership Report
To view a report on Membership Passes sold, go to Reports > Custom Report > Membership.
- What You’ll Learn: See how memberships are being used, including usage counts, limits, expiration dates, and which memberships are being purchased.
- Date Filters:
-
Purchase Date: The date when the purchase was made.
-
-
What you’ll see in the table: (* column can be filtered)
-
Reservation ID: A unique identifier for the purchase
-
Purchase Date: The date when the membership was purchased. *
-
Code: The unique code tied to a member's active membership plan.
-
Product: The membership product that was purchased. *
-
Uses: The number of times the membership has been used for a reservation.
-
Usage Limit: The maximum number of times the membership can be used.
-
Expiry: The date the membership is set to expire.
-
Member Name: The full name of the customer who holds the membership.
-
Member Email: The email address associated with the membership holder.
-
- When to Use This Report: Use this to track membership activity, monitor usage against limits, and follow up with members before expiration.