---
title: Xola Coupons
description: This article provides a comprehensive guide on creating and managing various types of coupons using Xola, including Discount Coupons, Vouchers, Buy X Get Y offers, and Unlock Coupons. Learn how to set terms, restrictions, and generate unique codes to effectively attract and retain customers.
---
[Skip to content](https://support.xola.com/xola-coupons#main-content)
English
Show submenu for translations
[](https://www.xola.com/)
- [Home](https://support.xola.com/)
- [24/7 Live Support](https://www.xola.com/support/)
Open main navigation
Close main navigation
- [Home](https://support.xola.com/)
- [24/7 Live Support](https://www.xola.com/support/)
- English
Show submenu for translations
- [Login](https://xola.com/_public/login.html)
[Login](https://xola.com/_public/login.html)
How can we help you?
- There are no suggestions because the search field is empty.
1. [Help Center](https://support.xola.com/?hsLang=en)
2. [Getting Started](https://support.xola.com/getting-started?hsLang=en)
3. [Account Setup & Configuration](https://support.xola.com/getting-started?hsLang=en#account-setup-configuration)
# Xola Coupons
## Create flexible discounts and offers to drive reservations
**Coupons** allow you to **create and apply codes** to **purchases** in order to **alter the payment due**, **apply a voucher**, or create a **buy x get y** scenario. This is a great way to **drive business**, or simply give **special offers** to your **customers**.
With **Xola**, coupons are a **flexible and powerful tool** to enhance your **promotional strategy** and **tailor your guest experience**. You can design a variety of **campaigns**—from straightforward **discounts** and **dollar-off codes** to more complex offers like **buy-one-get-one**, **group deals**, and **special vouchers**. These codes can be applied at different stages of the **guest journey**, whether as **rewards for loyal customers**, **incentives** to encourage **reservations during slower periods**, or **personalized offers** for **special events**.
All coupons can be **restricted by date**, **event type**, **demographic**, **users** or **product**, giving you **precise control** over how and when **discounts** are applied. Plus, you have the option to **set limits** for each code, **manage blackout dates**, and **track redemptions**, making it easy to **measure the impact** of your **marketing efforts**. Whether you’re looking to **fill empty spots**, **encourage repeat business**, or **create a buzz** around a new experience, **Xola’s coupon system** enables you to craft the ideal campaign for your **business goals**.
**User Access:** **Administrator** or **Marketer** roles have access to set up and manage Coupons in Xola.
**Administrator, Reservationist Lite** or **Reservationist** roles can apply and manage Coupons on reservations in Xola, if access is granted.
To **grant access** to users, [click here](https://seller.xola.app/settings/users).
[Watch the Coupon video tutorial](https://demo.xola.com/showcase/cmpmv03zn011xwv0jqfaf6l21?utm_source=link)
---
**What's covered in this article:**
- [Different types of coupons](https://support.xola.com/xola-coupons#Types)
- [Creating a coupon campaign](https://support.xola.com/xola-coupons#creating)
- [Discount Coupon](https://support.xola.com/xola-coupons#discount)
- [Voucher](https://support.xola.com/xola-coupons#voucher)
- [Buy x Get y](https://support.xola.com/xola-coupons#buyx)
- [Unlock Coupon](https://support.xola.com/xola-coupons#unlock)
- [Editing a coupon campaign](https://support.xola.com/xola-coupons#edit)
- [Applying a coupon or Voucher](https://support.xola.com/xola-coupons#apply)
- [Removing a coupon or voucher from a purchase](https://support.xola.com/xola-coupons#remove)
---
### Different Types of Coupons
**Discount coupon**
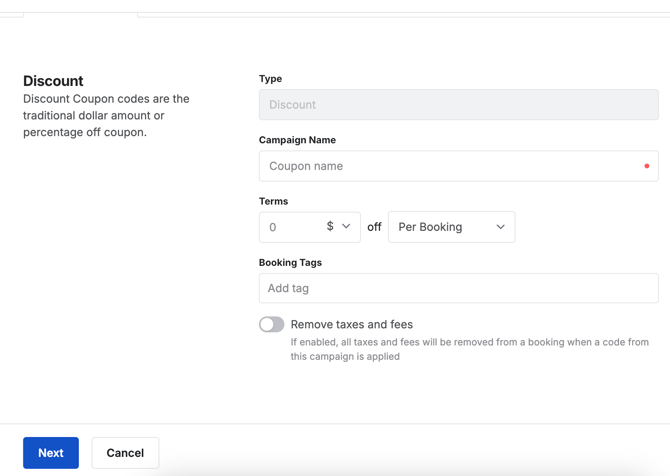
Discount Coupon codes are the traditional **dollar amount** or **percentage off** coupons. Five dollars off per purchase, 10% off during the holiday season, you know the drill. These can be applied during checkout or to an existing purchase.
**Voucher**
Vouchers are similar to coupons in many ways, the key difference being that **vouchers are applied as a payment method while other coupon types are applied as a discount.** The main difference to note about this is how taxes are handled when a voucher is applied to a purchase.
**Buy X Get Y**
Buy X Get Y coupons (BXGY) are a great way to incentivize group purchases for your customers while also offering a discount.
**Unlock coupon**
When entered, Unlock Coupon codes allow you to **specify an arbitrary price** (pre-tax) for a purchase. For example, when your mom comes to town you want to give her a special discount on the price of an experience at your establishment. An Unlock Coupon code would allow you to take the price from $120 down to...whatever price you deem fit. **You could even make the price $0 if you would like.**
---
### Creating a Coupon Campaign
#### Create a Discount Coupon
- Navigate to the **Marketing** tab and select [Coupons](https://seller.xola.app/marketing/coupons).
- Select the blue **Create a Coupon** button, located on the right-hand side of the screen.
- Choose **Discount.**
- Next, in the **Campaign** field, give your campaign a name. This name will not affect your coupon's code(s).
- You can designate tags in the Reservation Tag field to automatically generate a tag for reservations made with a code from this campaign.
- Set your coupon's **Terms.** In this section, you'll need to choose per-person or per-outing purchase discounts, which demographics your coupon can be applied to, and how many demographics must be booked for a purchase to qualify for a discount.
- Specify whether you would like to **remove taxes and fees** from your purchase when the coupon is applied.
- Click **Next**, and you will be taken to the **Restrictions** page:
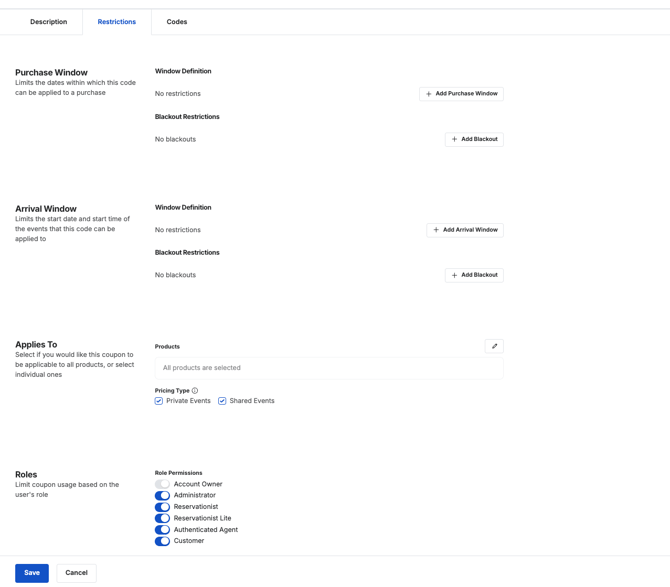
- **Click + Add Purchase Window:** Limits the dates within which this code can be applied to a purchase.
> **Example:** You want to make a code that can only be redeemed during the month of November. After November is over, you don't want customers to be able to apply the code anymore. Here, you would set your start date to 1 November and your end date to 30 November.
- - - **Click + Add Blackout:** by adding a blackout date, you can specify dates and times that the coupon *cannot* be redeemed.
- **Click + Add Arrival Window:** Limits the start date and start time of the events that this code can be applied.
> **Example:** You want to incentivize customers to reserve trips that occur next summer, so you would set your start date to 1 June and your end date to 31 August of next year. You can specify even further by placing restrictions on which day of the week and time of day your coupon can apply to.
- - - **Click + Add Blackout:** by adding a blackout date, you can specify event start dates and start times that the coupon *cannot* be redeemed.
- **Select Products:** Select whether you would like this coupon to apply to all products or individual ones. By default, all products are selected. Click the pencil icon to select which experiences you want this coupon applied to.
- **Pricing Type:** Select if this coupon applies to Private, Public, or both pricing types. These pricing types are set up on your **[Products Pricing](https://support.xola.com/pricing-preferences?hsLang=en#type)** page.
- **Roles:** Restrict coupon usage based on a user’s role. When enabled, eligible users can apply the coupon in both Checkout and Back Office.
- **Account Owner** – The primary user responsible for the account.
- **Administrator** – Assignable under [Grant Access Users.](https://support.xola.com/xola-settings-?hsLang=en#Users)
- **Reservationist** – Assignable under [Grant Access Users.](https://support.xola.com/xola-settings-?hsLang=en#Users)
- **Reservationist Lite** – Assignable under [Grant Access Users.](https://support.xola.com/xola-settings-?hsLang=en#Users)
- **Authenticated Agent** – Configurable under [Agents.](https://support.xola.com/agent-user?hsLang=en)
- **Customer** – The end user who makes reservations.
- Click **Save**, and you will be taken to the **Codes** page.
- Choose between **Limited Use** and **Unlimited Use.**
- If you select Limited use, the number you specify as the usage limit will be the maximum number of times that *each code* in your campaign can be used.
- Now, create the actual code that must be entered while making a purchase to provide the value you have just created.
- Type your desired code text into the box, it can contain any combination of letters, numbers, and special characters.
- Your code may not contain any spaces.
- You can create more than one code for the same discount campaign.
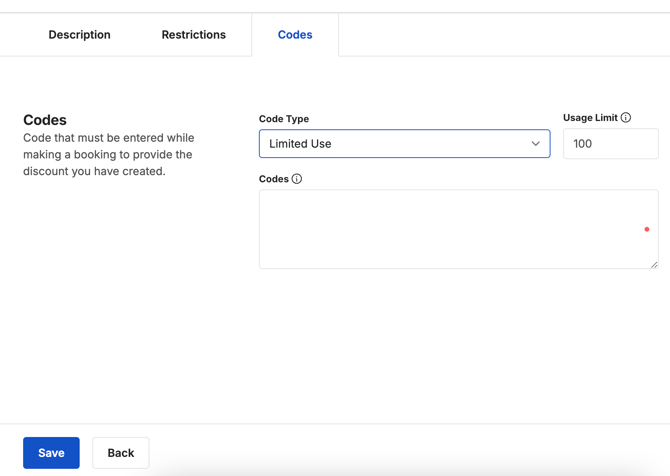
**Tip:** Add multiple codes at once by entering text separated by commas, or on separate lines.
#### Create a Voucher Campaign
- Navigate to the **Marketing** tab and select [Coupons](https://seller.xola.app/marketing/coupons).
- Click the **Create a Coupon** button, located on the right-hand side of the screen.
- Choose **Voucher**.
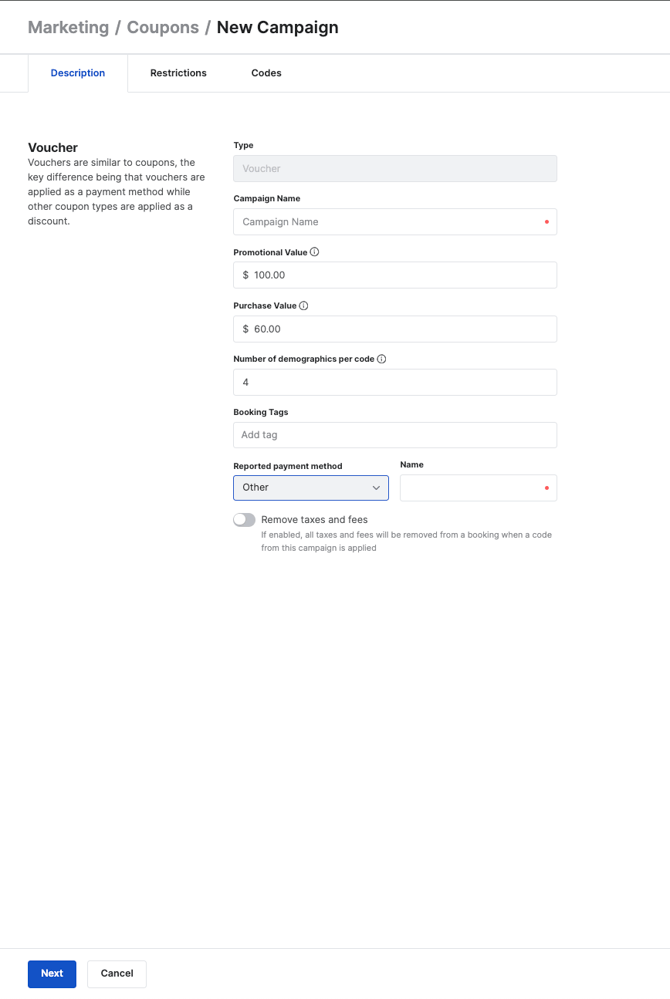
- In the **Campaign** field, give your voucher campaign a name. This name will not affect your coupon's code(s).
- Enter a **Promotional Value**.This is the maximum total amount that can be redeemed when using a code from this campaign for a reservation that falls within your campaign's restrictions.
- Enter a **Purchase Price**.This is the amount paid by your customer when they purchased this voucher deal. This is also the maximum total amount that can be redeemed when using a code from this campaign for a purchase that *violates* your campaign's restrictions.
- Enter the **Number of demographics per code**.This is the number of demographics that will receive a promotional price when reserved using a code from this campaign. Each demographic will share the campaign's promotional value equally.
- You can designate tags in the Reservation Tag field to automatically generate a tag for reservations made with a code from this campaign.
- You also must specify a **Reported payment method.** This is the value that will appear in the "method" column of your report exports for line items that reference an instance where a code from this campaign was used.
- Specify whether you would like to **remove taxes and fees** from your purchase when the coupon is applied.
- Before moving on to **Restrictions,** consider the following example of the above terms if you do not have taxes and fees removed.
**Promotional value vs. Number of demographics per code**
- This campaign has a promotional value of $100 and a number of demographics per code of 4.
- This means that when a code from this campaign is redeemed, **up to 4 demographics** will receive $25 toward the purchase.
- If less than 4 demographics are purchased, for example, if 2 demographics are purchased. Those 2 demographics will receive $25 towards the purchase and the code will carry $50 in value that would be applied if additional demographics are added to the purchase via the *change guest count* function.
**Promotional value vs. Purchase Price**
- This campaign has a promotional value of $100, a purchase price of $60, and a number of demographics per code of 4.
- This means that if a code from this campaign is used for a purchase that violates the campaign's restrictions, for example, if it is used to purchase an event that falls outside of the arrival window, up to 4 demographics will receive $15 towards the purchase. Notice that the number of demographics per code will always divide the redemption value equally.
- Click **Next**, and you will be taken to the **Restrictions** page:
- **Click + Add Purchase Window:** Limits the dates within which this code can be applied to a purchase.
> **Example:** You want to make a code that can only be redeemed during the month of November. After November is over, you don't want customers to be able to apply the code anymore. Here, you would set your start date to 1 November and your end date to 30 November.
- - - **Click + Add Blackout:** by adding a blackout date, you can specify dates and times that the coupon *cannot* be redeemed.
- **Click + Add Arrival Window:** Limits the start date and start time of the events that this code can be applied.
> **Example:** You want to incentivize customers to reserve trips that occur next summer, so you would set your start date to 1 June and your end date to 31 August of next year. You can specify even further by placing restrictions on which day of the week and time of day your coupon can apply to.
- - - **Click + Add Blackout:** by adding a blackout date, you can specify event start dates and start times that the coupon *cannot* be redeemed.
- **Select Products:** Select whether you would like this coupon to apply to all products or individual ones. By default, all products are selected. Click the pencil icon to select which experiences you want this coupon applied to.
- **Pricing Type:** Select if this coupon applies to Private, Public, or both pricing types. These pricing types are set up on your **[Products Pricing](https://support.xola.com/pricing-preferences?hsLang=en#type)** page.
- **Roles:** Restrict coupon usage based on a user’s role. When enabled, eligible users can apply the coupon in both Checkout and Back Office.
- **Account Owner** – The primary user responsible for the account.
- **Administrator** – Assignable under [Grant Access Users.](https://support.xola.com/xola-settings-?hsLang=en#Users)
- **Reservationist** – Assignable under [Grant Access Users.](https://support.xola.com/xola-settings-?hsLang=en#Users)
- **Reservationist Lite** – Assignable under [Grant Access Users.](https://support.xola.com/xola-settings-?hsLang=en#Users)
- **Authenticated Agent** – Configurable under [Agents.](https://support.xola.com/agent-user?hsLang=en)
- **Customer** – The end user who makes reservations.

- Click **Save**, and you will be taken to the **Codes** page: Now, create the actual code that must be entered while making a purchase to provide the value you have just created.
- Type your desired code text into the box, it can contain any combination of letters, numbers, and special characters.
- Your code may not contain any spaces.
- You can create more than one code for the same voucher campaign.
- All voucher codes are **One Time Use** codes.
#### Create a Buy x Get y Campaign
- Navigate to the **Marketing** tab and select [Coupons](https://seller.xola.app/marketing/coupons).
- Select the **Create a Coupon** button, located on the right-hand side of the screen.
- Choose **Buy X Get Y.**
- In the **Campaign** field, give your campaign a name. This name will not affect your coupon's code(s).
- You can designate tags in the Reservation Tag field to automatically generate a tag for reservations made with a code from this campaign.
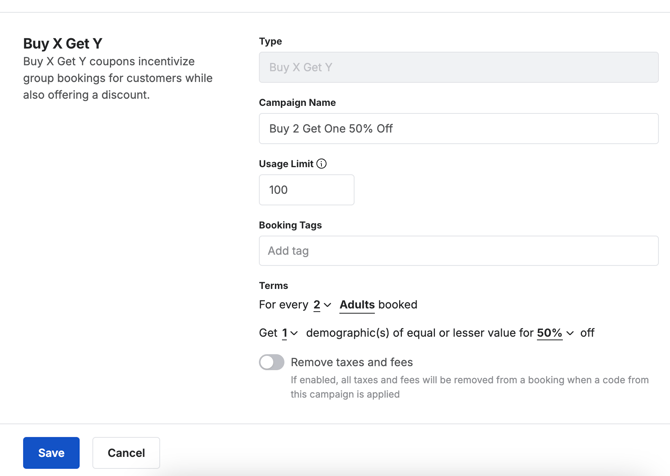
- Set your coupon's **Terms.**
- Choose per person or per outing purchase discounts, which demographics your coupon can be applied to, and how many demographics must be purchased in order for a purchase to qualify for a discount.
> **Example:** A 50% discount would be given to one demographic of equal or lesser value for every 2 adults that are booked. This account happens to have the demographics of Adults and Children. So, for every 2 Adults that are purchased, the customer would get 50% off of either an additional Adult or Child.
Since BOGO coupons are configured as "For Every", this means that a coupon that's configured as "For every 2 Adults" could apply a discount after any multiple of 2 adults are purchased. For example, the following discounts could occur:
- 2 Adults at full price, 1 equal or lesser demographic at 50% off
- 4 Adults at full price, 2 equal or lesser demographic at 50% off
- 6 Adults at full price, 3 equal or lesser demographic at 50% off
- etc...
- Click **Next**, and you will be taken to the **Restrictions** page:
- **Click + Add Purchase Window:** Limits the dates within which this code can be applied to a purchase.
> **Example:** You want to make a code that can only be redeemed during the month of November. After November is over, you don't want customers to be able to apply the code anymore. Here, you would set your start date to 1 November and your end date to 30 November.
- - - **Click + Add Blackout:** by adding a blackout date, you can specify dates and times that the coupon *cannot* be redeemed.
- **Click + Add Arrival Window:** Limits the start date and start time of the events that this code can be applied.
> **Example:** You want to incentivize customers to reserve trips that occur next summer, so you would set your start date to 1 June and your end date to 31 August of next year. You can specify even further by placing restrictions on which day of the week and time of day your coupon can apply to.
- - - **Click + Add Blackout:** by adding a blackout date, you can specify event start dates and start times that the coupon *cannot* be redeemed.
- **Select Products:** Select whether you would like this coupon to apply to all products or individual ones. By default, all products are selected. Click the pencil icon to select which experiences you want this coupon applied to.
- **Pricing Type:** Select if this coupon applies to Private, Public, or both pricing types. These pricing types are set up on your **[Products Pricing](https://support.xola.com/pricing-preferences?hsLang=en#type)** page.
- **Roles:** Restrict coupon usage based on a user’s role. When enabled, eligible users can apply the coupon in both Checkout and Back Office.
- **Account Owner** – The primary user responsible for the account.
- **Administrator** – Assignable under [Grant Access Users.](https://support.xola.com/xola-settings-?hsLang=en#Users)
- **Reservationist** – Assignable under [Grant Access Users.](https://support.xola.com/xola-settings-?hsLang=en#Users)
- **Reservationist Lite** – Assignable under [Grant Access Users.](https://support.xola.com/xola-settings-?hsLang=en#Users)
- **Authenticated Agent** – Configurable under [Agents.](https://support.xola.com/agent-user?hsLang=en)
- **Customer** – The end user who makes reservations.
Click **Save**, and you will be taken to the **Codes** page:
- - Choose between **Limited Use** and **Unlimited Use.**
- If you select Limited use, the number you specify as the usage limit will be the maximum number of times that *each code* in your campaign can be used.
- Now, create the actual code that must be entered while making a purchase to provide the value you have just created.
- Type your desired code text into the box, it can contain any combination of letters, numbers, and special characters.
- Your code may not contain any spaces.
- You can create more than one code for the same discount campaign.

**Tip:** Add multiple codes at once by entering text separated by commas, or on separate lines.
#### Create an Unlock Coupon
- Navigate to the **Marketing** tab and select [Coupons](https://seller.xola.app/marketing/coupons).
- Select the green **Create a Coupon** button, located on the right-hand side of the screen.
- Choose **Unlock.**
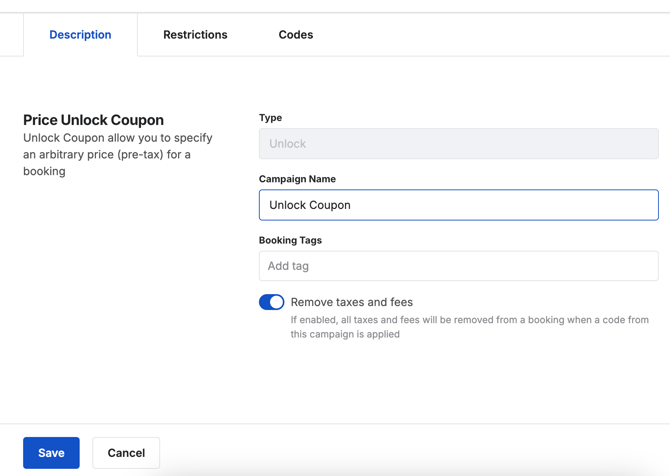
- In the **Campaign** field, give your campaign a name. This name will not affect your coupon's code(s).
- You can designate tags in the Reservation Tag field to automatically generate a tag for reservations made with a code from this campaign.
- Specify whether you would like to **remove taxes and fees** from your purchase when the coupon is applied.
- Click **Next**, and you will be taken to the **Restrictions** page:
- **Click + Add Purchase Window:** Limits the dates within which this code can be applied to a purchase.
> **Example:** You want to make a code that can only be redeemed during the month of November. After November is over, you don't want customers to be able to apply the code anymore. Here, you would set your start date to 1 November and your end date to 30 November.
- - - **Click + Add Blackout:** by adding a blackout date, you can specify dates and times that the coupon *cannot* be redeemed.
- **Click + Add Arrival Window:** Limits the start date and start time of the events that this code can be applied.
> **Example:** You want to incentivize customers to reserve trips that occur next summer, so you would set your start date to 1 June and your end date to 31 August of next year. You can specify even further by placing restrictions on which day of the week and time of day your coupon can apply to.
- - - **Click + Add Blackout:** by adding a blackout date, you can specify event start dates and start times that the coupon *cannot* be redeemed.
- **Select Products:** Select whether you would like this coupon to apply to all products or individual ones. By default, all products are selected. Click the pencil icon to select which experiences you want this coupon applied to.
- **Pricing Type:** Select if this coupon applies to Private, Public, or both pricing types. These pricing types are set up on your **[Products Pricing](https://support.xola.com/pricing-preferences?hsLang=en#type)** page.
- **Roles:** Restrict coupon usage based on a user’s role. When enabled, eligible users can apply the coupon in both Checkout and Back Office.
- **Account Owner** – The primary user responsible for the account.
- **Administrator** – Assignable under [Grant Access Users.](https://support.xola.com/xola-settings-?hsLang=en#Users)
- **Reservationist** – Assignable under [Grant Access Users.](https://support.xola.com/xola-settings-?hsLang=en#Users)
- **Reservationist Lite** – Assignable under [Grant Access Users.](https://support.xola.com/xola-settings-?hsLang=en#Users)
- **Authenticated Agent** – Configurable under [Agents.](https://support.xola.com/agent-user?hsLang=en)
- **Customer** – The end user who makes reservations.

- Click **Save**, and you will be taken to the **Codes** page:
- Choose between **Limited Use** and **Unlimited Use.**
- If you select Limited use, the number you specify as the usage limit will be the maximum number of times that *each code* in your campaign can be used.
- Now, create the actual code that must be entered while making a purchase to provide the value you have just created.
- Type your desired code text into the box, it can contain any combination of letters, numbers, and special characters.
- Your code cannot contain any spaces.
- You can create more than one code for the same campaign.

**Tip:** Add multiple codes at once by entering text separated by commas, or on separate lines.
Often referred to as the "family and friends coupon", Unlock Coupon codes should be **for staff use only and should not be shared externally with customers.** For this same reason, do not use an obvious or easily guessable code. [Below is an example](https://support.xola.com/xola-coupons#apply-unlock) of applying an Unlock Coupon.
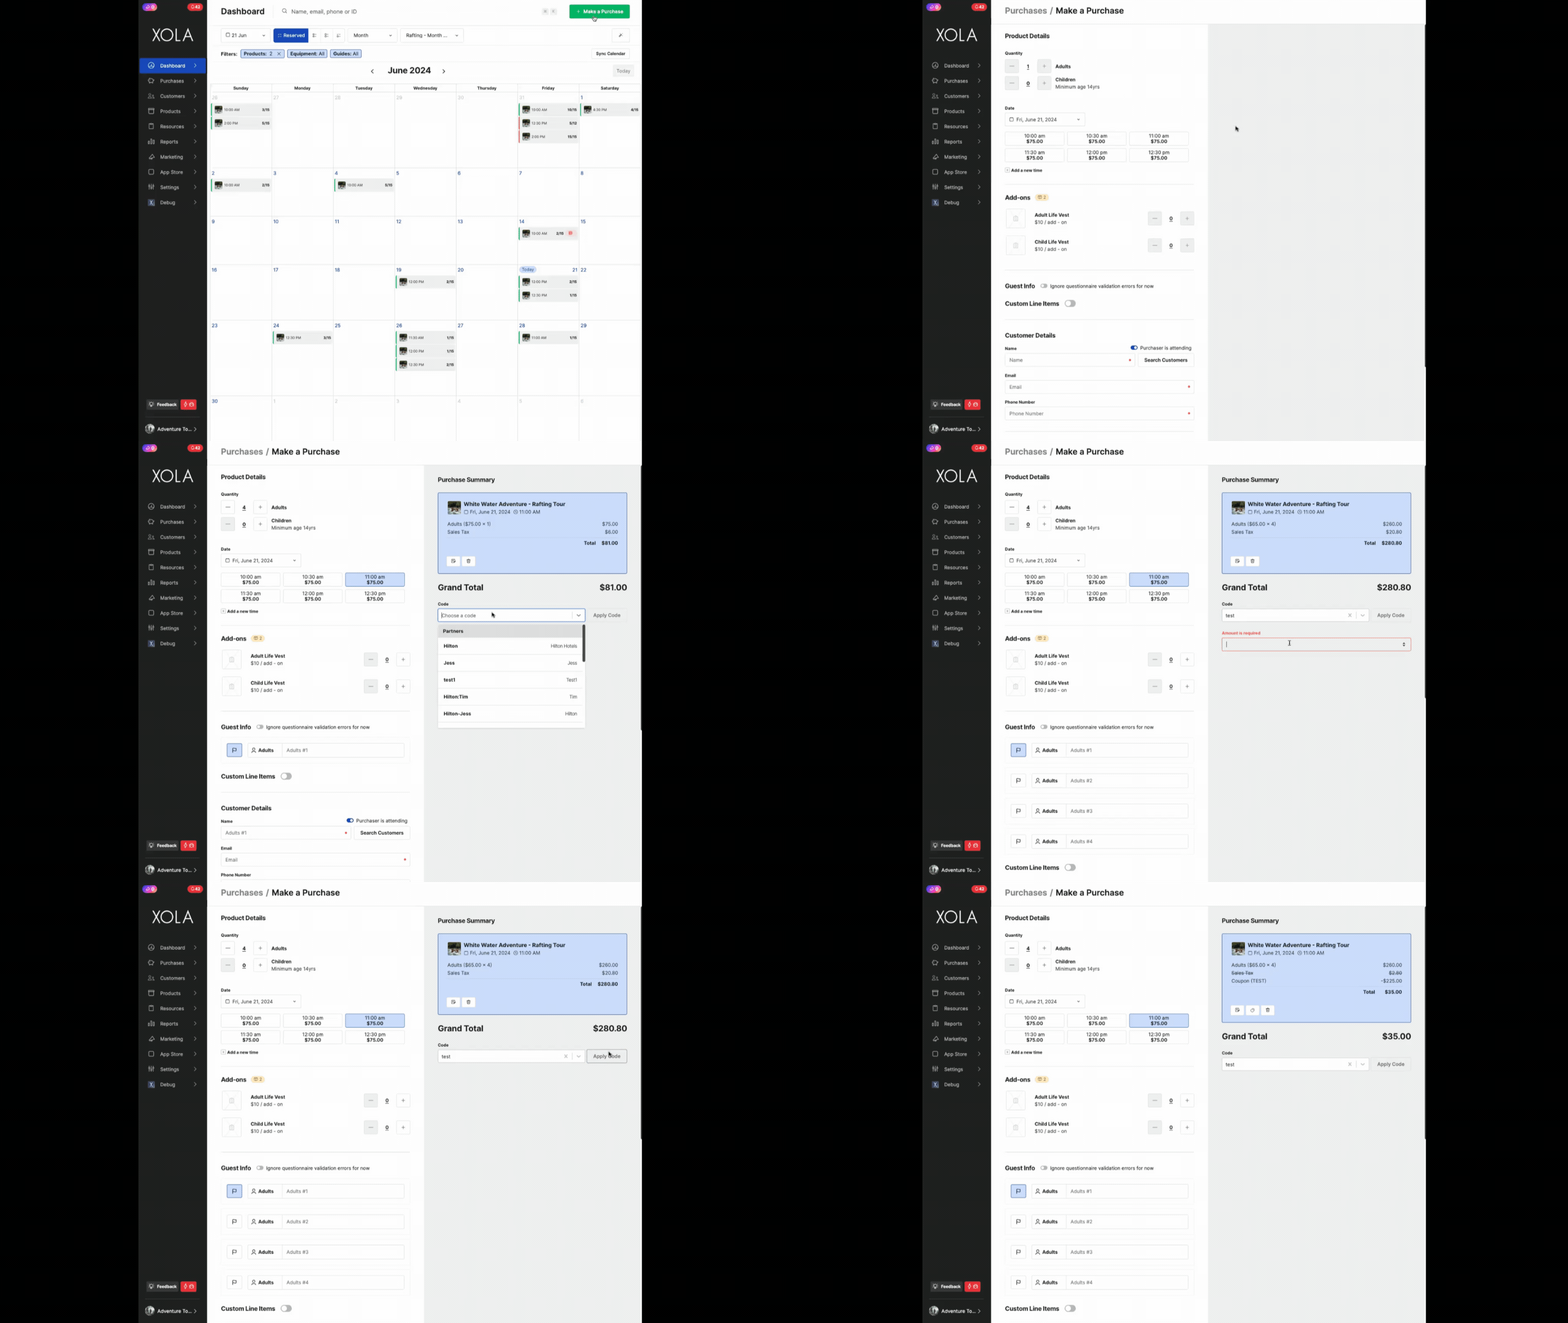
Unlock coupons can only be applied at the time of purchase.
### Editing Coupon Campaign
After navigating to [Marketing \> Coupons](https://seller.xola.app/marketing/coupons), select the coupon campaign that you would like to edit. You can edit your coupon campaign's Description, Restrictions, or Codes.
**Tip**: Need to find a coupon? You can search for the corresponding campaign by entering the code or Campaign name into the search bar located in **[Marketing \> Coupons](https://seller.xola.app/marketing/coupons)**.You can also filter the coupons based on Type in the top right-hand corner.

#### Void a Coupon
From the **Codes** section, hover over the code's **status**. You can update a code's status to 'Void' by clicking on the **Void** icon that appears. 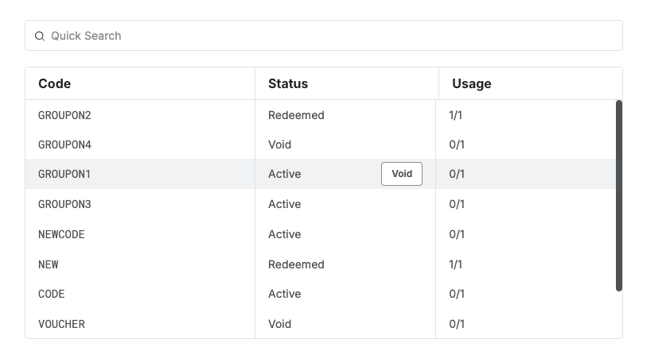
- **Active:** This code is able to be applied to a purchase.
- **Void:** This code is not able to be applied to a purchase.
- **Redeemed:** This One Time Use code has been applied to a purchase, and will no longer work if entered.
#### Add More Codes to Your Campaign
You can add new codes to a campaign from within **Codes** by using the "new code" bar.
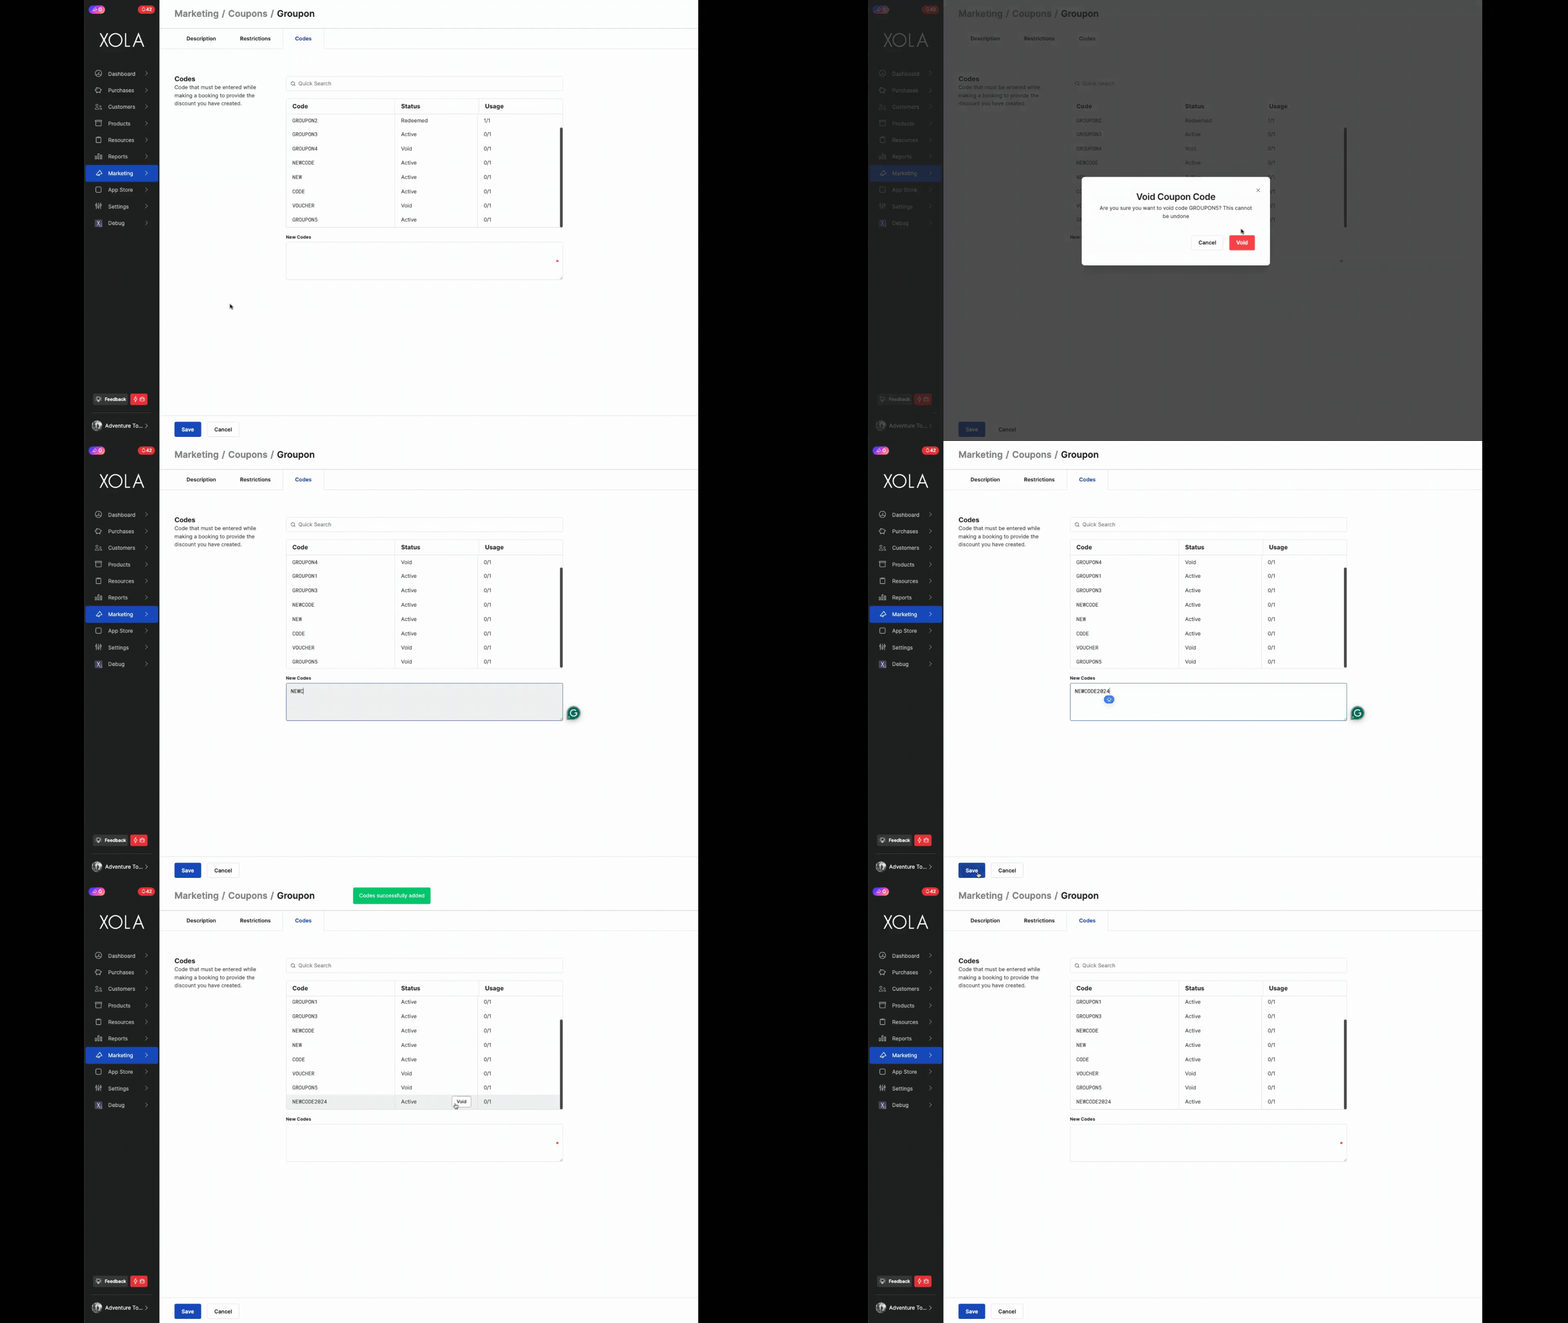
**Tip:** Add multiple codes at once by entering text separated by commas, or on separate lines.
---
### Applying a Coupon
#### During checkout
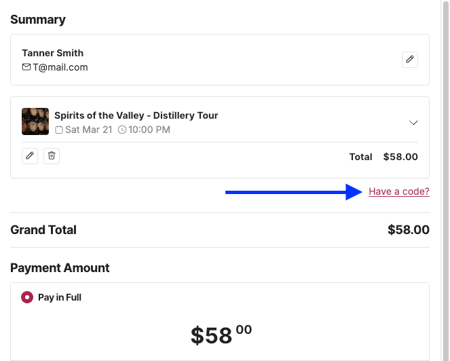
- Click **Have a code?**
- Enter the coupon code.
- Click Apply.
- You'll see the purchase amount change accordingly and the coupon code recorded as a line item in the Payment Summary.
#### After checkout
For instructions on applying a coupon code to an existing purchase, check out our **[Apply Discounts, Coupons, and Gifts](https://support.xola.com/applying-and-removing-codes?hsLang=en)** article.
Unlock coupons can only be applied at the time of purchasing, and not after the fact.
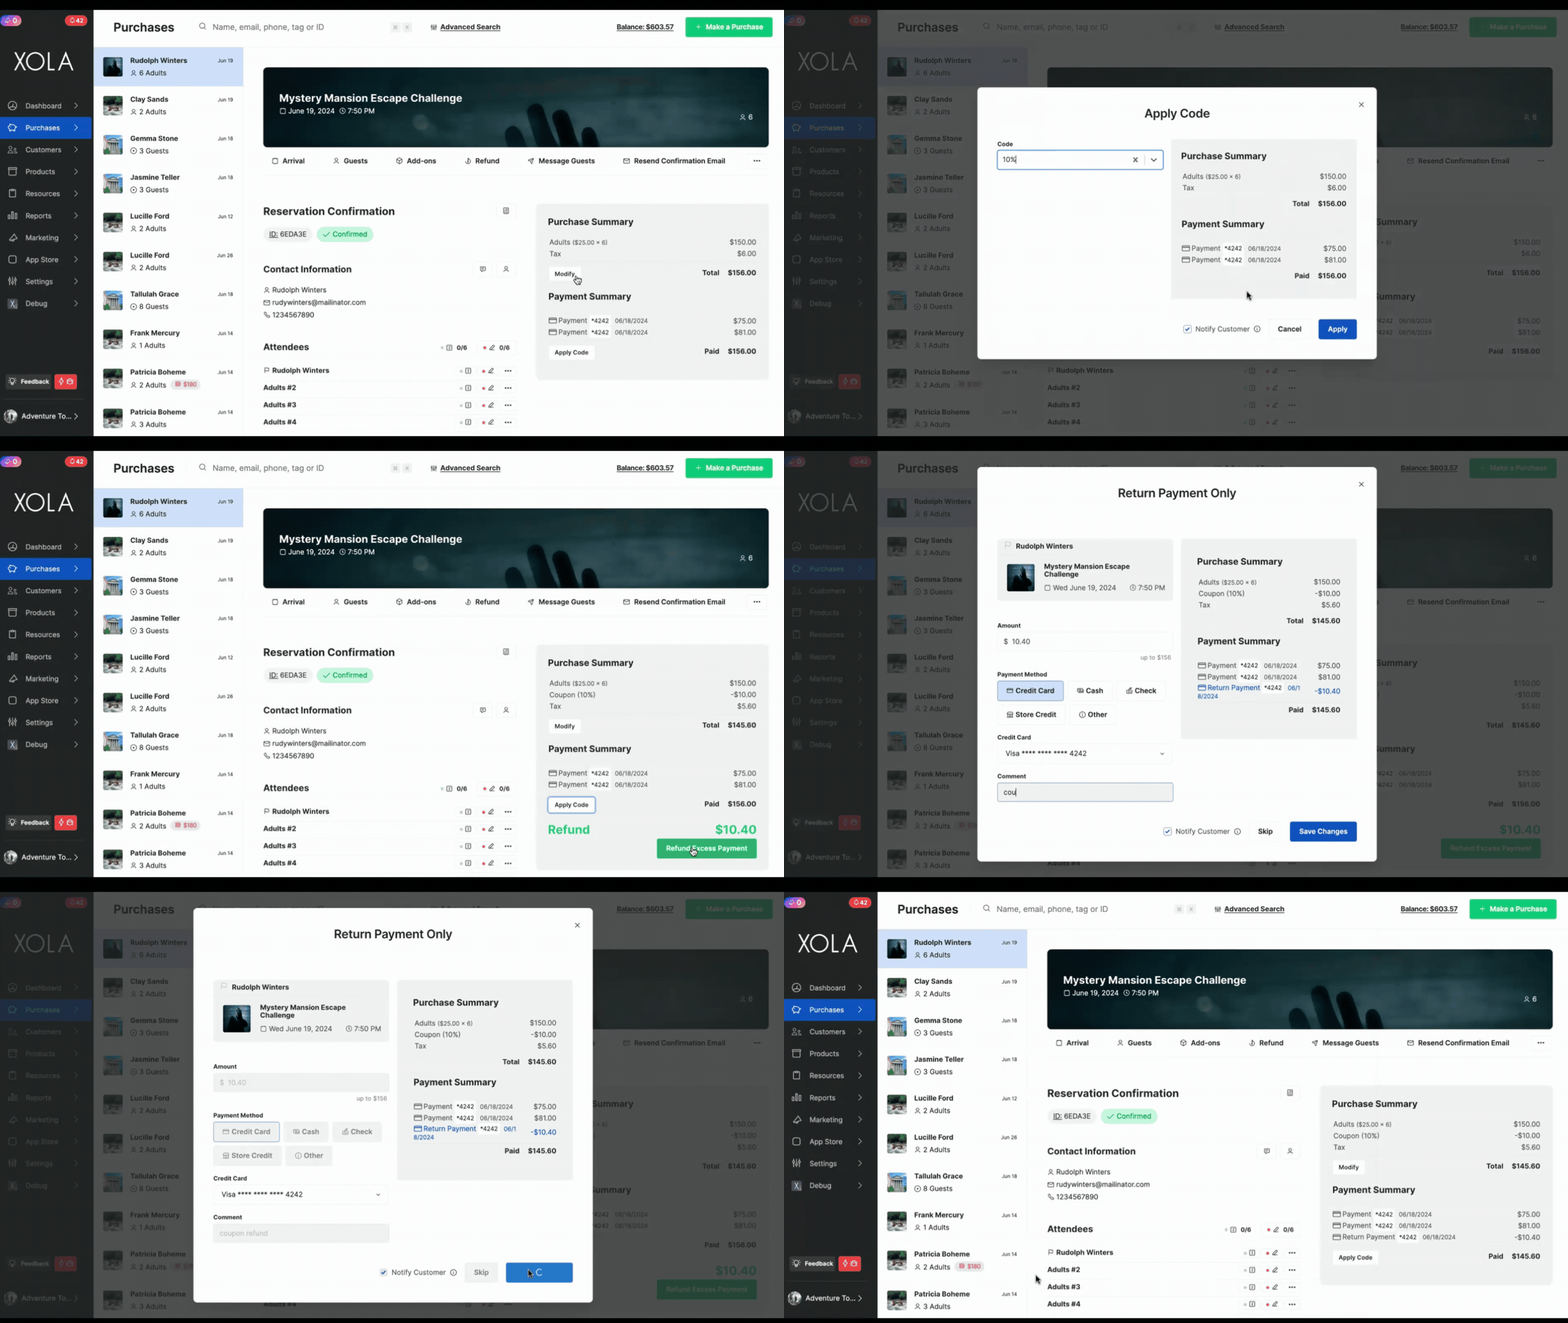
**Tip:** Remove a coupon that you have applied by clicking **Modify** under payment summary and clicking on **Code**.
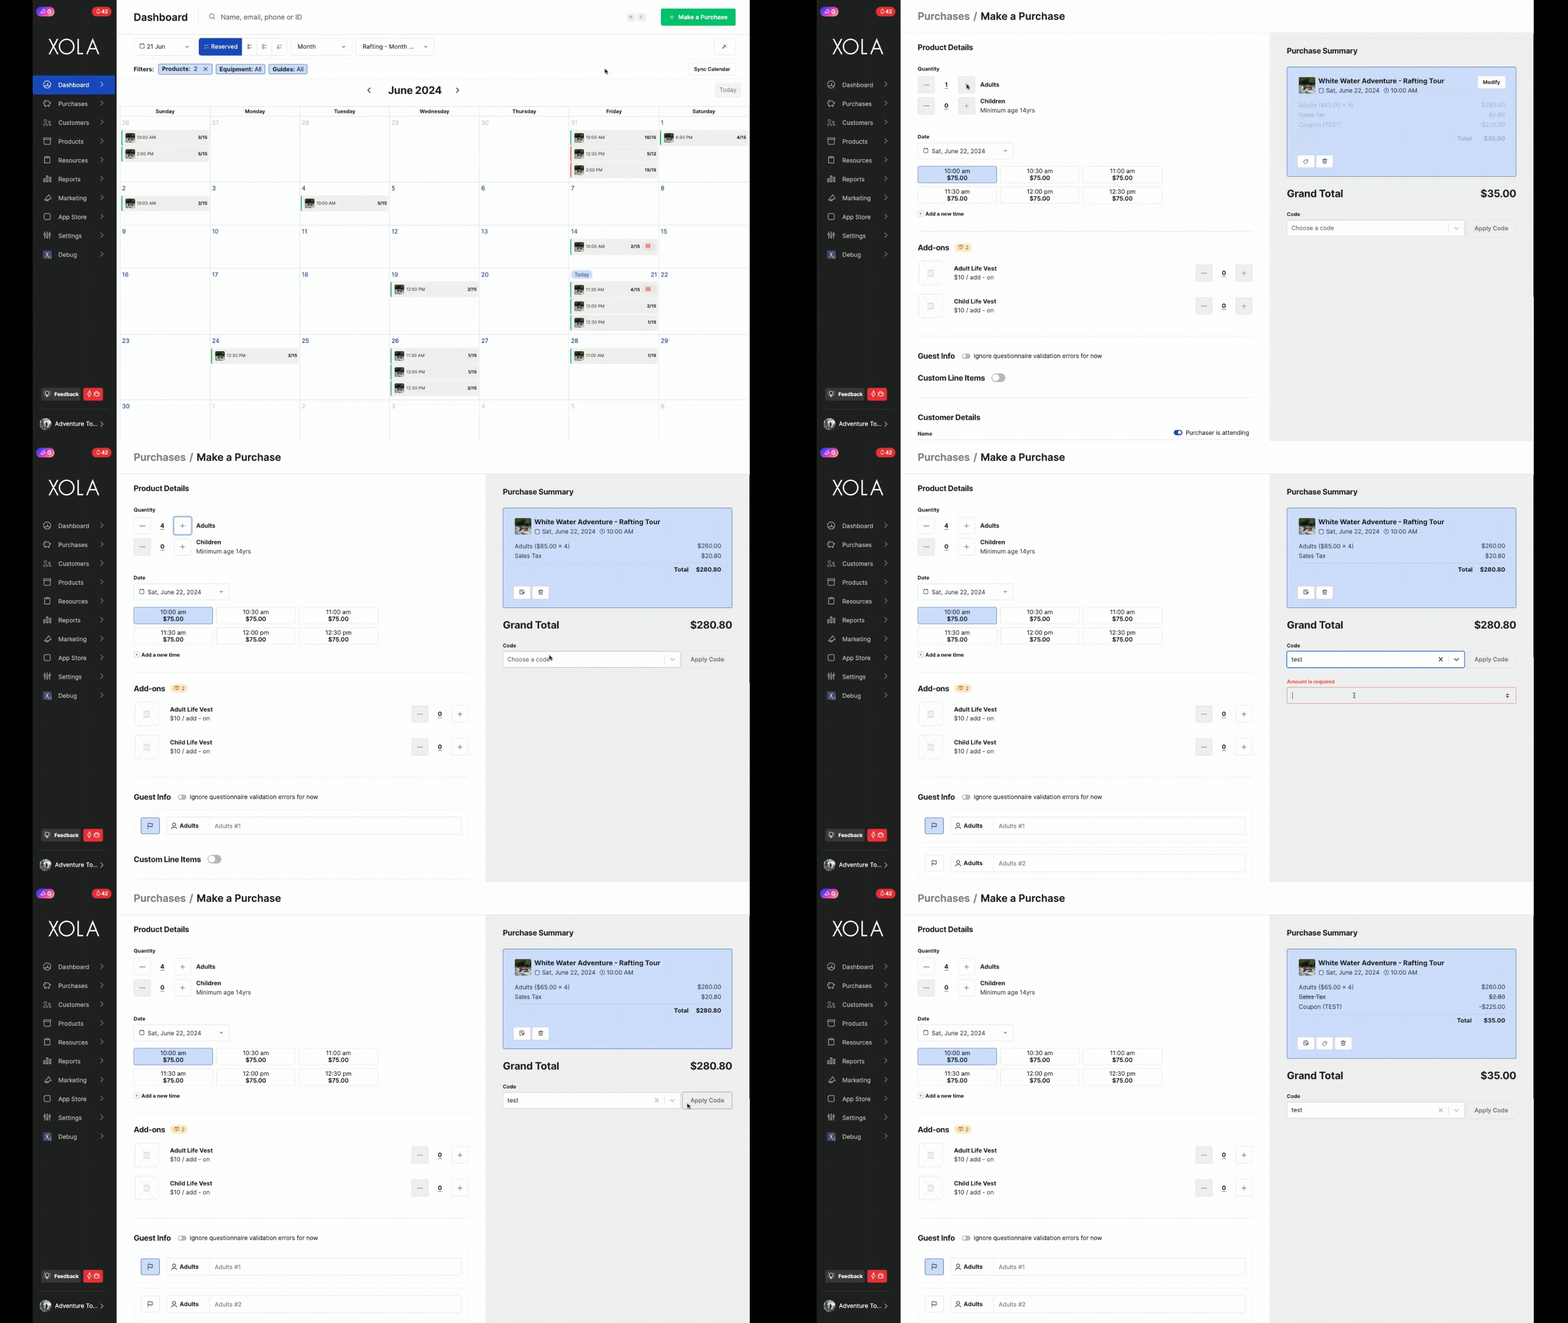
#### Applying an unlock coupon
- During checkout, click **add code** and enter the Unlock Coupon code.
- In the text box, enter the total amount that you would like to charge your customer before the tax
You may only enter an amount that is lower than the initial purchase total.
- You'll see the purchase amount change accordingly and the coupon code recorded as a line item in the Payment Summary.
#### Difference between Vouchers and Coupons
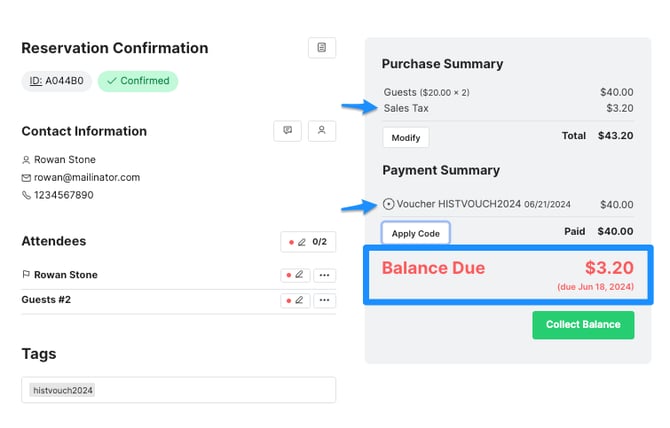
The difference between vouchers and coupons is that **vouchers are a method of payment** while **coupons apply a discount to the reservation total.** Consider the following example, where we'll apply a voucher and discount coupon that are both worth $40.
Since **vouchers** are a method of payment, taxes and fees are calculated and assessed before the amount due for the purchase is reduced. This means that any taxes and fees you have configured may still be owed after a voucher code is applied. If you would like taxes and fees removed from the voucher, you will have to toggle this on in the [Voucher's settings](https://support.xola.com/xola-coupons#voucher).
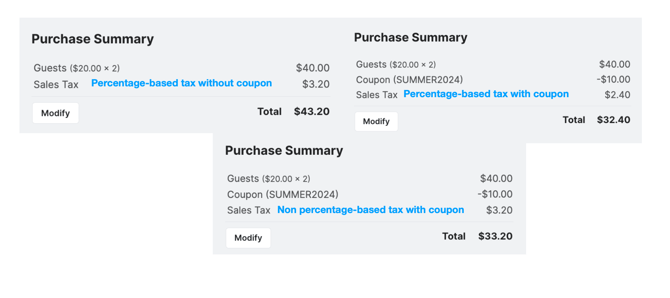
Since **coupons** are applied as a discount to a purchase's total value, taxes and fees are calculated and assessed after the amount due is reduced. This means that if you have a *percentage-based* tax or fee configured, its total will be affected by the discount coupon application.
**Note:** Multiple Vouchers can be applied to a reservation.
### Removing a coupon or voucher from a purchase
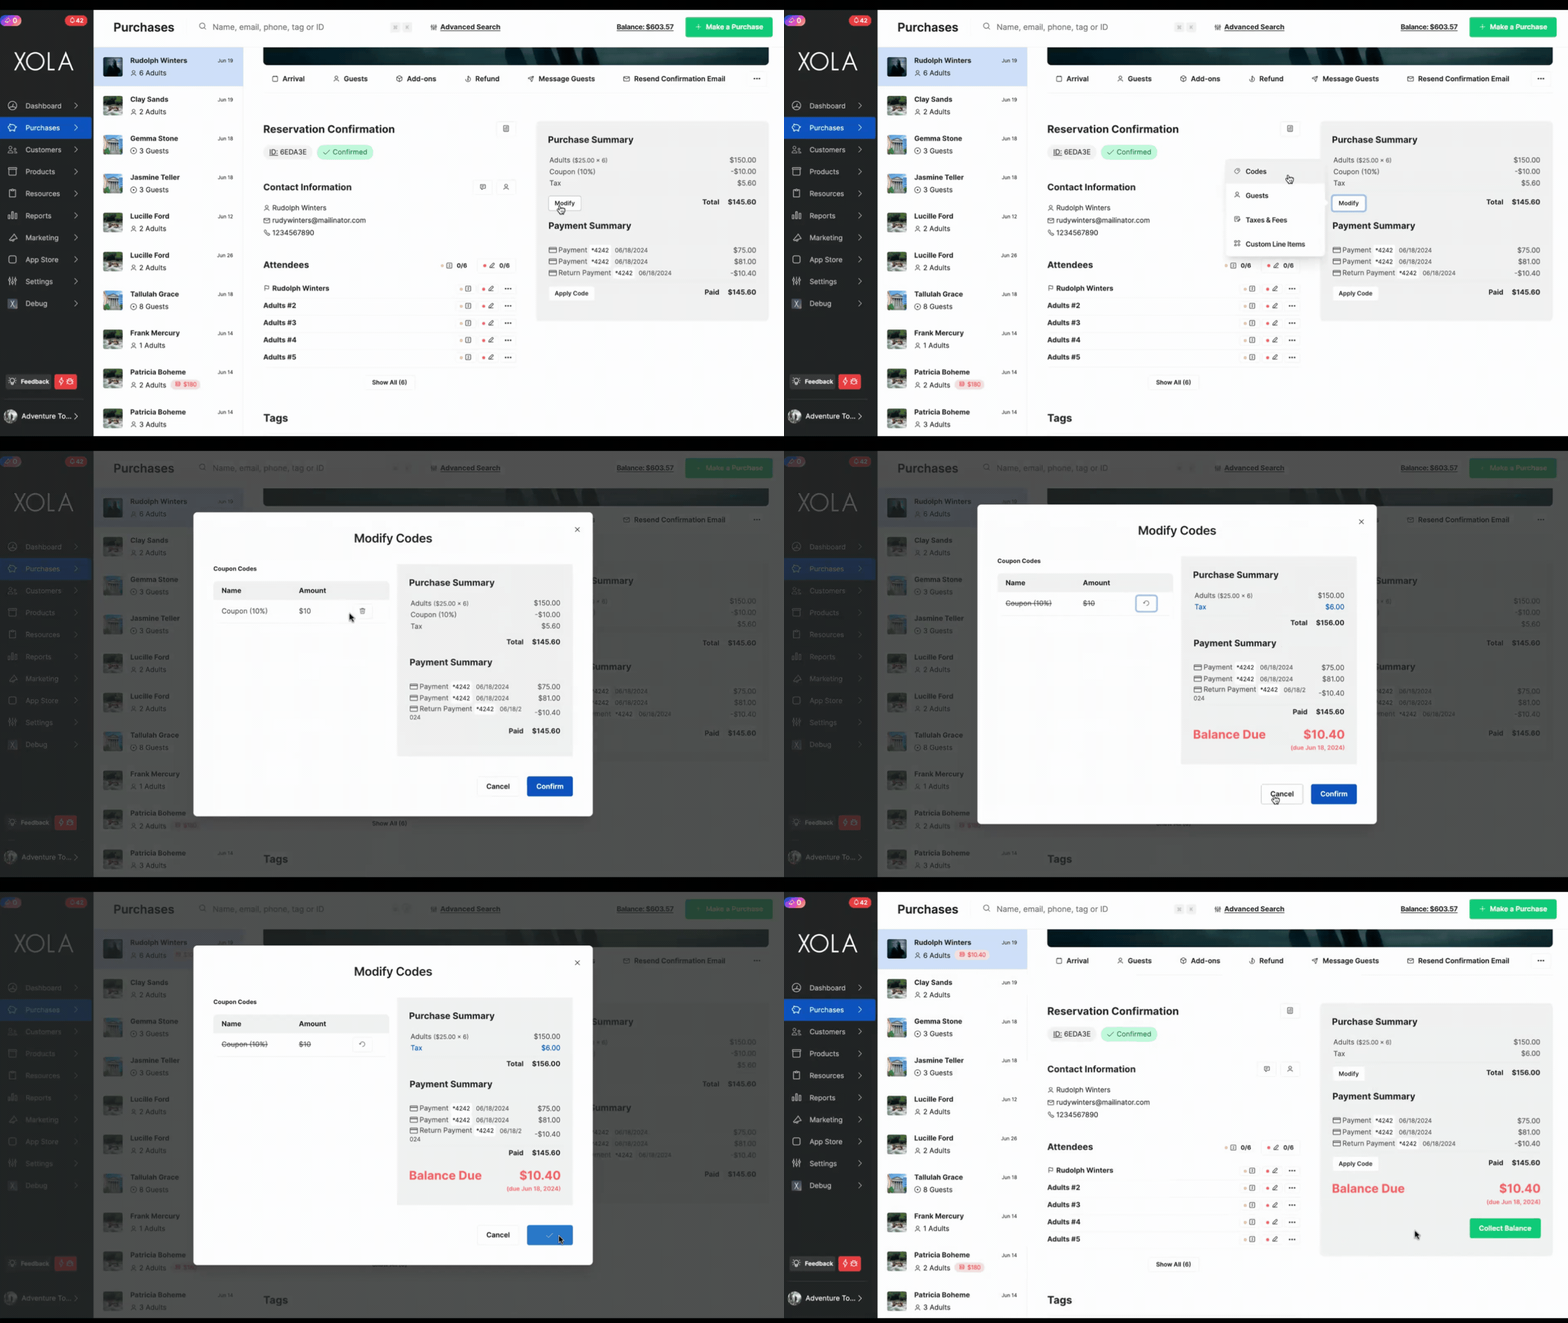
- In the [Purchases](https://seller.xola.app/purchases/) tab, navigate to the customer purchase.
- Under the Payment Summary, remove a coupon that you have applied by clicking **Modify**
- Next click the icon next to the code you would like to remove.
- Then click confirm.
- [Getting Started](https://support.xola.com/getting-started?hsLang=en#main-content)
- [Account Setup & Configuration](https://support.xola.com/getting-started?hsLang=en#account-setup-configuration)
- [Website Integration & Installation](https://support.xola.com/getting-started?hsLang=en#website-integration-installation)
- [Flex Plans](https://support.xola.com/getting-started?hsLang=en#flex-plans)
- [Managing Purchases & Customers](https://support.xola.com/managing-purchases-customers?hsLang=en#main-content)
- [Purchases Management](https://support.xola.com/managing-purchases-customers?hsLang=en#purchases-management)
- [Reservation Management](https://support.xola.com/managing-purchases-customers?hsLang=en#reservation-management)
- [Customer Management](https://support.xola.com/managing-purchases-customers?hsLang=en#customer-management)
- [Customer Data & Engagement](https://support.xola.com/managing-purchases-customers?hsLang=en#customer-data-engagement)
- [Reporting](https://support.xola.com/reporting?hsLang=en)
- [Integrations & Advanced Tools](https://support.xola.com/integrations-advanced-tools?hsLang=en#main-content)
- [Xola App Store Integrations](https://support.xola.com/integrations-advanced-tools?hsLang=en#xola-app-store-integrations)
- [Partner & Agent Management](https://support.xola.com/integrations-advanced-tools?hsLang=en#partner-agent-management)
- [Marketing & Tracking Integrations](https://support.xola.com/integrations-advanced-tools?hsLang=en#marketing-tracking-integrations)
- [Mobile and Hardware](https://support.xola.com/mobile-and-hardware?hsLang=en#main-content)
- [Mobile Tools and Apps](https://support.xola.com/mobile-and-hardware?hsLang=en#mobile-tools-and-apps)
- [Hardware Setup & Devices](https://support.xola.com/mobile-and-hardware?hsLang=en#hardware-setup-devices)
- Company
- [About Us](https://www.xola.com/about)
- [Careers](https://www.xola.com/team)
- [Press](https://www.xola.com/press)
- [Support](https://www.xola.com/support)
- [Security Policy](https://www.xola.com/security-policy/)
- Resources
- [Articles](https://www.xola.com/articles/)
- [Help Center](https://support.xola.com/)
- [Success Stories](https://www.xola.com/success-stories/)
- [App Store](https://www.xola.com/app-store)
- [Demo](https://www.xola.com/demo)
- [Xola Universe](https://www.xola.com/universe/)
- Documentation
- [API Documentation](https://developers.xola.com/)
- [Payment Services Agreement](https://www.xola.com/payment-services-agreement/)
- [Terms](https://www.xola.com/terms/)
[](https://www.xola.com/)
© 2026 Xola Inc. All rights reserved.
[Privacy Policy](https://www.xola.com/privacy-policy) [Terms of Service](https://www.xola.com/terms)