If you want to print physical tickets for your experiences—complete with your branding, reservation details, and experience information—Xola offers a professional solution through its partnership with Stimare and Star Micronics printers. This feature is ideal for tour operators, attractions, or venues looking to create a more polished, on-site check-in and guest entry process.
With the Stimare CLS 300 printer, you can issue branded tickets that improve operational flow and elevate the guest experience. However, this integration requires coordination with Xola Support and Stimare to ensure proper configuration before any hardware is purchased.
With Star Micronics printers, you can also offer printed tickets through Xola’s Kiosk App. This enables walk-up guests to easily purchase and receive tickets on-site, and then scan their unique QR codes at check-in to access their experience. Tickets are customizable to show your logo and experience details, and can be adjusted directly in your Xola account—no additional configuration with Xola Support is required. This makes it simple to deploy self-service kiosks, speed up lines, and maintain a consistent, professional presentation across both online and in-person check-ins.
Enhance your on-site experience by providing guests with professional, branded tickets. With Xola’s Ticket Printing integration, you can streamline check-in, improve brand visibility, and create a seamless, memorable first impression—especially useful for large groups or high-volume entry points.
User Access: Administrator roles have access to set up Ticket Printers in Xola.
Reservationist Lite or Reservationist roles can view and select which printer to print to in Xola.
Administrator, Reservationist Lite, Reservationist, Equipment Manager, Guide Manager or Guide roles can print tickets when checking in guest reservations in Xola.
To grant access to users, click here.
What’s Included in This Article
Overview of Ticket Printing with Stimare CLS 300
Xola allows you to print physical tickets that include:
-
Reservation details (date, time, guest info)
-
Your company logo or branding
-
Custom experience information
This setup is perfect for operators looking to offer guests a tangible check-in pass or entry credential.
Printer Hardware: Stimare CLS 300
Xola partners with Stimare to configure your ticket layout and ensure compatibility. The recommended printer is the:

This model is fast, reliable, and optimized for use with Xola’s system.
Important Note Before Purchasing
Please do not purchase the Stimare CLS 300 printer until you have:
-
Requested access through the Xola App Store
-
Spoken with a Xola representative
A support agent will work directly with Stimare to guide your ticket design and setup process.
How to Request Access in the Xola App Store
-
In Xola, go to the App Store
-
Locate the Ticketing app
-
Click Request Access
-
Complete the pop-up confirmation to submit your request
Next Steps & Support Coordination
After requesting access:
-
A Xola Support Agent will reach out to you
-
They’ll begin communications with Stimare
-
You’ll receive instructions to finalize your ticket printer setup
Once this process is complete, you’ll be ready to start issuing professional, custom-branded tickets to your guests.
How Ticket Printing Works
On Dashboard
- Navigate to your Dashboard, locate the guest's event, and click on it to show the roster.
- Next, locate the Check-In column under the guest section:
- Check in the group by clicking on the green
 button next to the group name at the top.
- Check in the group by clicking on the green
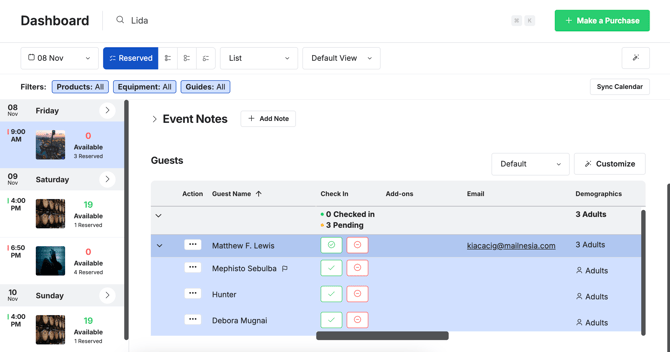
When you click the Check In button next to a reservation, a pop-up will appear prompting you to select how many guests you'd like to check in and/or print tickets for. You can:
-
Check in all guests at once or partially check in a group
-
Print physical tickets for the selected number of guests (if you’ve set up ticket printing).

On The Quick Dashboard Search Bar
- Navigate to your Dashboard. At the top of your screen, there is a search bar that enables you to quickly find a customer using their name, email, phone number, tag, or ID.
- Once a customer is searched and selected, click the check mark. Here you can:
- Check in the group by clicking on the green button next to the group name at the top.
- Check in the group by clicking on the green
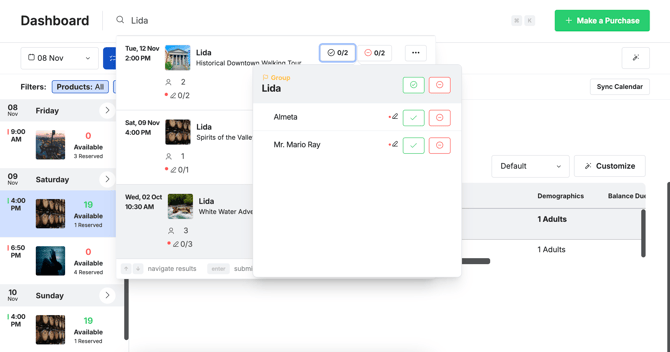
When you click the Check In button next to a reservation, a pop-up will appear prompting you to select how many guests you'd like to check in and/or print tickets for. You can:
-
Check in all guests at once or partially check in a group
-
Print physical tickets for the selected number of guests (if you’ve set up ticket printing).
Overview of Ticket Printing with Star Micronics
Xola allows you to print physical tickets with our Kiosk App that include:
-
Your company logo or other photo
- QR Code for scanning
-
Reservation details (date, time, guest info, add ons)
-
Custom Thankyou message
This setup is perfect for operators looking to use the Xola Kiosk App and offer guests a tangible check-in pass or entry credential that is scannable upon entry.
Printer Hardware: Star Micronics
The recommended printers to use with Kiosk is:
- Star TSP100 (all variants)
- Star TSP143 (all variants)
- mc-Print2
- mc-Print3
- TSP743 (all variants)
- TSP847 (all variants)
Important Note Before Purchasing
How to Set up Kiosk for Ticket Printing
Follow these steps to set up the Self-Service Kiosk:
- Go to the Apple App or Google Play store on your iPad or Android Device.
- Search Xola Kiosk, and install the Xola Kiosk App.
.png?hsLang=en)
- Once installed, open the App.
- Log into your Xola Account.
- Hit Launch Kiosk.
.png?width=550&height=733&name=Untitled%20design%20(41).png)
- Now you will be able to see the different functions your customers can do when they see the Kiosk.
To learn more about the features of Kiosk, click here.
Setting Up a Printer in Kiosk
Xola Kiosk supports USB, Bluetooth, and Network printers on Android and iOS devices. Follow the steps below based on how your printer connects.
USB Printer Setup (Android Only)
-
Plug the printer directly into your Android device using a USB cable.
-
Open the Kiosk app.
- After logging in, tap the screen 5 time fast in the top left corner.
- This will bring up a log in screen asking for a pin.
- The default pin the first time you log into the settings area is 8675309
- Go to Printer
-
Select Printer Connection Type → USB printer.
-
Under Printers find your printer and tap Connect.
The printer should connect automatically once selected.
Bluetooth Printer Setup
-
On your Android device, open System Settings → Bluetooth.
-
Turn Bluetooth on and pair the printer with your device.
-
Once paired, open the Kiosk app.
- After logging in, tap the screen 5 time fast in the top left corner.
- This will bring up a log in screen asking for a pin.
- The default pin the first time you log into the settings area is 8675309
- Go to Printer
-
Select Printer Connection Type → Bluetooth printer.
-
Under Printers find your printer and tap Connect.
The printer should connect automatically once selected.
Network Printer Setup
-
Set up the printer’s network connection directly on the printer (Wi-Fi or Ethernet).
-
Make sure the printer and the device are on the same local network.
-
Open the Kiosk app.
- After logging in, tap the screen 5 time fast in the top left corner.
- This will bring up a log in screen asking for a pin.
- The default pin the first time you log into the settings area is 8675309
- Go to Printers
-
Select Printer Connection Type → Network printer.
- Under Printers find your printer and tap Connect.
The printer should connect automatically once selected.

Important Notes
-
Bluetooth printers must be paired at the device level first before connecting in Kiosk.
-
Network printers must be fully connected to the network before they appear in the app.On Dashboard
How Ticket Printing Works Star Micronics
Making a Booking
The Kiosk allows your guests to make walk-up reservations on their own using a self-service screen. They can browse your experiences, choose a date and time, enter their information, and pay by credit card without staff assistance. As soon as the reservation is completed and payment is approved, a physical ticket will automatically print from the connected Star Micronics printer, providing the guest with a scannable entry pass for check-in.
Credit Card is the only method of payment that is accepted by Kiosk.
Required:
- Mobile Compatible card reader
- Account needs to have EMV enabled (contact support)
Making a reservation via the Kiosk app is similar to the web checkout experience.
- From the Kiosk home screen, press the Book Now button.
- Select an experience.
- Select the Date and Time for the activity.
- Select the number of guests.
- Provide the organizer's contact information.
- Collect payment (credit card only) to complete the reservation.
Once the payment is accepted, the guest can click the Sign Waiver or Finish button to complete the transaction. Once the payment is accepted, a physical ticket will automatically print from the connected Kiosk printer.
.gif?hsLang=en)