---
title: Product - Global Settings
description: Xola's Global Settings allow you to configure Reviews, Questionnaires, Terms & Conditions, Blackout Schedules, and more across all your experiences, ensuring uniformity and saving setup time.
---
[Skip to content](https://support.xola.com/product-global-settings#main-content)
English
Show submenu for translations
[](https://www.xola.com/)
- [Home](https://support.xola.com/)
- [24/7 Live Support](https://www.xola.com/support/)
Open main navigation
Close main navigation
- [Home](https://support.xola.com/)
- [24/7 Live Support](https://www.xola.com/support/)
- English
Show submenu for translations
- [Login](https://xola.com/_public/login.html)
[Login](https://xola.com/_public/login.html)
How can we help you?
- There are no suggestions because the search field is empty.
1. [Help Center](https://support.xola.com/?hsLang=en)
2. [Getting Started](https://support.xola.com/getting-started?hsLang=en)
3. [Account Setup & Configuration](https://support.xola.com/getting-started?hsLang=en#account-setup-configuration)
# Product - Global Settings
## Centralized Control and Flexible Customization for Streamlined Experience Management
---
**Global Settings** empower you to **centrally manage** key features—such as **Reviews, Questionnaires, Terms and Conditions, and Blackout Schedules**—across all your experiences from a single, streamlined location. This centralized approach significantly **reduces workload** by eliminating the need to configure each experience individually when settings are consistent, ensuring **uniformity** and saving you **valuable time**.
Xola’s flexible system doesn’t stop at global controls; you can easily **combine global and product-specific settings** to perfectly suit your operational needs. For example, you might establish **standard Blackout Schedules and Reviews** that apply universally while still creating **tailored Questionnaires** or **custom Terms & Conditions** for experiences requiring unique details or legal requirements. This **mix-and-match structure** puts you in complete control, offering the **freedom to optimize efficiency and customization** for every experience you provide.
**User Access:** **Administrator** or **Curator** roles have access to set up and manage Global Settings in Xola.
To **grant access** to users, [click here](https://seller.xola.app/settings/users).
[Watch the Global Settings video tutorial](https://demo.xola.com/showcase/cmnxpdbu702w71y0jlc54mpnk?utm_source=link)
---
**What's covered in this article:**
- [Blackouts and Restrictions](https://support.xola.com/product-global-settings#blackout)
- [Checkout Preferences](https://support.xola.com/product-global-settings#checkout)
- [Global Terms and Conditions](https://support.xola.com/product-global-settings#terms)
- [Check-in Preferences](https://support.xola.com/product-global-settings#checkin)
- [Custom Email Footer](https://support.xola.com/product-global-settings#footer)
- [Demographics](https://support.xola.com/product-global-settings#Demographic)
- [Add-ons](https://support.xola.com/product-global-settings#addon)
- [Pickup Location](https://support.xola.com/product-global-settings#Pickup)
- [Date Picker](https://support.xola.com/product-global-settings#datepicker)
- [Reviews](https://support.xola.com/product-global-settings#reviews)
- [Questionnaire](https://support.xola.com/product-global-settings#Question)
---
### Blackouts and Restrictions
Need to block off certain days or times - like holidays, team events, or limited staffing? Use **Blackout Schedules** in **Global Settings** to manage availability across all experiences. These settings help you prevent bookings when you're closed or unable to check in multiple groups at once.
#### Creating a Blackout Schedule
- Navigate to the [Products \> Global Settings \> Blackouts and Restrictions](https://seller.xola.app/products/globalSettings/blackout).
- To create a new Blackout Schedule, hit **+Blackout Schedule**.
- **Name:** Name this schedule so you can easily identify it.
- **Dates**
- - **Date Range:** Select the days of the week for which you'd like to make close-off availability.
- **Specific Date:** Select the calendar dates for which you'd like to make close-off availability.
- **Time Ranges:** Select the time range in which the Blackout Dates will close off availability.
**Note**: Events with active reservations in this blackout schedule will be retained.
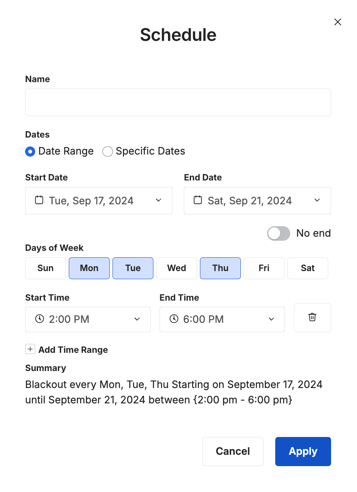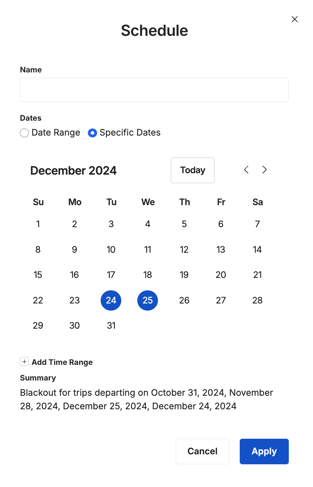
Days and times that have been designated as Blackout Schedules will not show any availability on your website or in the back office for your staff.
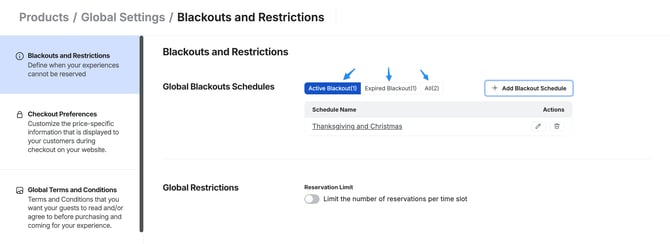
After creating your blackout schedules, you can edit them by clicking the  icon or delete them by selecting the icon. Additionally, use the tabs above the schedules to view which schedules are active, expired, or all.
#### Reservation Limits
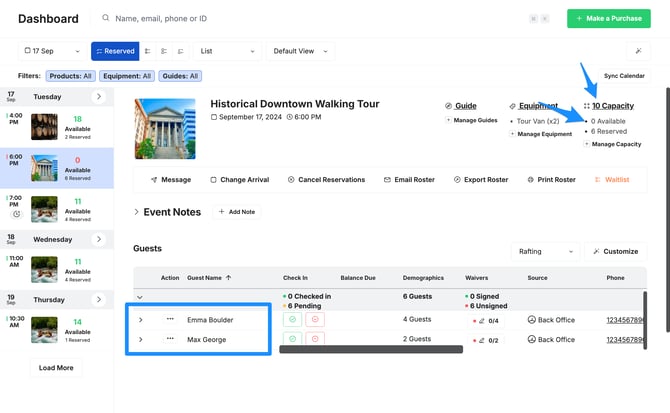
This feature ensures that no more than the specified number of reservations can start at the same time across all your experiences. This helps limit the number of groups checking in at the same time.
- Navigate to the[**Products** \> **Global Settings** \> **Blackout and Restrictions.**](https://seller.xola.app/products/globalSettings/blackout)
- Under Global Restrictions, toggle on the limit the number of reservations per time slot.
- Next, add the number of reservations you will allow in one time slot.
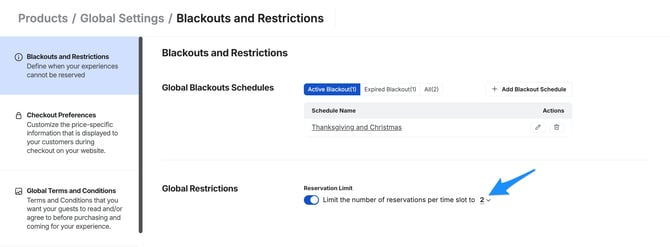
This will override any capacity you have set.
> **For Example:** If you have a capacity set to 10 guests for an experience, and your limit restriction is set for the time slot is 2 reservations.
>
> Reservation 1: 2 guest
>
> Reservation 2: 4 guest
>
> Your capacity is capped at 6 guests and the last 4 spots will be unavailable.
---
### Checkout Preferences
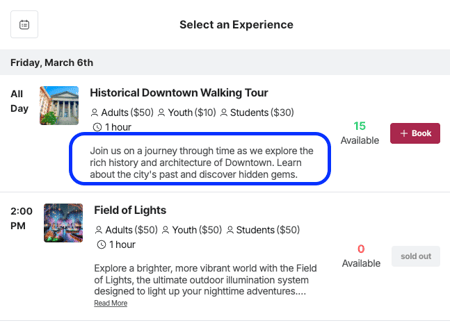
In Xola, you can customize the price-specific information that is displayed to your customers during checkout on your website. You may choose to show the range of prices for your experiences, the lowest price, a price range, or simply no price information. You can also customize how Taxes & Fees are shown. If you use Timeline checkout, you can control the information that appears on the tiles displayed on the first page of checkout.
#### Customize your Price Messaging
- Navigate to the **[Products \> Global Settings \> Checkout Preferences](https://seller.xola.app/products/globalSettings/checkout)**.
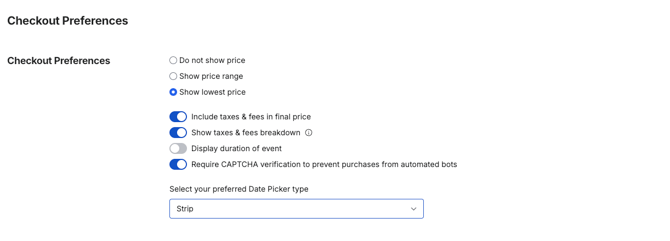
- Select from one of the following options:
- **Do not show price:** No prices will show at all at checkout.
- **Show price range:** Checkout will display the lowest-highest prices for the experience.
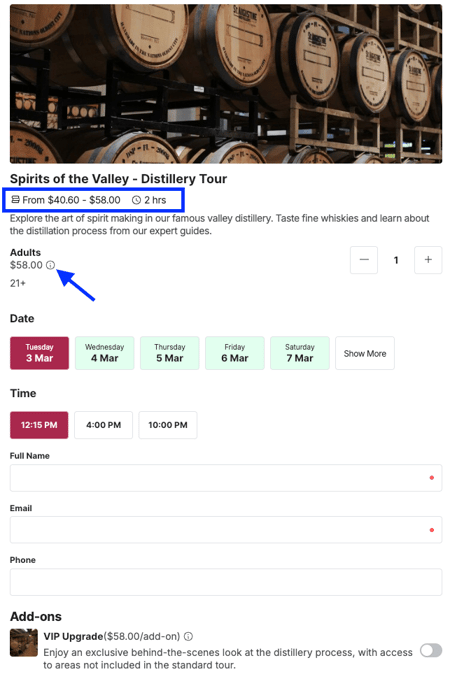
- **Show lowest price:** Will show the lowest demographic price for the experience.
Additionally, you can customize how Taxes and Fees are shown.
- **Include Taxes & Fees in final price:** This indicates at the start of checkout that the price shown includes taxes and fees.
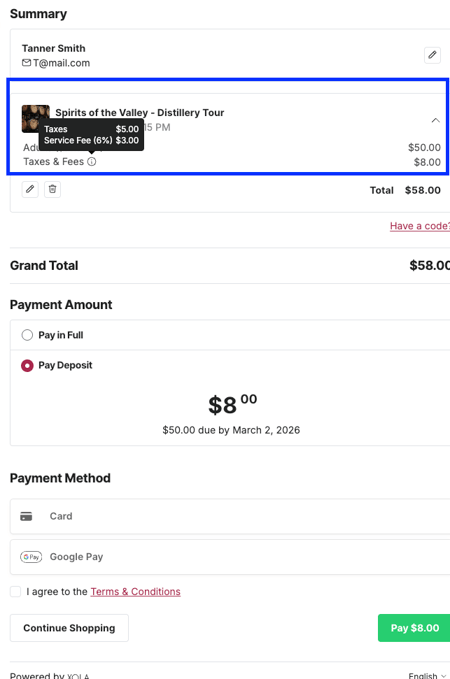
- **Show Taxes & Fees Breakdown:** You can opt to show each tax and fee as a line item on hover and in emails to customers or have them lumped as a single line item.
- **Display Duration of Event:** Show the event's duration during checkout.
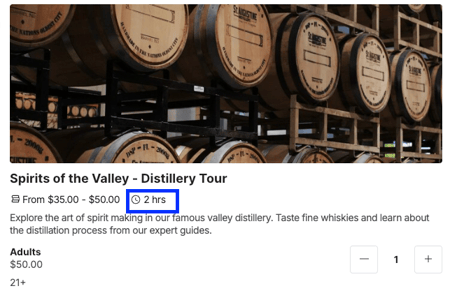
- **Require CAPTCHA verification to prevent purchases from automated bots**: means customers have to complete a quick human-check before they can finish a purchase.
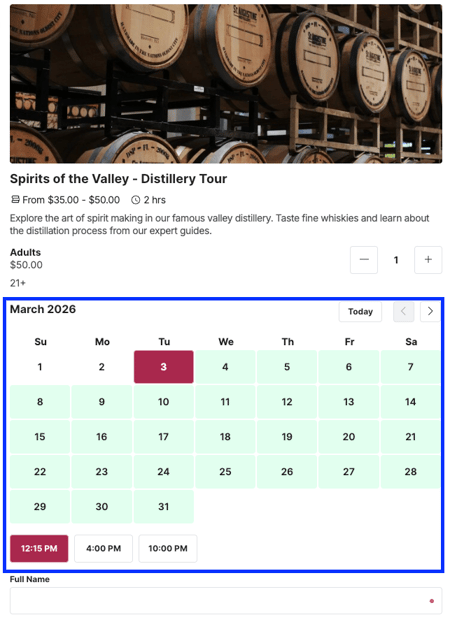
- **Select your preferred Date Picker type:**
- **Strip**: Xola will determine how many days in advance to display to your customers in a strip format.
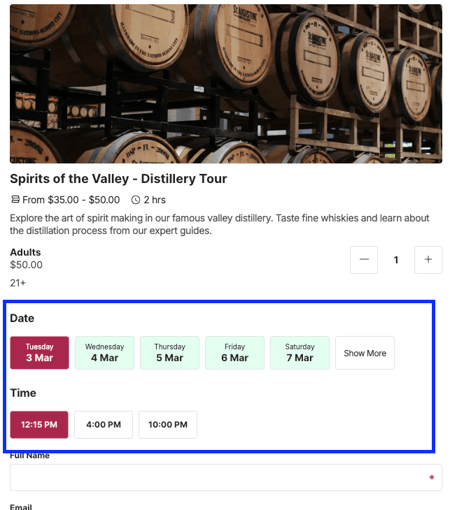
- - **Calendar:** Your date picker will display in a month-by-month calendar view.
Customize Timeline Checkout's Appearance
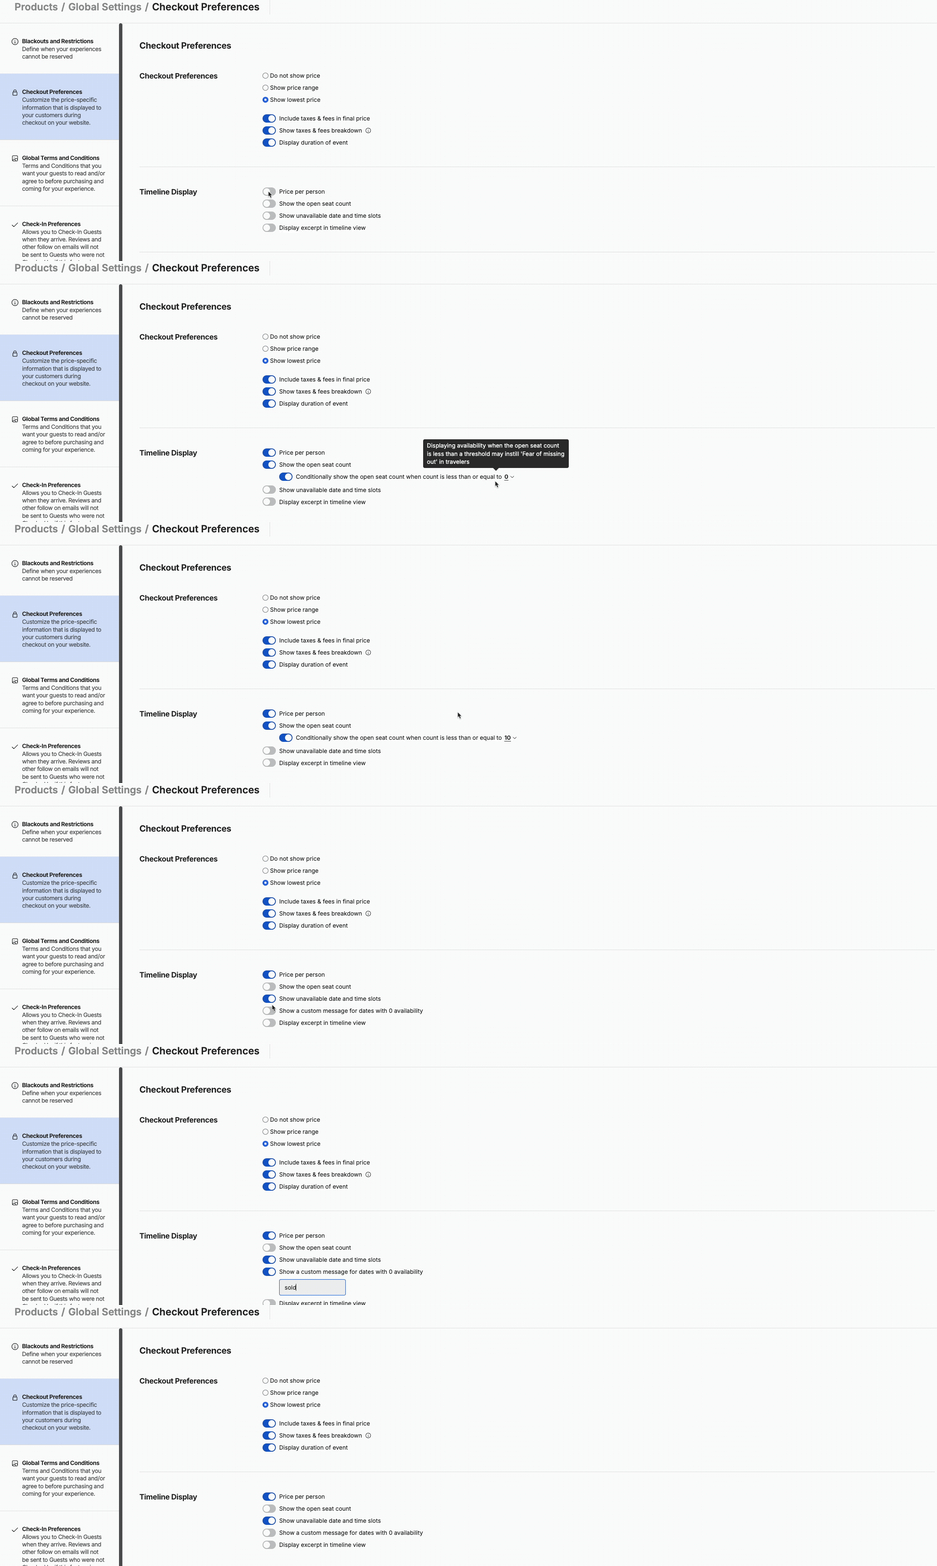
Select from one of the following options:
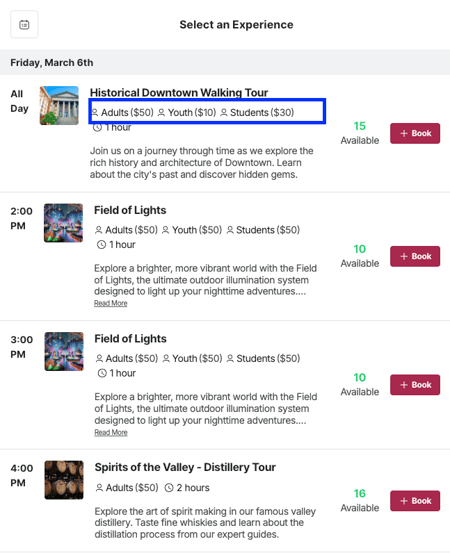
- **Price Per Person:** On timeline checkout, this will display prices for all demographics associated with a given experience.
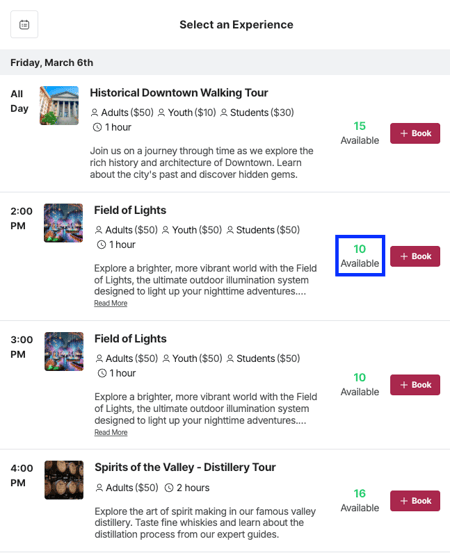
- **Open Seat Count:** Display the remaining seats available to be booked for this particular time slot.
- **Conditionally show the open seat count**: You can choose to only display the seat count once it is equal to or below a specific number.
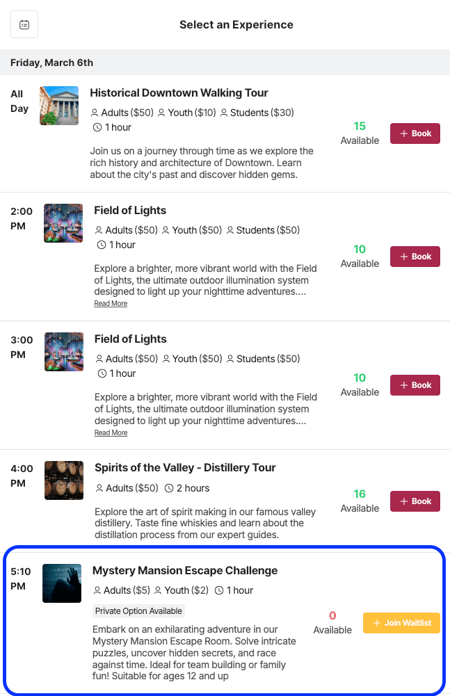
- **Show unavailable timeslots**
****
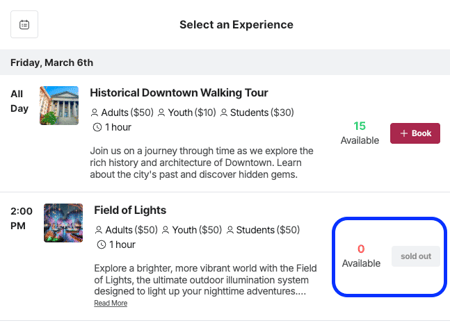
- **Show a custom message for unavailable dates:** If you don't enter anything here, the default will be to display "0 Available".
- **Display excerpt in timeline view:** This will show your excerpt in your timeline checkout
#### Split Pay
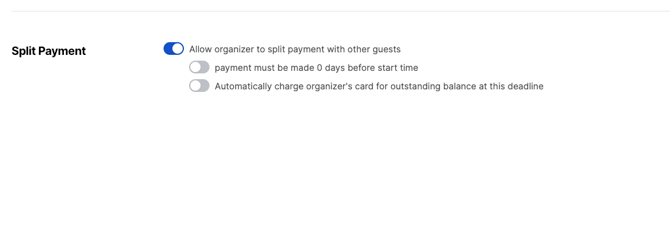
To learn more about Split Pay, **[click here](https://support.xola.com/split-payment-purchases?hsLang=en)**.
---
### Global Terms and Conditions
You may have Terms and Conditions (T&Cs) that you want your guests to read and/or agree to before booking and arriving for your experience. In Xola's Global Settings, you're able to paste in not only your T&Cs in that heavy legalese, but you can even include a reader-friendly version that's easier for us plebeians to understand.
The best thing about Xola Terms and Conditions? You can require your customers to agree to them before completing their reservation. The customer will have to check a checkbox agreeing to T&C before they will be able to reserve.
The following details how to set up Terms and Conditions in Global Settings, meaning you'll have one set of T&Cs that apply to all of your products. For details on how to set up **Product-Specific T&Cs**, click **[here](https://support.xola.com/product-experiences-set-up?hsLang=en#terms)**.
#### Set Your Terms and Conditions
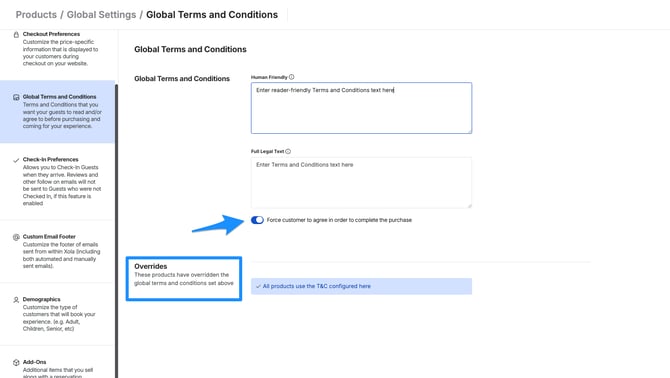
- Navigate to the [Products \> Global Settings \> Global Terms and Conditions](https://seller.xola.app/products/globalSettings/terms).
- Enter the Full Legal Text of your T&Cs in the first text box.
- Optional: If you'd like to summarize or paraphrase the legal text for your customers, enter the terms in the Human-Friendly text box as well.
- To have your terms and conditions shown to customers on the checkout, tick the box **Force customer to agree in order to complete the purchase**. This will make the customer agree to these T&Cs before they pay."
- The customer will have to check a checkbox agreeing to T&C before they will be able to reserve.
- Click **Save**.
Xola will tell you if any products have product-specific T&Cs that override the Global in the **Overrides** section.
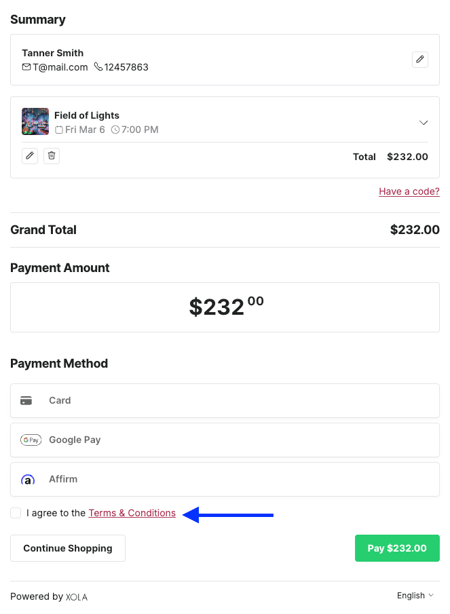
#### The Customer Experience
Once you configure your Terms and Conditions, the customer will have to check a checkbox agreeing to Terms and Conditions before they will be able to reserve.
**Note**: Customers will be forced to agree to the terms and conditions set, regardless of the **Force customer to agree in order to complete the purchase** toggle being enabled.
---
### Check-in Preferences
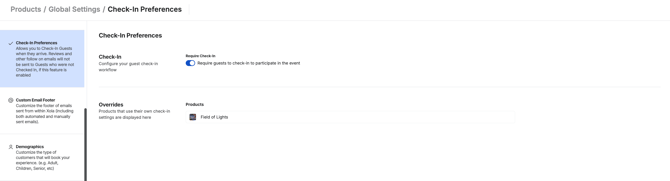
**Global Check-In Preferences** apply to all experiences when enabled.
Go to **[Global Settings \> Check-In Preferences](https://seller.xola.app/products/globalSettings)** and toggle on **Require guests to check-in to participate in the event**.
Once enabled, only guests marked as checked-in will receive follow-up emails like reviews and gratuity requests. Guests marked as no-shows will be excluded.
You’ll also see a list of experiences that have custom check-in settings that override the global default.
[Click here](https://support.xola.com/check-in-preferences?hsLang=en) to learn more about Check-In Preferences.
---
### Custom Email Footer
In Xola you have the option to customize the footer of emails sent from within Xola (including both automated and manually sent emails)**.** This can be done at the global level, or on an experience by experience basis.
To set up a global custom email footer, follow these steps:
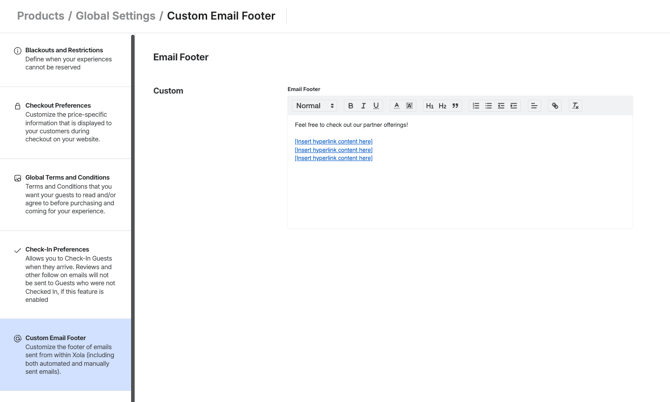
- Navigate to **[Products \> Global settings \> Custom Email footer](https://seller.xola.app/products/globalSettings/customer-email-footer)**.
- Use the text editor tool to create a footer section that will appear at the bottom of your emails sent through Xola.
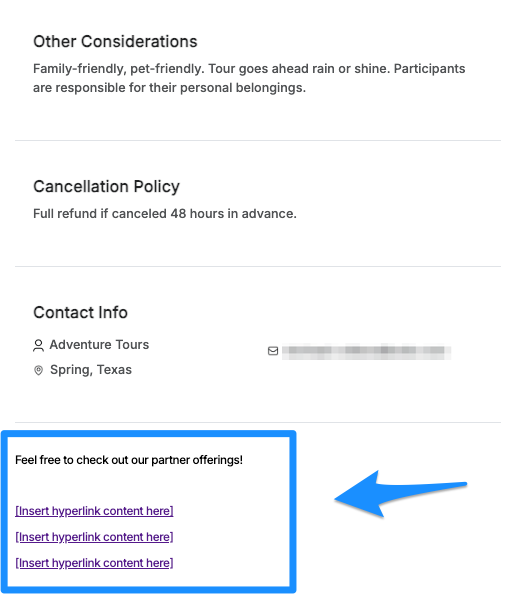
Here's what the above footer would look like when used in a purchase confirmation or reminder email:
---
### Demographics
You can set your pricing demographics on a product-specific or global basis. If you've got five different tours and you offer the same demographic discounts across the board, Xola makes it easy to set these up just once.
- Navigate to the [Products \> Global Settings \> Demographics](https://seller.xola.app/products/globalSettings/demographics).
- Click **+Create Demographic** to add a new global demographic.
- Enter in the **Name** of the demographic.
- **Optional:** Enter a caption for this demographic.
- Click **Create**.
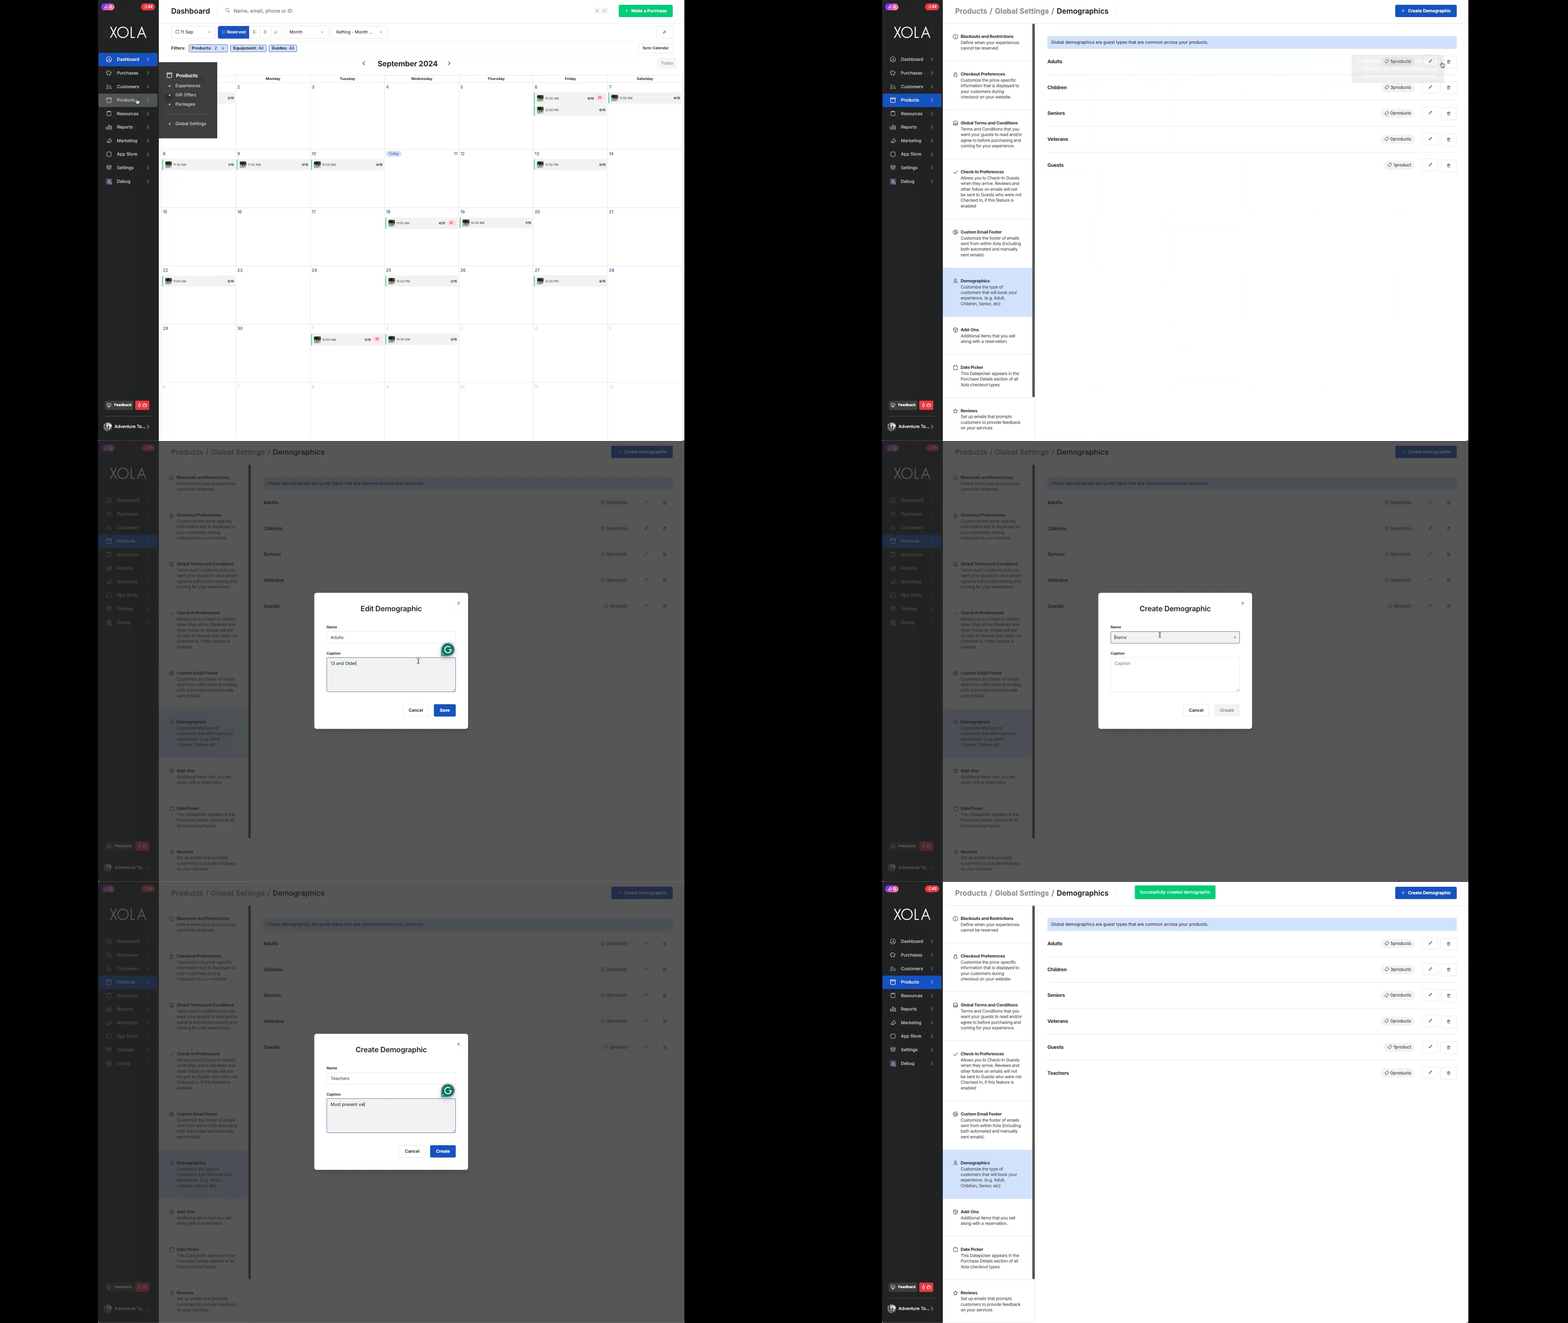
After creating demographics, you can edit them by clicking the  icon or delete them by selecting the icon. These changes will apply to all experiences to which the demographic is applied.
---
### Add-ons
Add-ons are extra items that you sell alongside a reservation. These can be anything from GoPro cameras and water bottles to lunch or a bottle of champagne. It really depends on your business.
Add-ons can be customer-facing (available to purchase during online checkout) or private (can only be added to a reservation if it is a back office purchase or modification).
- Navigate to the [Products \> Global Settings \> Add-Ons](https://seller.xola.app/products/globalSettings/add-ons).
- Click +**Create Add-on**.
- **Name**
- Add the **Description** of the add-on.
- This will show in checkout and is not mandatory.
- Add the **Products** that the add will apply to.
- Add an **image** for the Add-on.
- Click the Upload Photos button to add photos to your Add-on. You can add a .jpg and .png images to each Add-on with a maximum size of 5 MB.
- Choose a **type**:
- **Quantity:** can be added to a reservation incrementally, similar to demographics.
- **Checkbox:** can be added to a reservation in a binary fashion. If toggled during the reservation process, the add-on will be added.
- **Dropdown list:** create a list of options to choose from at the time of reserving (each with different prices, if you'd like). Only one option can be chosen.
- You can drag and reorder the list to appear in the order you would like, by clicking the three lines and dragging it.
- You can choose which dropdown add-on you would like to be the default item shown during checkout.
- This will show the customer your default add-on, instead of showing the words "choose an option"
- Set a **Price:**
- Quantity add-ons can have a single price "per quantity". The add-on's final price will depend on the quantity chosen.
- Checkbox add-ons and dropdown list options can be priced either as a discrete dollar amount or as a percentage of the reservation demographic total (before other add-ons and before any applicable taxes and fees).
- Set **Limits**:
- **Limit add-ons per event:** Set the maximum number of this add-on that can be sold across all reservations for a single event (time slot). Once the limit is reached, the add-on will no longer be available for that event.
- This option is not avaiable for **drop-down** add-ons.
- **Limit add-ons per reservation:** Set the maximum number of this add-on that can be added to a single reservation.
- This option is only available for **quantity** add-ons.
- **Limit add-on quantity per guest:** Set the maximum quantity of this add-on that each guest in a reservation can purchase.
- This option is only available for **quantity** add-ons.
- - **Allow reservationist to oversell:** When enabled, your staff can go over the limits above when making a back office purchase or modifying a reservation. Customers booking online will still be held to the limits.
- This option is not avaiable for **drop-down** add-ons.
> **For Example:** You have 10 GoPro cameras available for each tour. Toggle on **Limit add-ons per event** and enter 10. If one reservation books 4 GoPros and another books 6, the GoPro add-on will no longer be available for that event.
>
> To keep a single group from booking all 10, you can also toggle on **Limit add-ons per reservation** and enter 4.
**Note:** Limits only apply to the add-on they are set on and do not affect your experience’s capacity.
- **Settings:**
- **Private Add-ons:** If you do not want this add-on to appear during online checkout, toggle on "Add-on is only available for back office purchases." This add-on will only show in back office purchases or when modifying a purchase.
- **Required:** You have the option to make an add on **required**, meaning customers must choose an option in order to proceed with their reservation. Reservationists may skip these.
- This option is not avaiable for **checkbox** add-ons.
- Click **Save**.

After creating your Add-ons, you can edit them by clicking the  icon or delete them by selecting the icon.
**Add-ons + Taxes & Fees**
You can decide whether or not to apply Taxes & Fees to Add-ons by navigating to [Settings \> Taxes & Fees](https://seller.xola.app/settings/taxesAndFees). Click **[here](https://support.xola.com/taxes-and-fees-setup?hsLang=en)** for more on configuring your Taxes & Fees.
### Pickup Location
Pickup Locations allow you to define where guests should meet you before an experience begins. These locations can include optional pricing, instructions for guests, and an optional pick-up time.
Pick-up Locations are useful when:
- You offer transportation or shuttles
- Guests must meet at a specific location before the experience
- Different locations have different pricing or instructions
#### Creating a Pick-Up Location
To add a new Pick-up Location, go to **[Products → Global Settings → Pickup Locations,](https://seller.xola.app/products/globalSettings/pickup-locations)** thenclick **Create Pickup Location**. A modal will open where you can configure the details.

Next, enter the details of the pickup location:
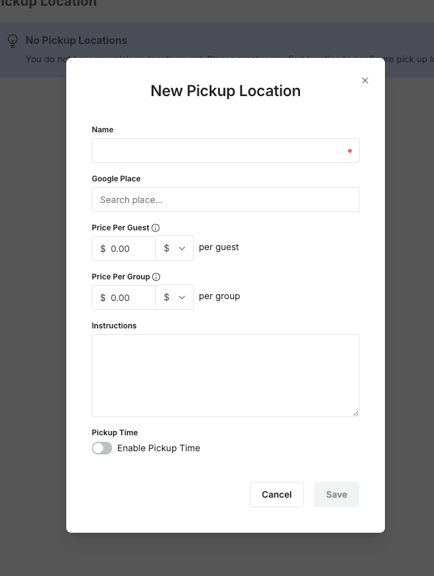
- **Name:** Enter a name for the pick-up location. This is required and is how the location will appear internally and to guests. This name will appear in Checkout, the email communications with the guest, and on the Roster.
- **Google Place:** Search for and select a location using Google Places. This helps ensure accurate address and map data for guests on communication emails.
- **Price Per Guest (optional):** Set an additional fee that applies per guest for this pick-up location. This option is best if you want each guest in a group to pick their own pickup location through our questionnaire.
- Enter an amount (e.g. $5.00 per guest). The amount can be a per-guest dollar amount or a percentage of the total price of the experience.
- **Price Per Group (optional):** Set a flat fee per booking group, regardless of the number of guests. This is best used when only the reservation organizer selects the pickup location for the whole group.
- Enter an amount (e.g. $20.00 per group). The amount can be a per-group dollar amount or a percentage of the experience's total price.
Leave at $0.00 if no per-guest or per group charge applies.
- **Instructions:** Add any instructions guests should know about this pick-up location, such as:
- Where to meet
- What to look for
- Arrival timing or parking notes
These instructions are visible to guests on all communication emails that include the pick-up location.
- **Pickup Time (optional):** Enable Pickup Time if guests are expected at a location at a specific time. This will update the confirmation email to include the time they should arrive at the pickup location. This is based on the scheduled event time.
Once all required fields are completed:
- Click **Save** to create the pick-up location
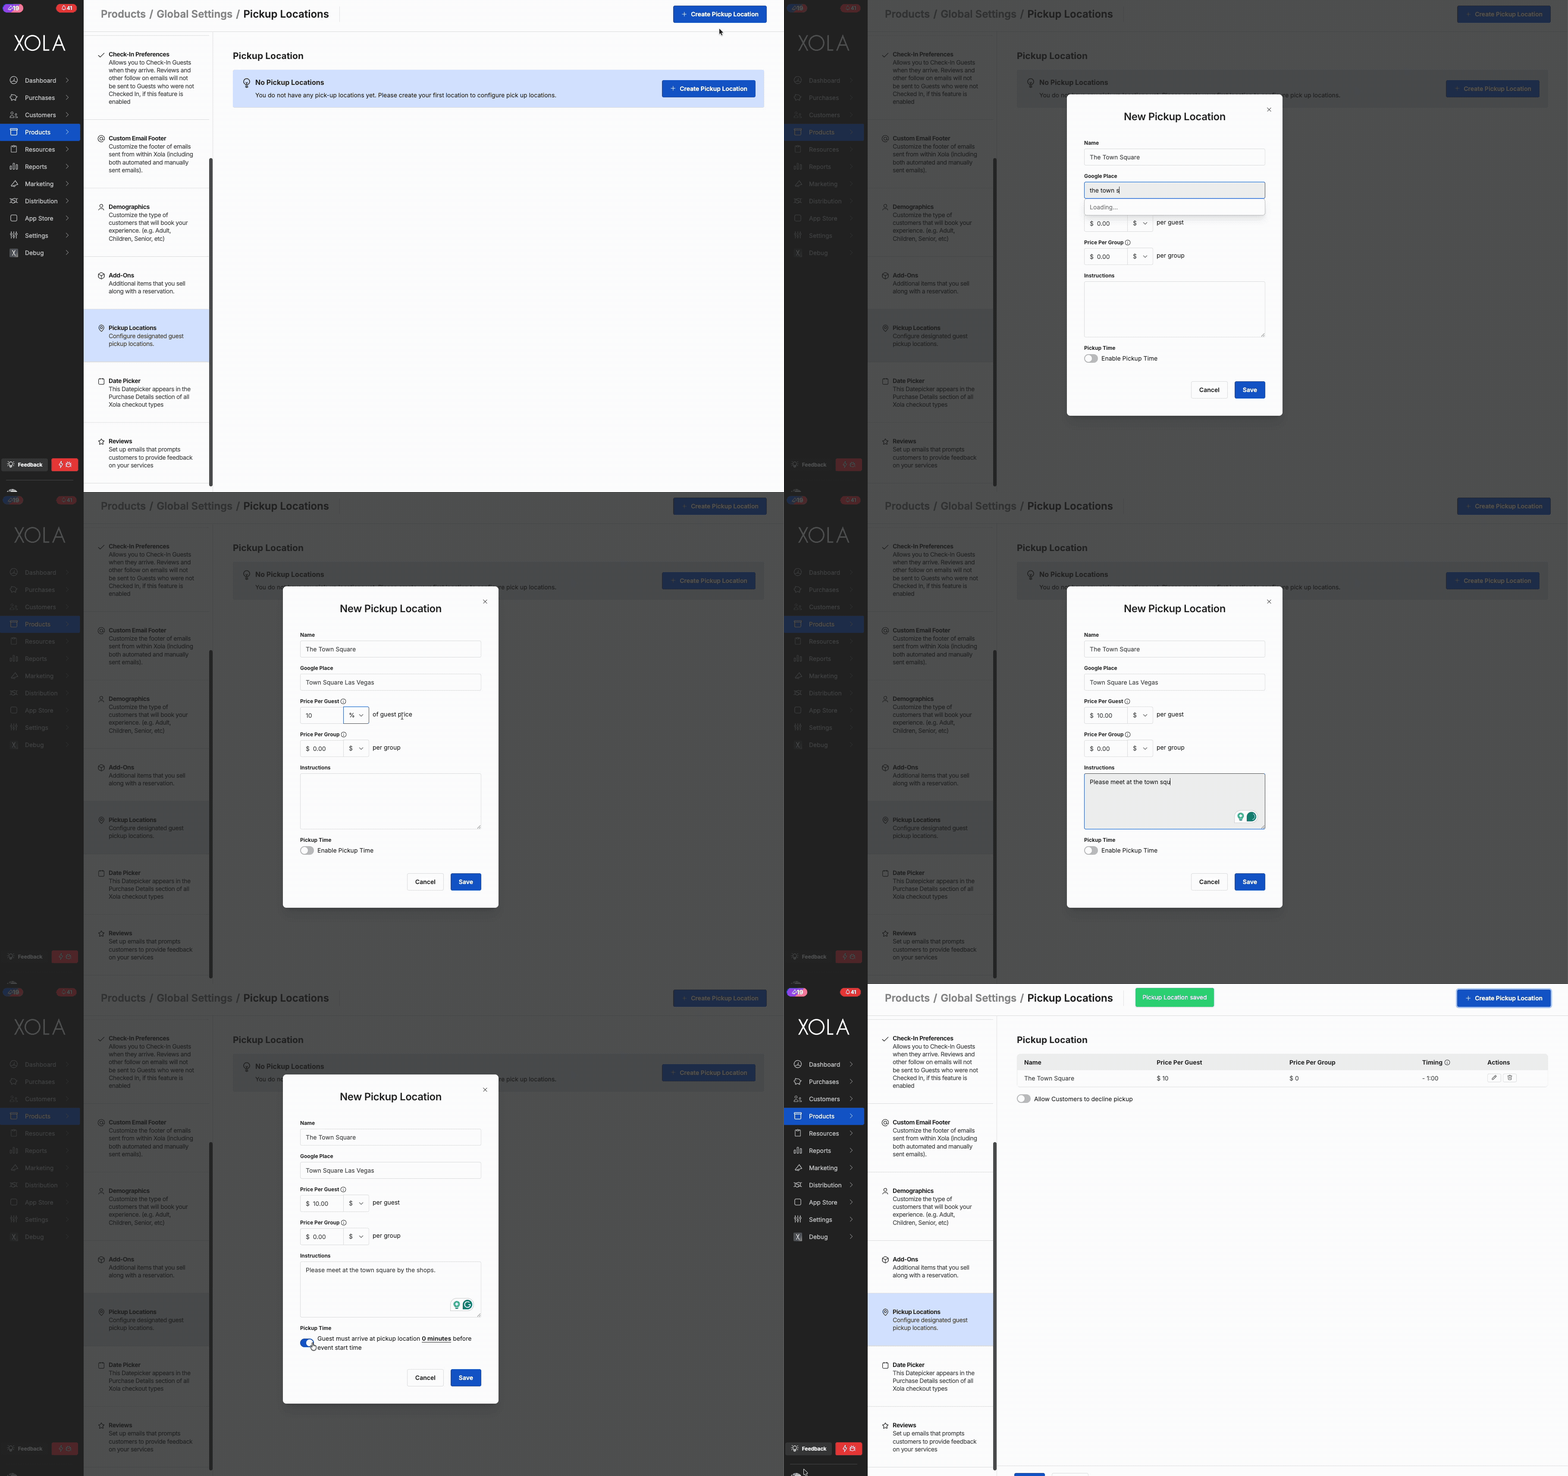
Once pickup locations are added, you will see a table of all your pickup locations. You can also toggle on **Allow Customers to decline pickup.** Once toggled, you can:
- Edit the **Pickup location dropdown option** wording or keep as the default.
- Add a **Custom message to include in** all emails with a pickup location for your guests to see.

Under the action column in the table, you can use the  icon to edit an existing pickup location or use the icon to delete a pickup location.
Next, you must add the pickup location to your questionnaire, either at the Global level or for a specific Experience. Click on the link to learn more about adding the pickup location to your questionnaire at the [Global level](https://support.xola.com/product-global-settings#Pickup-question)or [Experience level](https://support.xola.com/product-experiences-set-up#question).
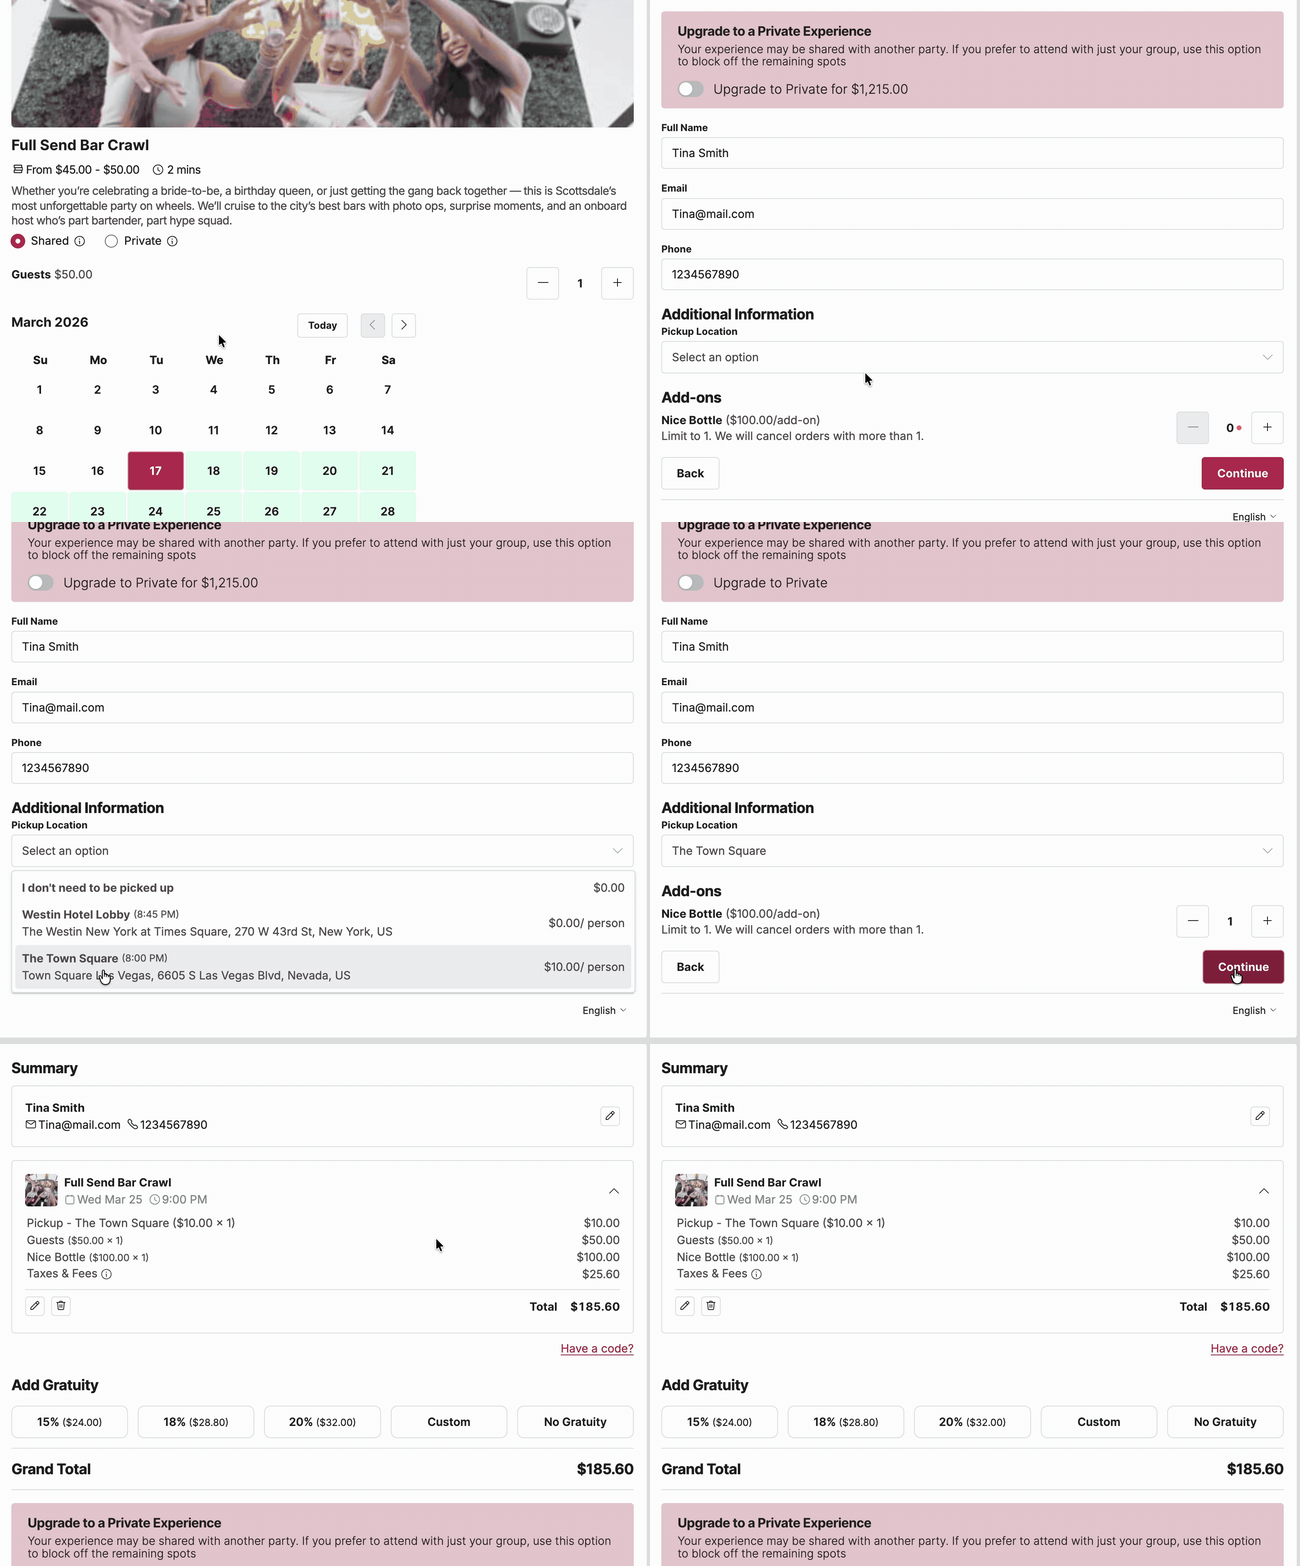
**Pickup Location on Checkout:**
When a pickup location is configured for an experience, customers can select it during checkout under **Additional Information** after entering their contact details. Their selection will also appear in the payment summary on the following page.
****
Click the links to learn more about how pickup locations work on:
- [Back Office Purchases](https://support.xola.com/make-purchases-through-back-office?hsLang=en)
- [Communications to customers](https://support.xola.com/customer-communication-automatic-emails-sms?hsLang=en)
### Date Picker
In Xola, you can customize the information displayed to your customers while they are choosing dates inside your online checkout windows. This can be put to use in many different ways, depending on what type of message you'd like to send to your customers.
For example, using **Show Open Seat Count** along with **Sold out** messaging for unavailable departures, you can create a sense of urgency to book or showcase the popularity of certain experiences. Alternatively, if your site has a clean and minimalistic design, you may consider choosing not to display information like Trip Price or Open Seat Count at all.
Using Timeline checkout? Find out how to customize **[here](https://support.xola.com/product-global-settings#checkout)** instead.
#### Customize Your Date Picker (Reservation Details Page)
This Date Picker appears in the Reservation Details section of all Xola checkout types (except for Gift Certificate checkout). This is the page where customers input items like date, guest count, and contact information, and the Date Picker itself appears when the customer clicks to choose a date. To customize this, follow the steps below.
- Navigate to the **[Products \> Global Settings \> Date Picker](https://seller.xola.app/products/globalSettings/datepicker)**.
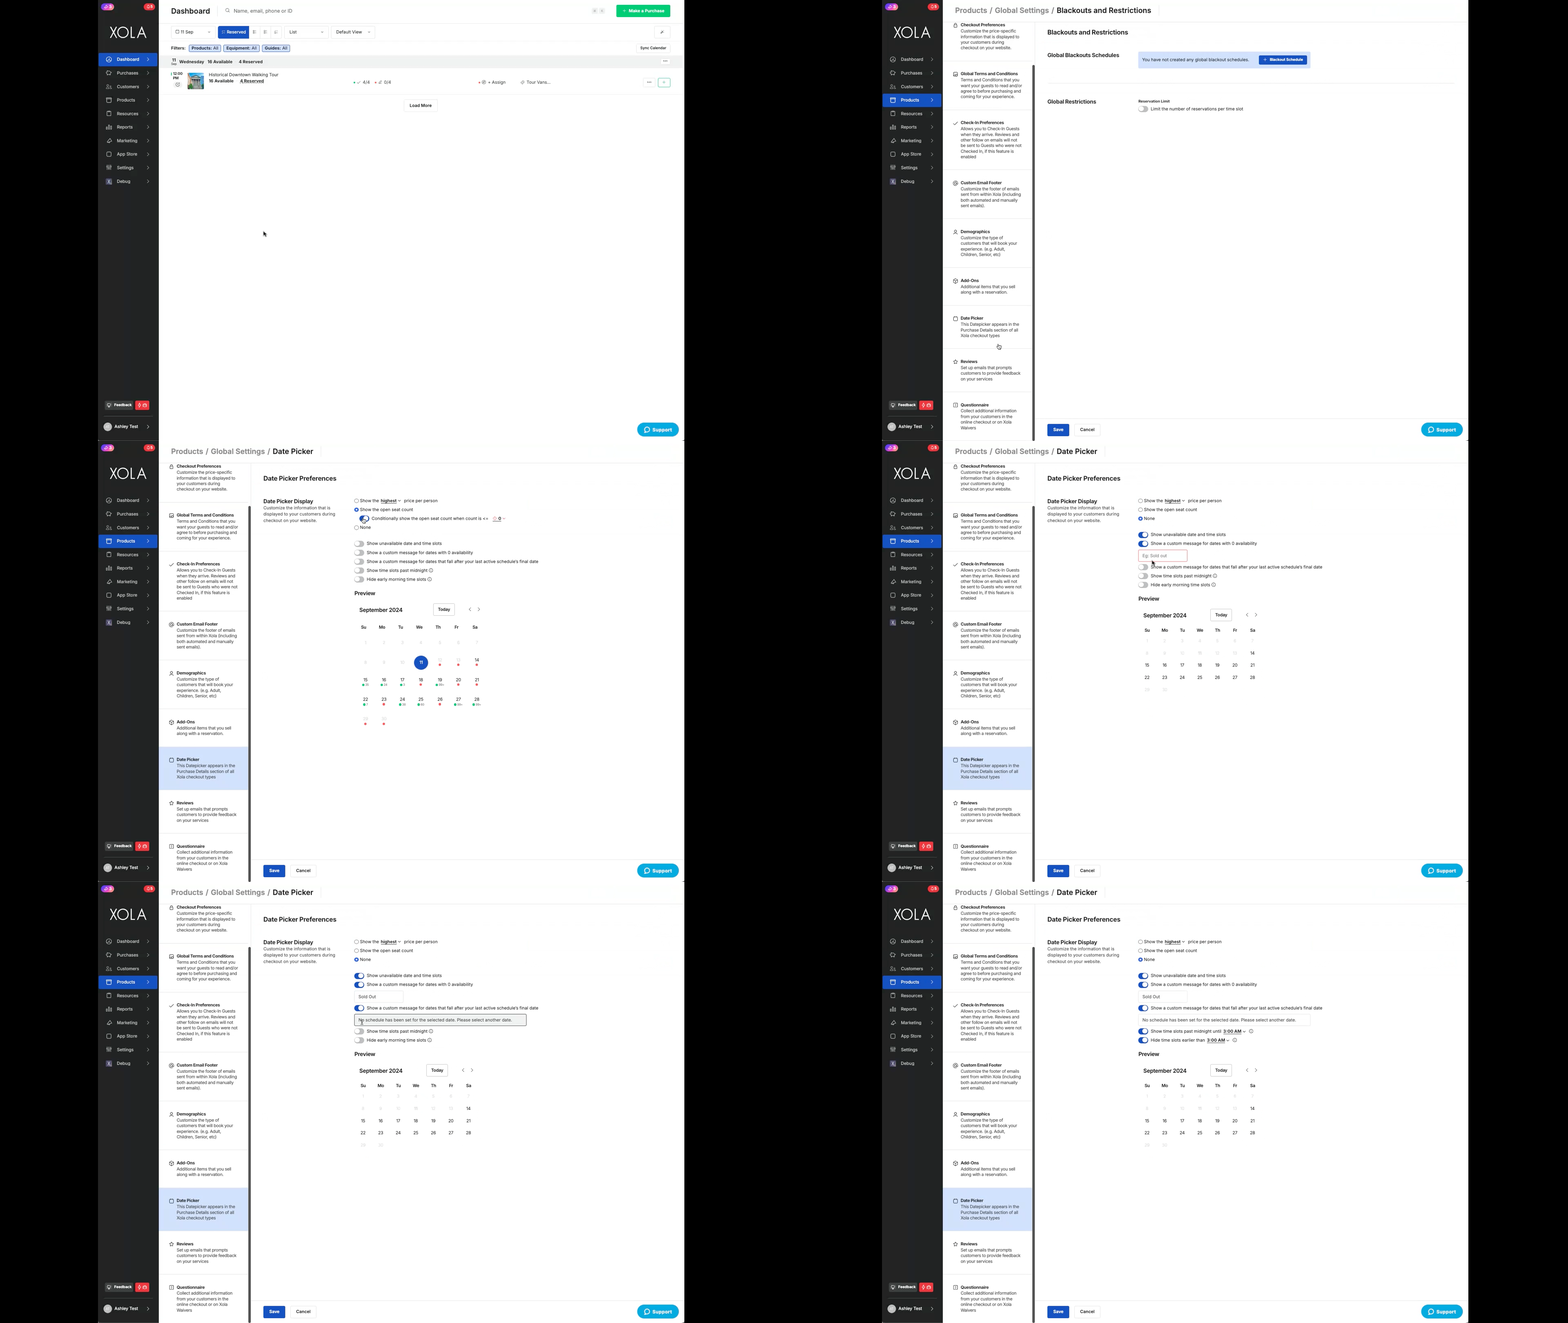
- Select from one of the following options.
- **Price Per Person:** This will display either the highest or lowest base price according to the experience pricing configured.
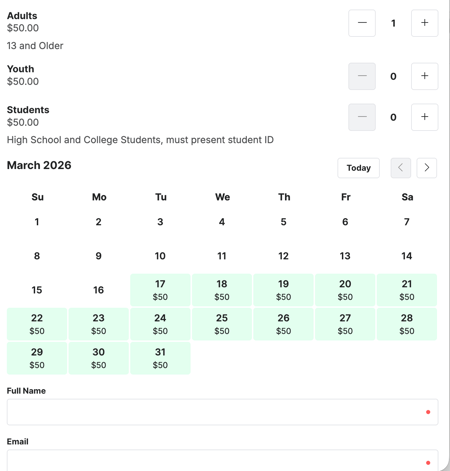
- - **Open Seat Count:** This will display the number of seats available. Note that if a day with multiple time slots is available, the individual time slots will show the number of available seats.
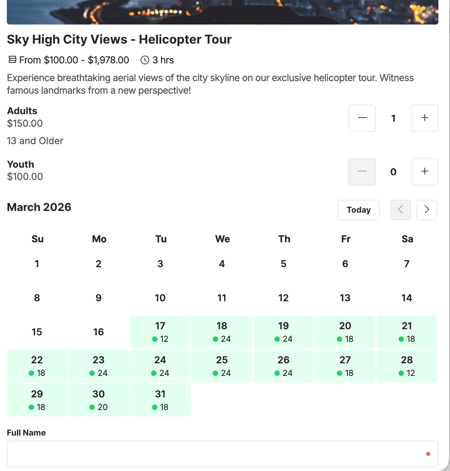
- - - **Conditionally display availability:** Displaying availability when the open seat count is less than a threshold may instill 'Fear of missing out' (FOMO) in travelers.
- **None:** All days will be shown green, indicating tours are going out.
- **Show unavailable timeslots:** When disabled, days with available time slots will be green and unavailable dates white.
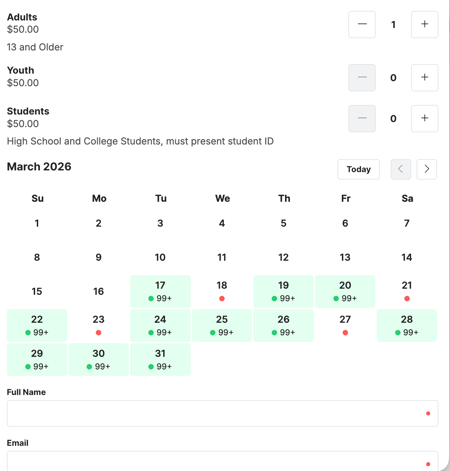
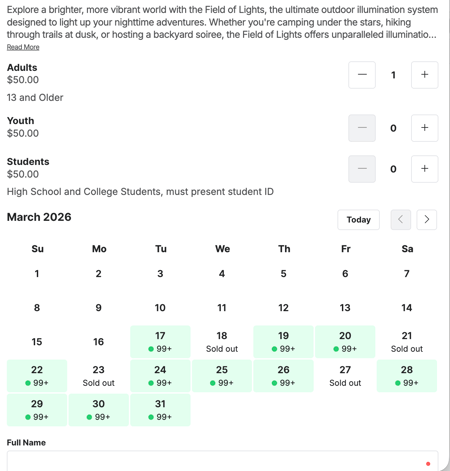
- - **Show a custom message for dates with 0 availability:** Add "Sold out" messaging, "Call us", or whatever you would like customers to do.
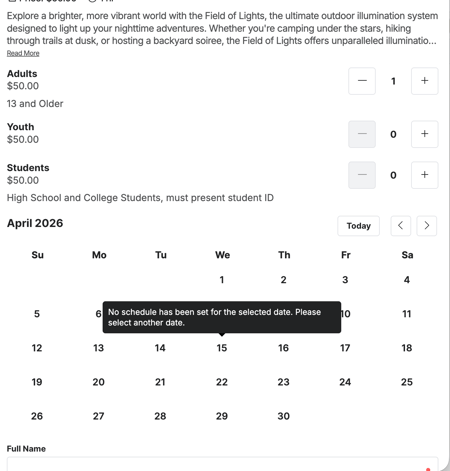
- - **Show a custom message for dates that fall after your last active schedule’s final date:** This is also beneficial for experiences with schedules that aren't active year-round (i.e. seasonal schedules)
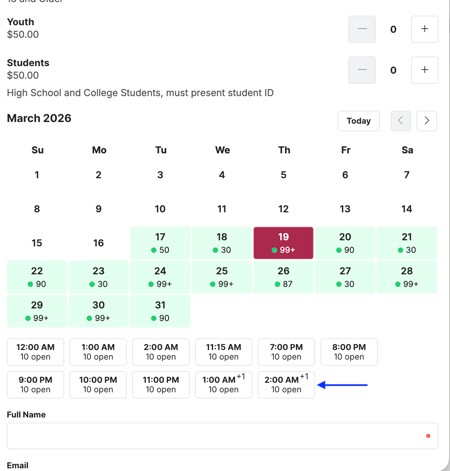
- - **Show time slots past midnight:** When enabled, you can display late-night time slots from the next calendar day on the previous day’s checkout. For example, a 1:00 AM time slot on Saturday can be shown under Friday’s availability.
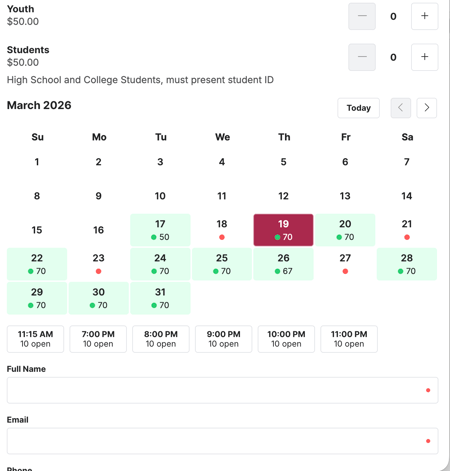
- - **Hide early morning time slots:** When enabled, you can hide early morning time slots from appearing on the customer-facing checkout. This is useful for slots meant only for back-office use like a 3:00 AM booking that shouldn't be visible to customers.
---
### Reviews
In Xola, Reviews are follow-up emails and/or SMS automatically sent to any customer associated with the reservation that has a valid email address, including the option to request reviews from non-organizer contacts that are collected via **[digital waivers](https://support.xola.com/xola-waivers?hsLang=en)** and **[split payment](https://support.xola.com/split-payment-purchases?hsLang=en)**.
This review request is sent 24 hours **[(unless configured otherwise in settings)](https://support.xola.com/xola-settings-?hsLang=en)** after their experience and prompts them to provide feedback on your services. You can configure the Xola system to send your customers links to either the Xola review system (private feedback) or to your Trip Advisor, Yelp, or Google+ page (public reviews). You also have the option to create a completely customized review email and SMS.
To enable Reviews, follow the steps below:
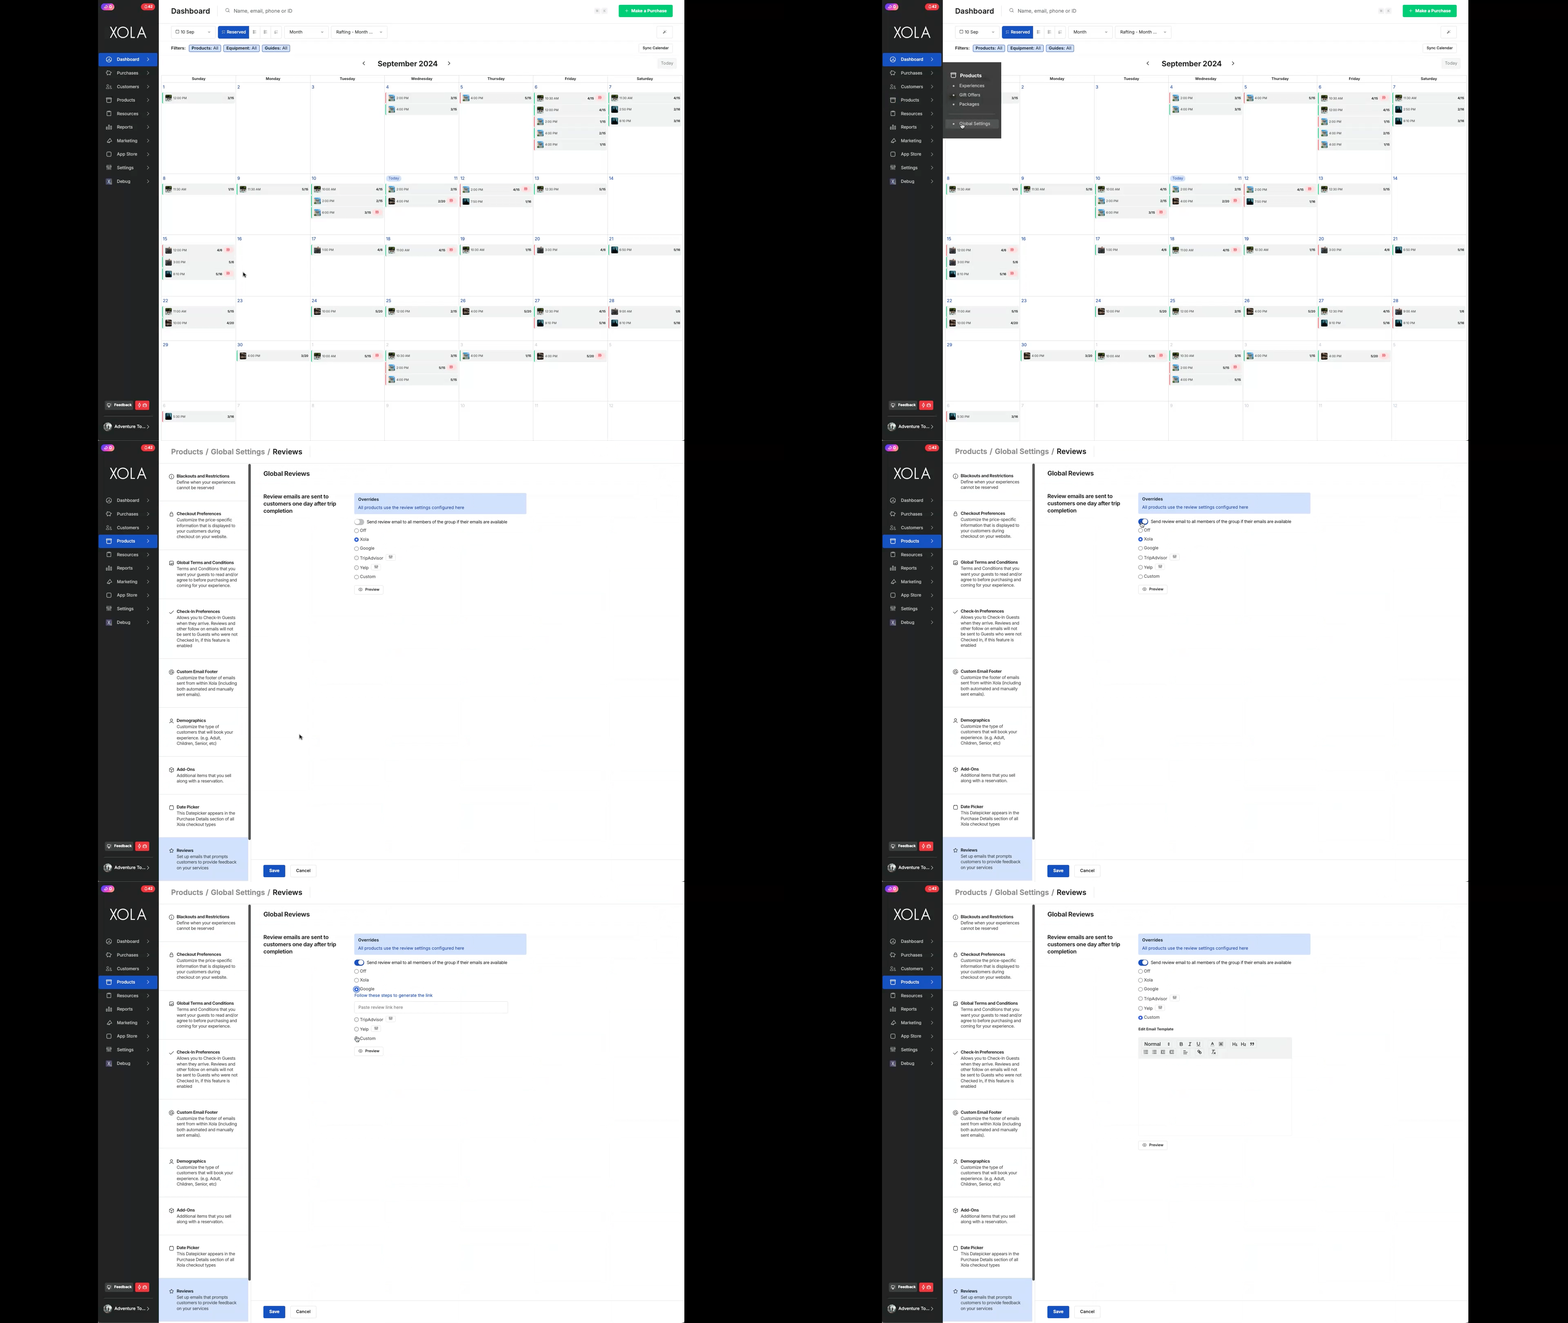
- Navigate to [Product \> Global Settings \> Reviews](https://seller.xola.app/products/globalSettings/reviews).
- Select one of the following review options to be sent to your customers.
- If you would like reviews to be sent to organizers and non-organizer contacts that are collected via **[digital waivers](https://support.xola.com/xola-waivers?hsLang=en)** and **[split payment](https://support.xola.com/split-payment-purchases?hsLang=en)**, make sure to toggle on
##### Collect reviews from each member of the group (if their contact details are available)
**Note**: If you have **Require Check-In** enabled either as a **[global setting](https://support.xola.com/product-global-settings#checkin)** or on the experience level, only guests who are checked in will receive the review request.
#### Smart Review
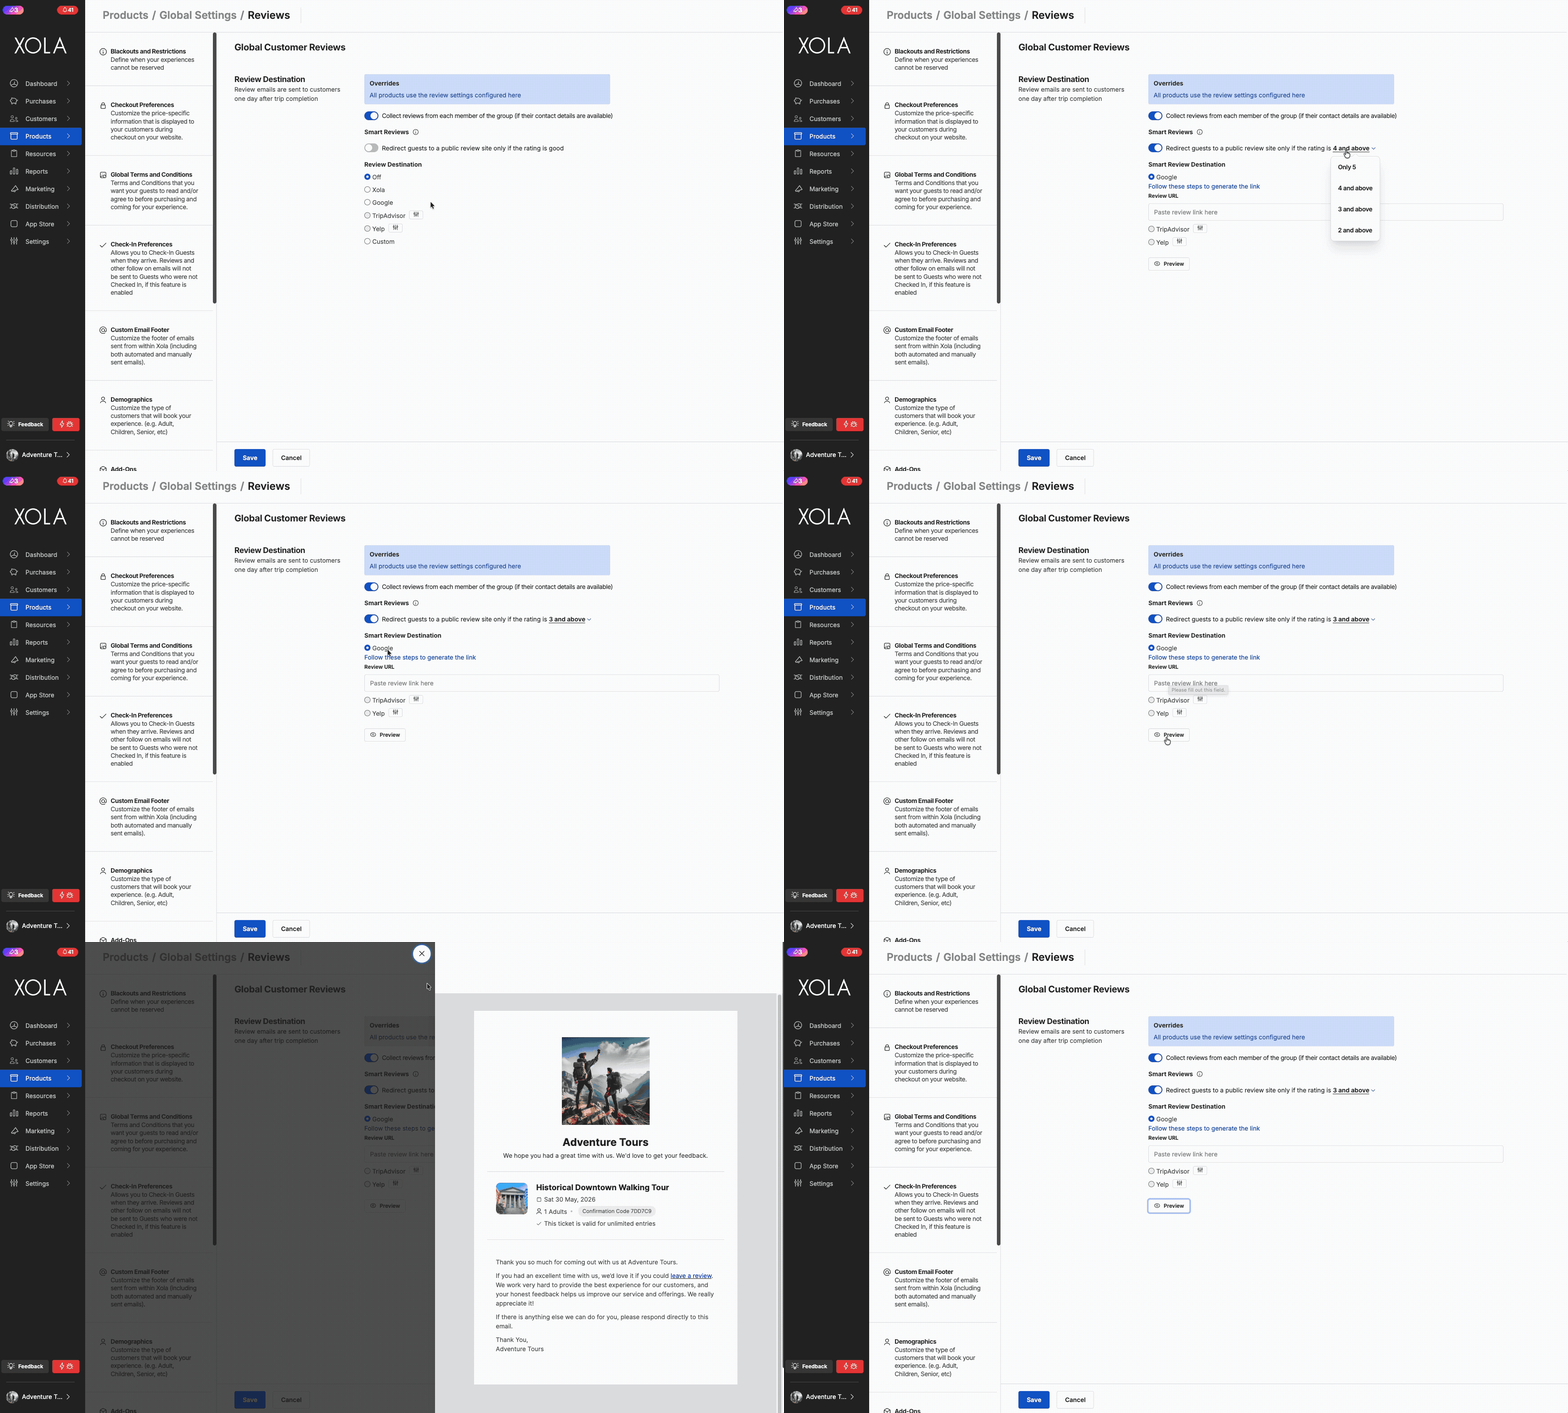
Smart Reviews helps you collect more positive public reviews by directing satisfied guests to your preferred review platform. After a guest submits feedback, Xola evaluates their rating. If the guest leaves a rating of your choosing or higher, they will be redirected to your selected public review site, encouraging them to share their positive experience online.
You can choose one of the following review platforms as your Smart Review destination:
- Google
- TripAdvisor
- Yelp
**Configuring Smart Reviews**
- Enable the Smart Reviews feature.
- Use the drop down to choose how many stars or higher you want directed to leave a review.
- Select your preferred **Smart Review Destination**:
- Google
- TripAdvisor
- Yelp
- Paste the public review URL for the selected platform into the **Review URL** field.
- Save your changes.
Once configured, guests who leave a rating of your choosing or above will be automatically directed to the review page you specified.
#### Xola Review
- Xola reviews are for your eyes only.
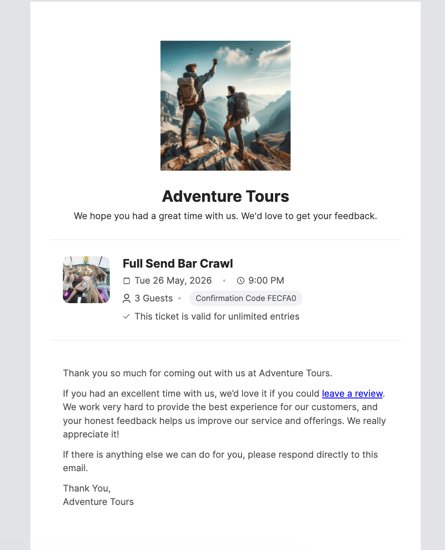
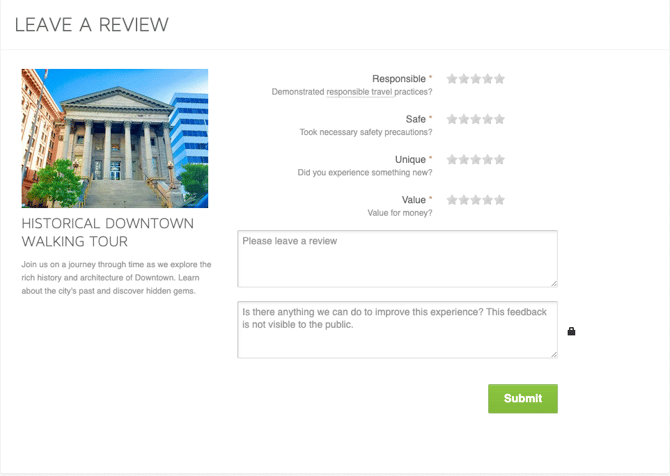
- Customers are sent an email and/or SMS that thanks them for coming and includes a link to a Xola review site.
- Once the customer submits their feedback, it's sent to your Communication email (or Primary if you do not have one). It is not posted anywhere online.
- The Xola Review is a great option for new businesses or new tour options as you can get feedback from your valued customers without having it plastered all over the internet!
#### TripAdvisor/Yelp/Google+
- Before you can enable this Review option for TripAdvisor or Yelp, you'll need to follow the steps outlined in the article **[Link to Social Media](https://support.xola.com/xola-settings-?hsLang=en#Company)** to add your profiles navigate to**[Settings \> Company Profile](https://seller.xola.app/settings/company)**.
- Once you've got your social media URLs pasted into your Settings tab, select **TripAdvisor** or **Yelp** for your Review request.
- For Google+ reviews, select the **Google+** option then follow the instructions presented for generating the special Google+ Review link.
- The link to review will read, "We'd love for you to leave us a review on \[TripAdvisor/Yelp/or Google+/\]" (depending on the one you choose).
- Once clicked, your customer will be taken directly to your profile on either one of those websites where they can go ahead and leave you a review.
#### Custom Review
- In the text field of the Custom email option, you can write in whatever copy you like.
- Hyperlink text or URLs so you can link back to your website, to multiple review sites, or wherever else on the internet you'd like your customers to visit!
- Add Variables to make your email more personalized.
- These variables will dynamically populate content in the email based on the Customer in question.
- **Arrival:** Will auto-populate the start date entered by the customer.
- - **Company**:Your company's name, as entered in the [settings tab](https://seller.xola.app/settings/company?__hstc=266414609.ad74f4b19e6001d81692782edb772b85.1778006707368.1779902615619.1779914053614.28&__hssc=266414609.4.1779914053614&__hsfp=3f014472fddf3c8fc0ee152222d4923a).
- - **Company email**: Your account's primary email address.
- **Company communication email**: Your account's communication email address.
- **Company phone**: Your company's phone number, as entered in the [settings tab](https://seller.xola.app/settings/company?__hstc=266414609.ad74f4b19e6001d81692782edb772b85.1778006707368.1779902615619.1779914053614.28&__hssc=266414609.4.1779914053614&__hsfp=3f014472fddf3c8fc0ee152222d4923a).
- **Company website**: Your company's website, as entered in the [settings tab](https://seller.xola.app/settings/company?__hstc=266414609.ad74f4b19e6001d81692782edb772b85.1778006707368.1779902615619.1779914053614.28&__hssc=266414609.4.1779914053614&__hsfp=3f014472fddf3c8fc0ee152222d4923a).
- **Customer name**: Will auto-populate what the customer entered in the name field.
- **Experience name**: Will show the name of the experience that was abandoned.
- **Quantity count**: Will show only the number of demographics entered by the customer.
- **Quantity**: Will show the number and name of the demographics entered (i.e. 1 adult).
- You can also update the Review SMS to include a custom link of your choice.
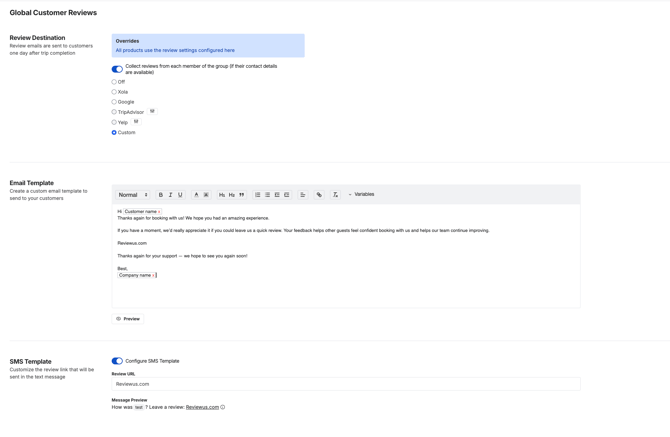You can see a preview of your email by clicking the Generate Preview button under the email body.
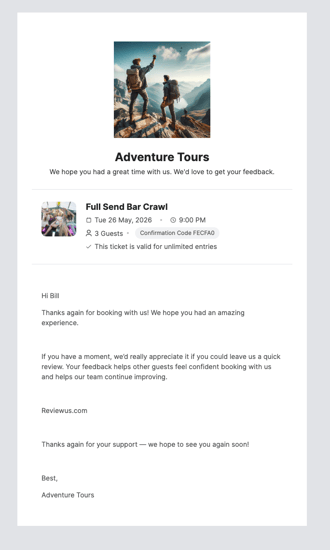
**Note:** The details above on how to set up Reviews in Global Settings, meaning you'll have one Review request that is sent out over all your different experiences. For details on how to set up an experience-specific Review requests, click **[here](https://support.xola.com/product-experiences-set-up?hsLang=en#reviews)**.
Xola allows you to not send reviews to individual customers by going to the [purchases tab](https://support.xola.com/purchases-tab#details) and toggling off **collect customer review** under the contact information. For some OTA's (i.e. GYG) Xola automatically has the review request toggled off per their policies.
---
### Questionnaire
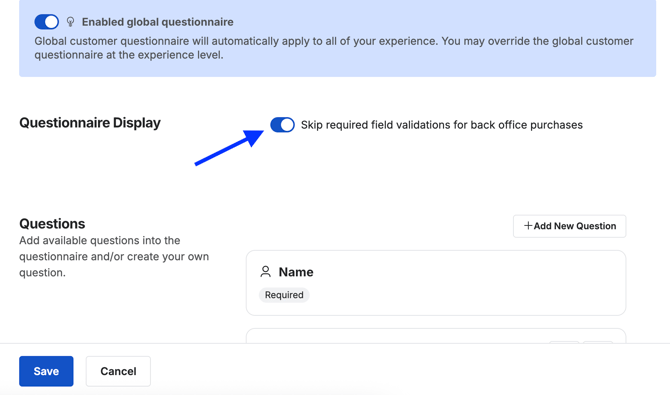
Questionnaires collect additional information from your customers after they complete checkout. What is included in the Questionnaire is completely customizable, and it can be set up as Global or Product-Specific. A Xola user can skip a questionnaire in the back office (it can always be updated in the customer purchase), but customers must complete it if they book through your website checkout.
**Note:** To skip the questionnaire by default when [making a purchase in the back office](https://support.xola.com/make-purchases-through-back-office?hsLang=en), toggle on **Skip required field validations for back office purchases.**
****
- Navigate to [Products \> Global Settings \> Questionnaire](https://seller.xola.app/products/globalSettings/questionnaire).
- Click on **+Add New Question**.
**Predefined Questions**
- There are predefined questions you can choose from to build your questionnaire that cover a variety of general themes like Date of Birth, Medical Conditions, Addresses, Marketing Consent, etc.
- When customizing the question, you can add additional content, a link, and even change the question response type (e.g., from short text to dropdown items).
**Pro Tips:**
If you use the **[Google Calendar sync](https://support.xola.com/xola-settings-?hsLang=en#profile)** and have Pickup Location as a questionnaire field, the Pickup Location for your guests will be included in the events that show up in your Google Calendar.
Need to sum the weights of all guests on your trip? Add a Weight field and tick the "Sum total weights" box. All weights input into the questionnaire will appear summed in the Roster.
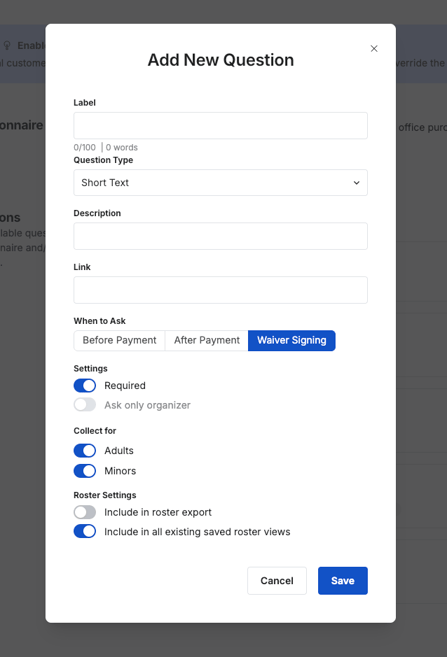
- **When to Ask:**
- **Before Payment:** This question will be asked before the customer gets to the payment screen on checkout.
- **Per Guest questions** (shows the organizer and demographics for each question):
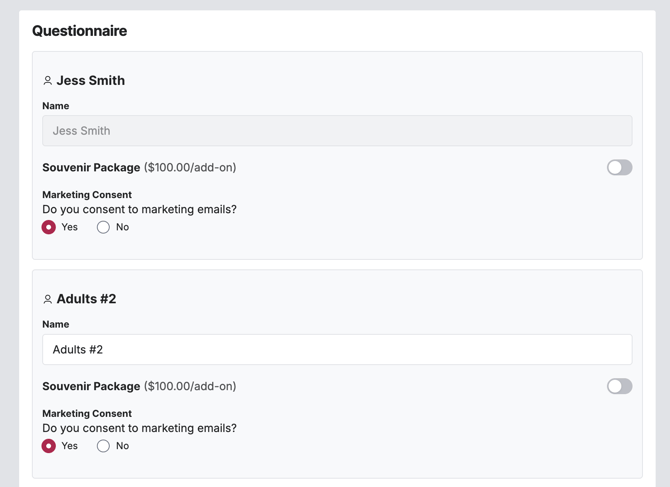
- **Organizer only questions** (only asks the organizer of the reservation in a section called **Additional Information)**: 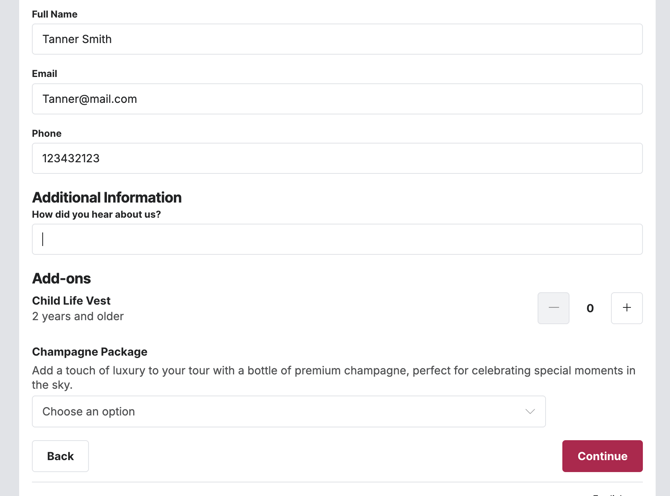
- **After Payment:** This question will be asked after the customer has completely checked out.
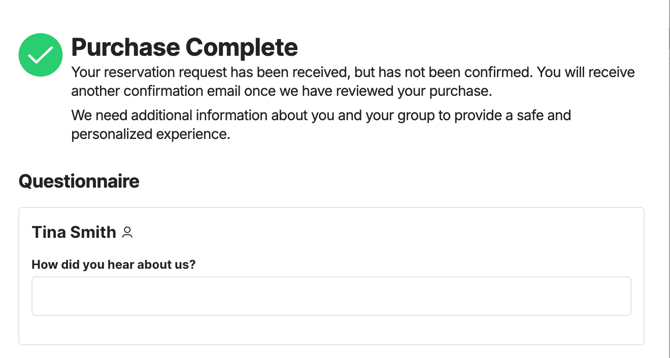
- **Waiver:** This question will be asked when the customer fills out the waiver attached to the experiences.
- To learn more about setting up **Xola Waivers**, **[click here](https://support.xola.com/xola-waivers?hsLang=en)**.
- **Settings**
- - **Required**: Required for guest to fill out.
- **Ask Only Organizer**: Only the organizer (person who is making the reservation), is asked the question.
- **Collect For** (only shows when you toggle on **Ask during Waiver signing**):
- **Adults**:Will show on the adult waiver
- **Minors**:Will show on the Minor section of the waiver.
- **Roster Settings**
- **Include in roster export**:This question will show in all [roster exports](https://support.xola.com/email-export-and-print-the-roster?hsLang=en#export).
- **Add this question to all of my saved roster views**:This question will show on your [saved roster views](https://support.xola.com/xola-roster?hsLang=en#Roster-customization).
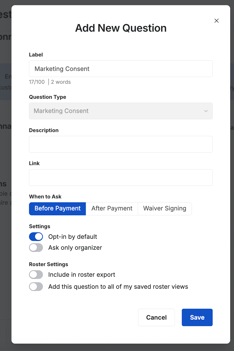
**Marketing Consent Question**
For the Marketing Consent question, you can ask this Before or After payment or in Xola Waivers. You can also set the question to be toggled on as opt in by default.
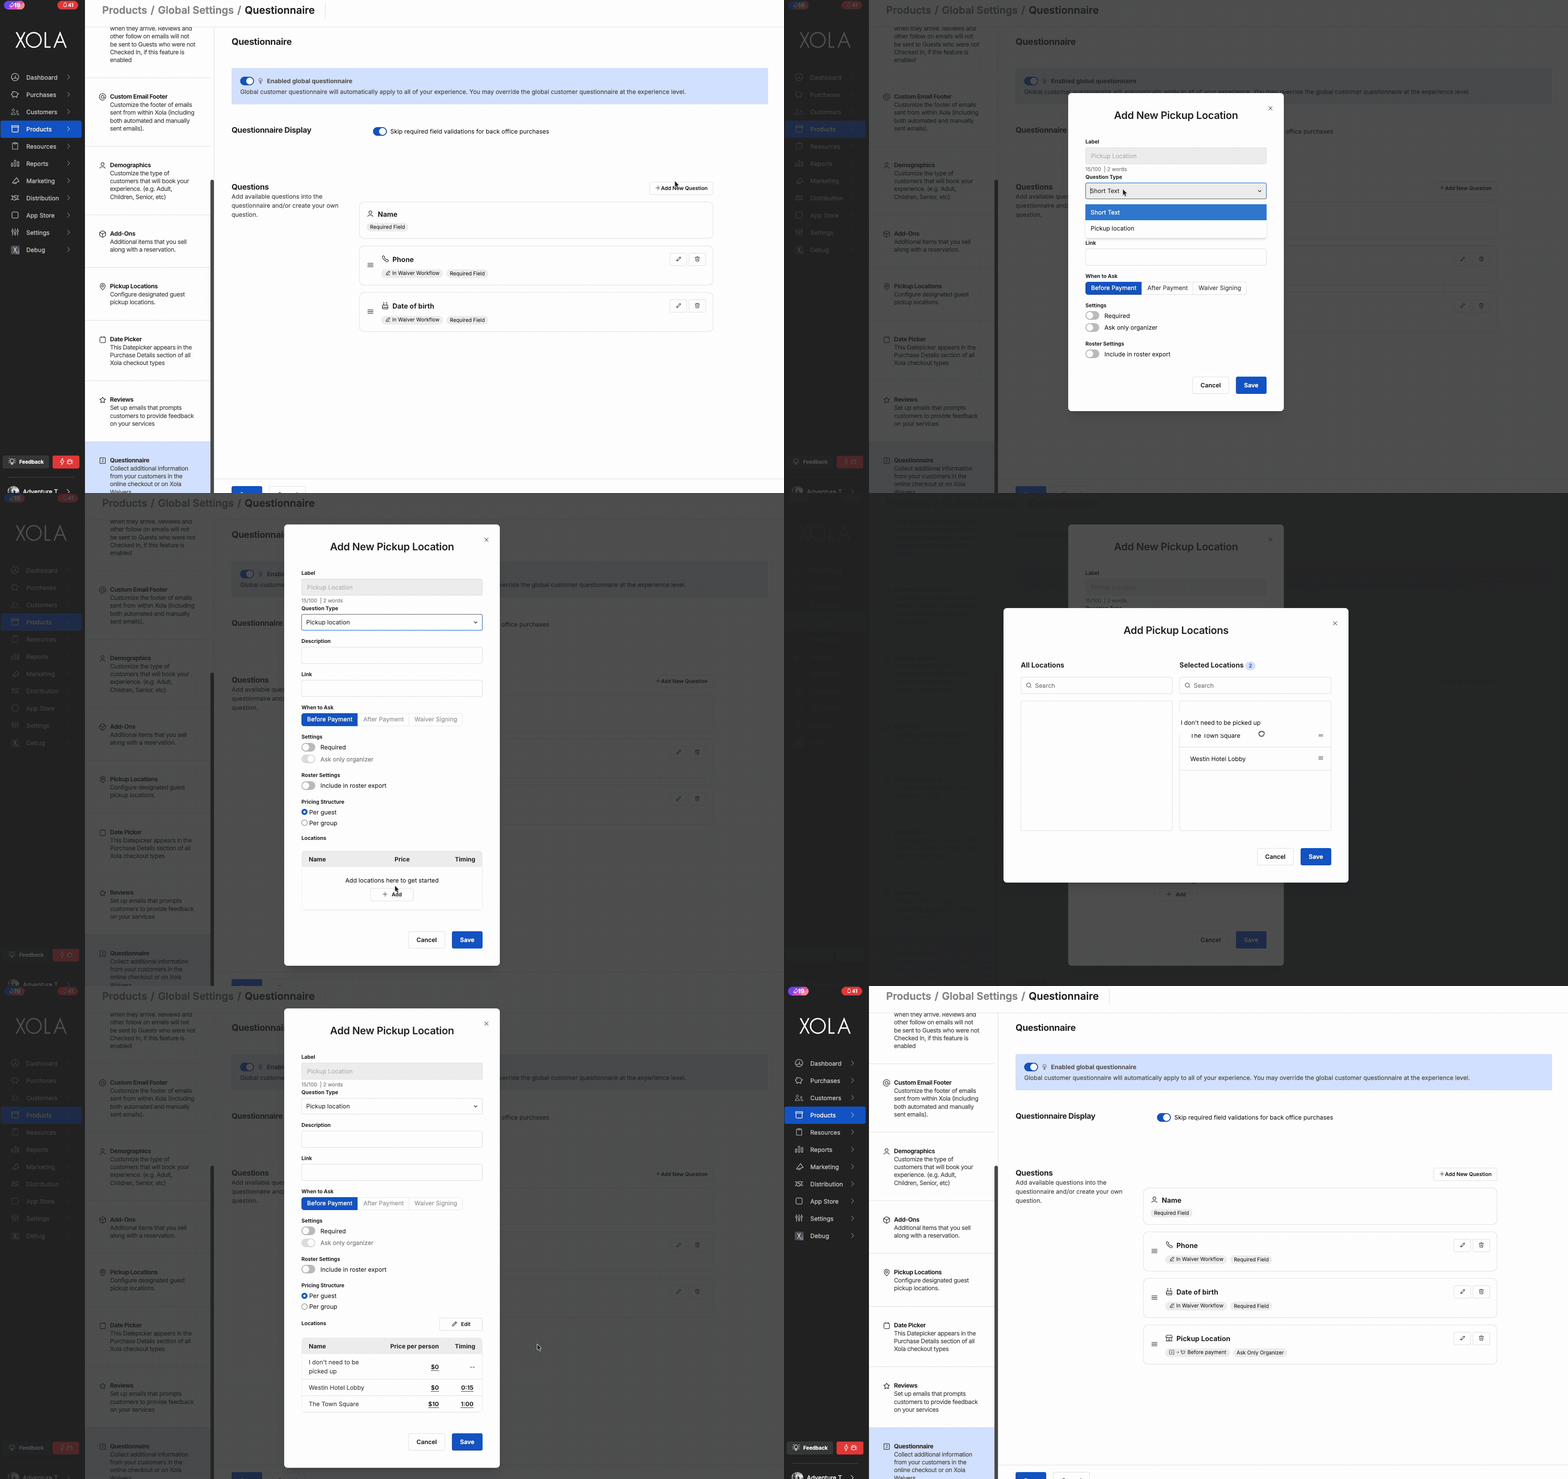
**Pickup Location Question**
For the Pickup Location question, you can either select Short text, which lets the guest type in their answer, or choose Dropdown and select Pickup Location. The Pickup location option connects directly to the [Pickup Locations](https://support.xola.com/product-global-settings#Pickup) you’ve configured under [Global Settings \> Pickup Location.](https://seller.xola.app/products/globalSettings/pickup-locations)
**Pricing Structure:** Choose whether pricing should be Per guest or Per group. This selection will automatically apply to the pricing you’ve already configured for each pickup location.
Be sure to click the +Add button to include the pickup location choices you want guests to see.
****
**Custom Questions**
- There are custom questions you can create, such as:
- **Short text:** The customer types in response.
- **Long Text:** The customer types in response.
- **Checkbox:** The customer checks a box.
- **Dropdown:** Create and edit your own dropdown menu for customers to choose from.
Dropdown should not exceed 110 characters; if you exceed this, the characters will be cut off.
- When customizing the question, you can add additional content, a link, and even change the question response type (e.g., from short text to dropdown items).
- **When to Ask:**
- **Before Payment:** This question will be asked before the customer gets to the payment screen on checkout.
- **Per Guest questions** (shows the organizer and demographics for each question):

- **Organizer only questions** (only asks the organizer of the reservation in a section called **Additional Information)**: 
- **After Payment:** This question will be asked after the customer has completely checked out.

- **Waiver:** This question will be asked when the customer fills out the waiver attached to the experiences.
- To learn more about setting up **Xola Waivers**, **[click here](https://support.xola.com/xola-waivers?hsLang=en)**.
- **Settings**
- - **Required**: Required for guest to fill out.
- **Ask Only Organizer**: Only the organizer (person who is making the reservation), is asked the question.
- **Collect For** (only shows when you toggle on **Ask during Waiver signing**):
- **Adults**:Will show on the adult waiver
- **Minors**:Will show on the Minor section of the waiver.
- **Roster Settings**
- **Include in roster export**:This question will show in all [roster exports](https://support.xola.com/email-export-and-print-the-roster?hsLang=en#export).
- **Add this question to all of my saved roster views**:This question will show on your [saved roster views](https://support.xola.com/xola-roster?hsLang=en#Roster-customization).

- [Getting Started](https://support.xola.com/getting-started?hsLang=en#main-content)
- [Account Setup & Configuration](https://support.xola.com/getting-started?hsLang=en#account-setup-configuration)
- [Website Integration & Installation](https://support.xola.com/getting-started?hsLang=en#website-integration-installation)
- [Flex Plans](https://support.xola.com/getting-started?hsLang=en#flex-plans)
- [Managing Purchases & Customers](https://support.xola.com/managing-purchases-customers?hsLang=en#main-content)
- [Purchases Management](https://support.xola.com/managing-purchases-customers?hsLang=en#purchases-management)
- [Reservation Management](https://support.xola.com/managing-purchases-customers?hsLang=en#reservation-management)
- [Customer Management](https://support.xola.com/managing-purchases-customers?hsLang=en#customer-management)
- [Customer Data & Engagement](https://support.xola.com/managing-purchases-customers?hsLang=en#customer-data-engagement)
- [Reporting](https://support.xola.com/reporting?hsLang=en)
- [Integrations & Advanced Tools](https://support.xola.com/integrations-advanced-tools?hsLang=en#main-content)
- [Xola App Store Integrations](https://support.xola.com/integrations-advanced-tools?hsLang=en#xola-app-store-integrations)
- [Partner & Agent Management](https://support.xola.com/integrations-advanced-tools?hsLang=en#partner-agent-management)
- [Marketing & Tracking Integrations](https://support.xola.com/integrations-advanced-tools?hsLang=en#marketing-tracking-integrations)
- [Mobile and Hardware](https://support.xola.com/mobile-and-hardware?hsLang=en#main-content)
- [Mobile Tools and Apps](https://support.xola.com/mobile-and-hardware?hsLang=en#mobile-tools-and-apps)
- [Hardware Setup & Devices](https://support.xola.com/mobile-and-hardware?hsLang=en#hardware-setup-devices)
- Company
- [About Us](https://www.xola.com/about)
- [Careers](https://www.xola.com/team)
- [Press](https://www.xola.com/press)
- [Support](https://www.xola.com/support)
- [Security Policy](https://www.xola.com/security-policy/)
- Resources
- [Articles](https://www.xola.com/articles/)
- [Help Center](https://support.xola.com/)
- [Success Stories](https://www.xola.com/success-stories/)
- [App Store](https://www.xola.com/app-store)
- [Demo](https://www.xola.com/demo)
- [Xola Universe](https://www.xola.com/universe/)
- Documentation
- [API Documentation](https://developers.xola.com/)
- [Payment Services Agreement](https://www.xola.com/payment-services-agreement/)
- [Terms](https://www.xola.com/terms/)
[](https://www.xola.com/)
© 2026 Xola Inc. All rights reserved.
[Privacy Policy](https://www.xola.com/privacy-policy) [Terms of Service](https://www.xola.com/terms)