Xola's Pricing Preferences empower you with a robust suite of tools to design pricing strategies that fit your operation—whether you're running public tours, private experiences, or custom events. You have the flexibility to set dynamic pricing models, including group discounts, tiered pricing that rewards larger parties, variable rates for private outings, and much more. This section puts you in control, letting you fine-tune every detail: configure per-person or per-outing rates, apply markups or markdowns based on group size or schedule, and set special promotional prices for specific offerings.
All of your pricing options are conveniently managed from a single dashboard, streamlining updates and ensuring consistency across your experiences. With Xola, it’s easy to launch seasonal specials, automate upsell offers, or adapt pricing as demand or operational needs change. Whether you’re seeking to maximize repeat business, boost off-peak sales, or drive premium reservations, Xola's Pricing Preferences give you the precision and adaptability to meet your business goals while delivering a clear, customer-friendly checkout experience every time.
User Access: Administrator or Curator roles have access to set up pricing preferences in Xola.
To grant access to users, click here.
What's covered in this article:
- Experience Types
- Demographics
- Pricing Structure
- Payment Requirement
- Down Deposits
- Promote Private Pricing
To get to your pricing preferences, navigate to Products > Experiences. Here, you can either add a new experience and set the pricing or edit the pricing for an existing one.
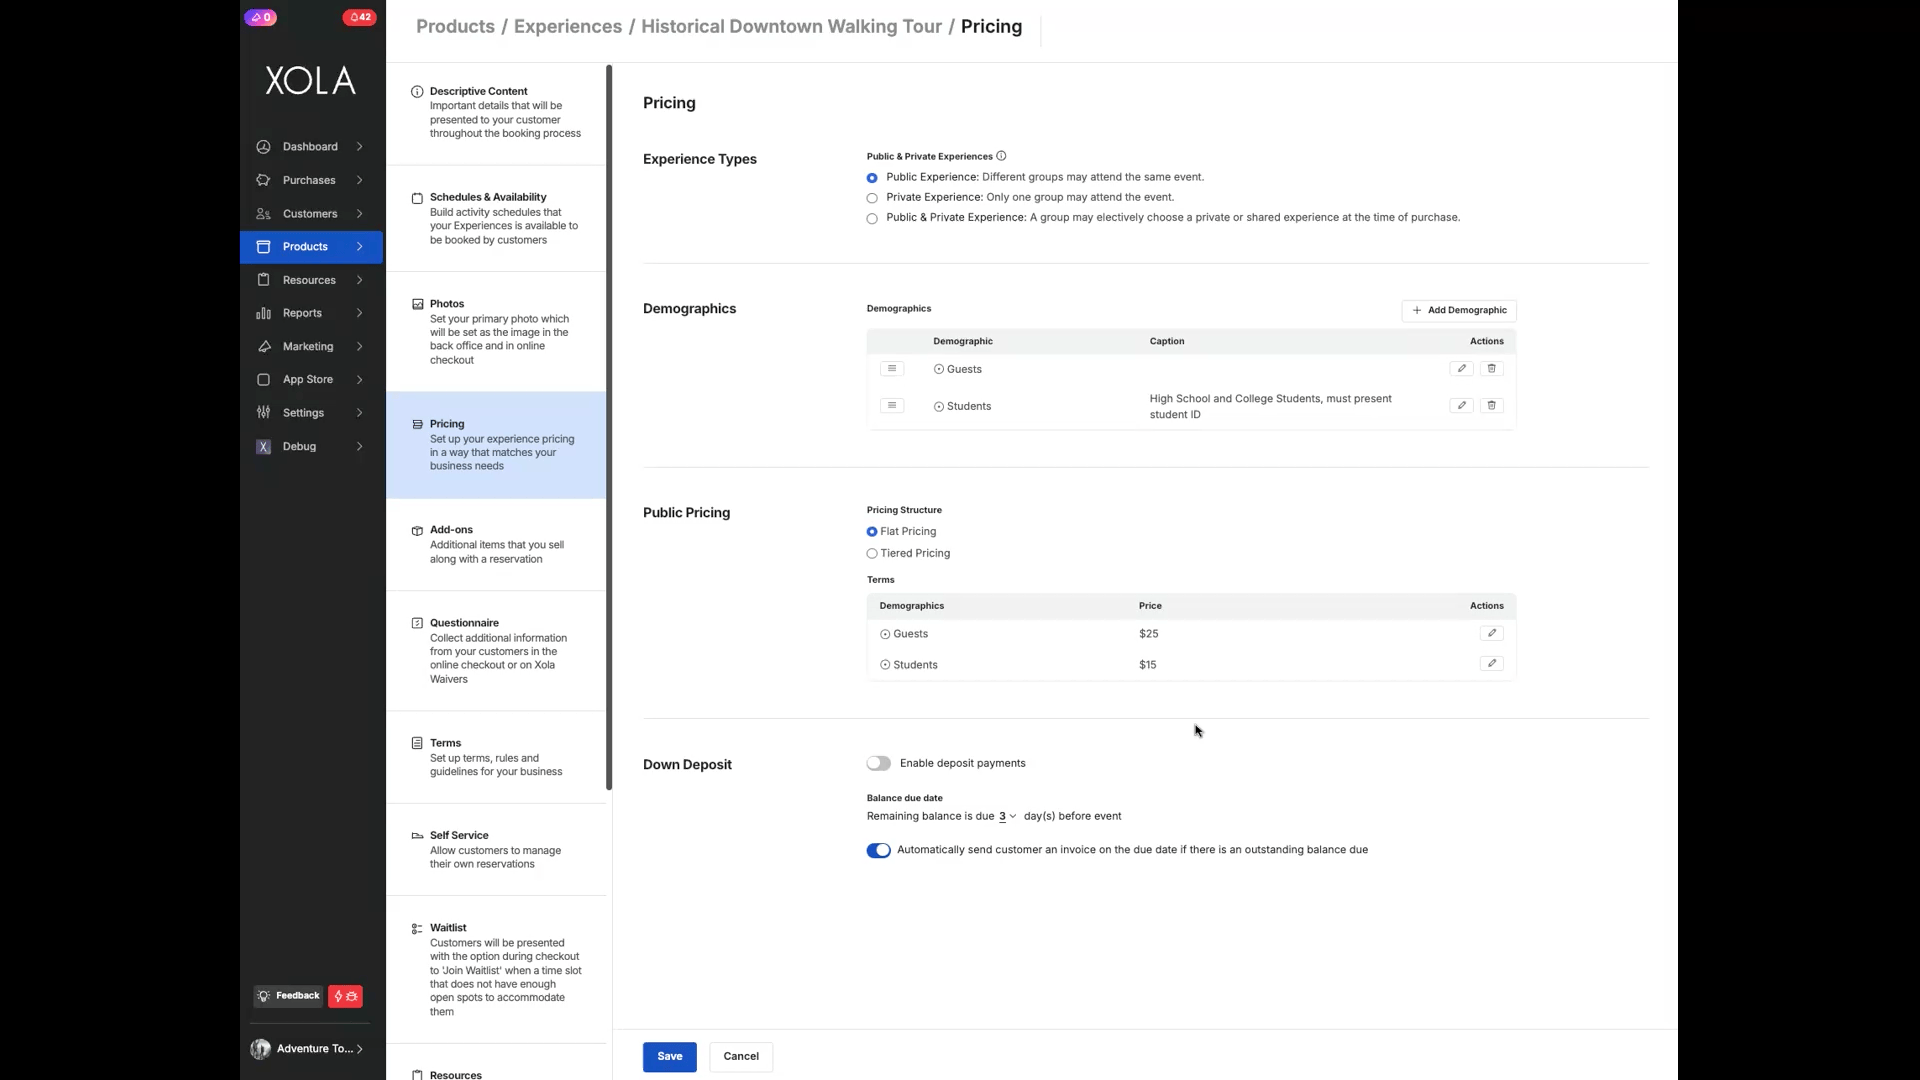
Experience Types
These options allow you to choose if your customer will be on a public trip and share the experience with other people, a private trip in which they will be the only group on the experience, or Public & Private, where the customer can choose which they would like to do at the time of checkout.
- Public Experience: Different groups may attend the same event.
- Private Experience: Only one group may attend the event.
- Public & Private Experience: At the time of purchase, a group may electively choose a private or public experience.
- For back-office purchases:
- During the back office purchase process, select an experience that has private & public purchase enabled.
- At the top of the page, select Public or Private. After selecting this option, only time slots that can take the option you chose will appear.
- Different pricing rules will apply if the experience has been configured with a different price for Private pricing.

- For checkout purchases:
- During the checkout process, the customer will select an experience that has private & public purchase enabled.
- At the top of the page, they will select Shared or Private. After selecting this option, only time slots that can take the option you chose will appear.
- Different pricing rules will apply if the experience has been configured with a different price for Private pricing.
- If you have Promote Private Pricing turned on, then if they select Public, they will be given the Promote Private Pricing banner you configured.

- Switch a purchase type:
- After a public or private purchase has been made, you can switch it to the other type. This option is on the Purchases tab, on the modification ribbon at the top.
- When choosing to switch a purchase from public to private, only events that do not have a purchase on them yet will appear as available.
- Any pricing differences that have been configured will be applied when changing an experience type.

Demographics
Now, to set up demographics, you will click Add Demographic and select a Global Demographic or select Create Demographic and input the following:
- Name: You can use one of our default demographics, such as Adults or Children, or type your own in the text field.
- Caption: If you'd like, add an optional caption for that demographic that will be shown to your customers at checkout. For example, if the demographic is 'Students', you may want to add a caption such as "High School and College Students, must present student ID".
- Reorder the demographics in the order you want shown on checkout by clicking and holding the
 icon and dragging the demographic to the right order.

Tip: To edit a demographic, click the ![]() icon.
icon.
Pricing Structure
Under the pricing structure, depending on what experience type you choose, you will have the following options:
Public Pricing
Flat Pricing
With Flat Pricing, whatever you have set for the demographic price will be the cost per person.
To edit the individual demographic pricing, click on the ![]() icon and input the price for that specific demographic.
icon and input the price for that specific demographic.

Tiered Pricing
With Tiered Pricing, the price you charge changes when group size thresholds are passed, this could be a markup, markdown, or final price. You could also do a $ amount or % of the demographic amount.
- Click the +Add Tier button.
- Put the group size for which the pricing will apply. This is greater than or equal to the number you set.
- Configure the price for each demographic.
- Markup: Price increases by the amount set.
- Markdown: Price decreases by the amount set.
- Final Price: Price set to show as the price for that tier.
- Click Save.
- Continue to add as many tiers as desired for this experience.
Customers can also use a coupon at checkout when using tiered pricing.
Private Pricing
Per Person vs. Per Outing Pricing
When you select the experience type to be private, you have the option for your experience to be priced either per person or per outing.
- Per-person pricing will change the total price based on the number of individuals in the reservation.
- Per Outing, pricing is a private experience at a single price, regardless of the number of people reserving.
- The pricing can be flat or tiered, based on group size and the preferences you set.
Flat Pricing
With Flat Pricing, the total number of people booking does not impact the price per person or per outing. Whatever you have set for the demographic price or per outing price will be the cost.
To edit the individual demographic pricing, click on the ![]() icon and input the price for that specific demographic.
icon and input the price for that specific demographic.
Tiered Pricing
With Tiered Pricing, the price you charge changes when group size thresholds are passed, this could be a markup, markdown, or final price. You could also do a $ or % of the demographic amount or per outing price.
- Click the +Add Tier button.
- The first tier will have you create a base price for each demographic or per outing.
- Put the group size for which the pricing will apply. This is greater than or equal to the number you set
- On the second tier, configure the price for each demographic or per outing price.
- Markup: Price increases by the amount set.
- Markdown: Price decreases by the amount set.
- Final Price: Price set to show as the price for that tier.
- Click Save.
- Continue to add as many tiers as desired for this experience.

Note: For private pricing, you can choose which of your experience schedules you want to offer the private purchase option.
Payment Requirement
For experiences priced at $0, you have the option to collect credit card details during the reservation. This allows you to keep a card on file for any charges that may need to be processed after the initial purchase. You can toggle this setting separately for both Checkout and Back Office transactions.

Down Deposits
By setting up Down Deposits, you provide your customer the option to pay only a deposit at checkout, with the remaining balance due at a specified time. A deposit can be set up as a fixed amount per person, per purchase, or a percentage of the purchase.
- Toggle on the Enable Down deposit.
- Next, set how many days away you want a customer to pay a deposit.
For example, if you want customers who book more than 30 days in advance to pay a deposit, set 30 days in the field.
-
- If you want the customer to always have the option to pay a deposit, you can set this to 0 days.
- Choose your Deposit Amount:
- Set a dollar amount Per Person
- Set a dollar amount Per Booking
- Set a percentage amount Per Booking
- Checkout Preference
- Allow customers to choose between paying in full or deposit amount: This means that the customer will have the option on the payment screen to pay the deposit amount or the full amount.
- Require customers to pay deposit amount only: This means the customer will only have the option to pay the deposit amount and will have a balance due when they arrive. Alternatively, you can set up sending invoices to the customer with a balance due before arrival.
- Balance Due Date
- Set how many days before the event you wan the remaining balance to be due.
- Toggle on the option to invoice customers for the balance due before their arrival automatically.
- You can also set up your Self-Service options to allow customers to make payments via invoice for any balance due before their experience.

Promote Private Pricing
If you've selected the Public & Private experience type, you have the option to present private pricing as an upsell banner:
How to Set It Up
- Toggle on: Promote Private Pricing as an Upsell
This enables the banner to appear during checkout, encouraging customers to upgrade to a private experience. - Optional: Hide the public/private selector toggle
While you can hide the selector, Xola recommends keeping it visible. When shown, customers are given a clear choice upfront, improving your chances of converting them to a private experience.- If you hide the toggle, Xola assumes all bookings are public by default and displays the upsell banner automatically.
- Customize the Banner Message
Xola provides a default banner template, but you can tailor the text to match your brand voice and business goals better.
How It Works at Checkout
-
Customers begin the booking process by seeing the public pricing for the experience.
-
After selecting a date, they'll be given the option to upgrade to a private booking.
-
Once a selection is made, the availability calendar and pricing dynamically update:
-
Private experiences are only available for time slots with no existing reservations.
-
Any checkout price messaging will reflect the chosen option (public or private) in real time.
-
