---
title: Guide Management
description: This article explains how to add and manage guides in Xola, including setting up their schedules, permissions, and contact information. It also covers assigning guides to events and configuring notifications to keep them informed.
---
[Skip to content](https://support.xola.com/guide-management#main-content)
English
Show submenu for translations
[](https://www.xola.com/)
- [Home](https://support.xola.com/)
- [24/7 Live Support](https://www.xola.com/support/)
Open main navigation
Close main navigation
- [Home](https://support.xola.com/)
- [24/7 Live Support](https://www.xola.com/support/)
- English
Show submenu for translations
- [Login](https://xola.com/_public/login.html)
[Login](https://xola.com/_public/login.html)
How can we help you?
- There are no suggestions because the search field is empty.
1. [Help Center](https://support.xola.com/?hsLang=en)
2. [Managing Purchases & Customers](https://support.xola.com/managing-purchases-customers?hsLang=en)
3. [Reservation Management](https://support.xola.com/managing-purchases-customers?hsLang=en#reservation-management)
# Guide Management
## Granular Guide Controls and Scheduling: Set Permissions, Enable Overlap, and Empower Calendar Sync for Smarter Staffing
**Guide Management** in Xola is a powerful tool designed to help you **organize your staff**, **streamline scheduling**, and improve both the **guide** and **guest experience**. You can build and maintain **guide profiles** complete with names, contact information, bios, photos, and customized schedules, making it simple to keep your **roster** up-to-date. Assign guides to specific **experiences** and events within Xola, and the system will automatically notify them via **email** or **SMS**, sending out assignments and supplying a **roster** with guest details 24 hours before the event to ensure guides are always prepared.
To prevent **scheduling conflicts**, guides and managers can set **availability windows** and restrict assignments to times when guides are actually available. **Guide schedules** are flexible and can account for one-off shifts, holidays, or recurring patterns, and you can also set up **permissions** to control who can update schedules. Guides can **sync** their schedules directly to **Google Calendar**, **iCal**, or other popular tools for real-time updates.
For a more personalized **customer experience**, Xola enables you to showcase **guide information** directly in confirmation and reminder emails. Share your **guides’ bios and photos** so customers know who will be leading their adventure, building excitement and trust before the trip begins. From centralized management to client-facing communications, **Guide Management** brings clarity, reliability, and professionalism to every part of your team’s workflow.
**User Access:** **Administrator** or **Guide Manager** roles have access to this set up and assign Guides in Xola.
**Reservationist, Reservationist Lite, or Equipment Manager** roles can view the Guide assignments on the Dashboard.
**Guide** roles can only view **events they are assigned** for on the Dashboard.
To **grant access** to users, [click here](https://seller.xola.app/settings/users).
[Watch the Guide Management video tutorial](https://demo.xola.com/showcase/cmp1ph066002u0e0k5pw336au?utm_source=link)
---
**What's covered in this article:**
- [Adding a new Guide](https://support.xola.com/guide-management#add-new)
- [Guide Management Global Settings](https://support.xola.com/guide-management#GlobalSettings)
- [Managing Existing Guides](https://support.xola.com/guide-management#existingguides)
- [Assigning Guides to Events](https://support.xola.com/guide-management#assigning)
---
### Adding a new Guide
To add a new guide to your Xola account:
- Navigate to [Resources \> Guide Management](https://seller.xola.app/resources/guides).
- Select the blue **+Add** button.
#### Information
- You’ll then need to enter the following information about your guide:
- **Name:** Guide names are displayed when you go to assign that guide to an event, and can also be displayed to your customers in Confirmation and reminder emails for events to which this guide is assigned.
- **Email:** This is the email that guides will use to log in and receive notifications from Xola.
- **Phone Number:** Guides can input their number to receive an SMS message when they have been assigned and unassigned from an event (SMS is setup under**[Settings \> Notifications](https://seller.xola.app/settings/notifications)**).
- **Bio:** This can be displayed to your customers in Confirmation and Reminder emails for events to which this guide is assigned. For more information on how to configure that, **[see below](https://support.xola.com/guide-management#displaying)**.
- Select **Save**.
- Now, your guide will receive an email asking them to confirm their email address and set up a Xola password. They will use their email and password to log into their Xola account.
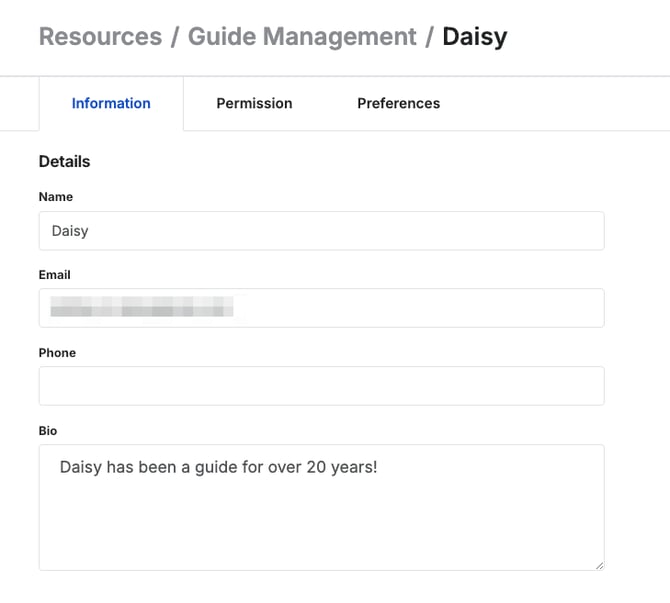
After you enter the guide's basic information, you will be able to add more information about your guide and their schedule. An available schedule will need to be set up for them to view events to which they've been assigned as a guide. The following section will outline the schedule setup.
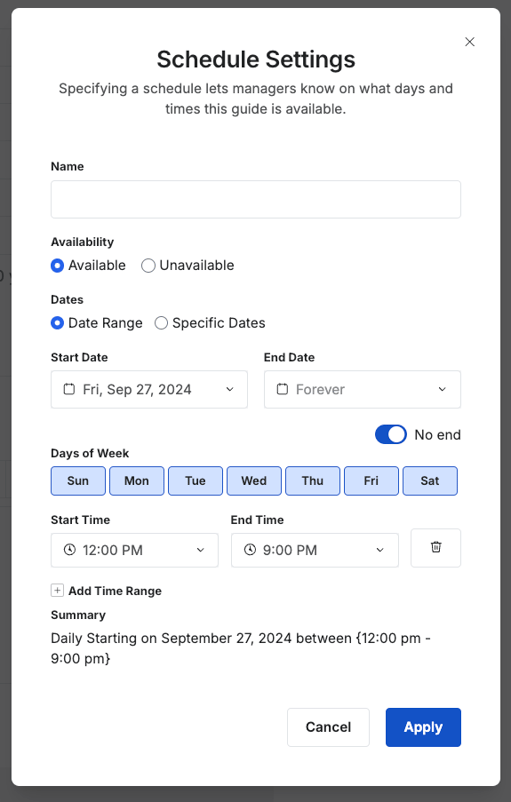
You can configure schedules for your guides that determine when they can and cannot be assigned to events.
An available schedule must be in place to assign a guide to reservations.
Guide schedules are similar to “windows” of time, indicating a specific period when the guide is **available** or **unavailable** for assignment.
To create a new guide schedule, select the **+Add Schedule** button. Then, follow these steps:
- **Name:** Give the schedule a name. This can help you identify what the schedule represents later without having to click back into it to view the details.
- **Availability:** Choose whether the period that you specify should allow or prevent the guide from being assigned to events.
- **Available:** If selected, the guide’s name will appear as an option when you go to assign a guide to a given event.
- **Unavailable:** If selected, the guide’s name will show up as an option when you go to assign a guide to a given event, but it will be grayed out and say 'Unavailable'.
- **Dates**
1. - **Date Range:** The schedule you create will repeat each week on your equipment calendar. Select or deselect individual weekdays under Days of Week. Selected days appear in blue and deselected days appear in white.
- **Specific Dates:** This allows you to hand-select individual days to which this schedule will apply.
- **Time Ranges:** Choose the time range during which you want to either make a guide available or restrict the guides availability. For example, if a guide can only be assigned to events that occur in the afternoon, you could set an **available** schedule with a **start time** of 12:00.
If you create an **unavailable** schedule that overlaps with an **available** schedule, Xola will honor the periods of **unavailability** from the unavailable schedule.
After you add a schedule, you can add a photo for the guide. This photo will show in the confirmation and reminder email if you add the preference to show [guide information to emails](https://support.xola.com/guide-management#displaying).
This is what the section will look like after you add in the basic information, schedule, and photo:
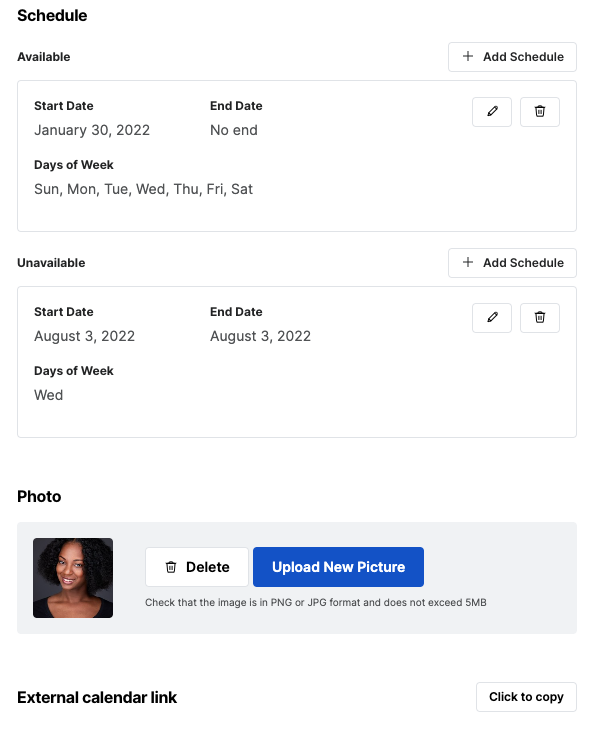
- Next, you can give your guides a External Link to their assignments on a calendar.
- Select the **click-to-copy** link next to the Calendar section.
- Copy the URL generated and send it to your guide.
- **Google Calendar:** On the sidebar, click the **plus sign** next to **Other Calendars**. Select **From URL**. Paste in the Xola-generated calendar URL and click **Add Calendar**.
- **iCal:** Click **File** and select **New Calendar Subscription**. Paste in the Xola-generated calendar URL, set your preferences, and click **OK**.
**Note:** This link will only display events the guide is assigned to, and those events will appear on their external calendar after you assign them. Sync frequency depends on the calendar platform, so updates may not appear immediately.
#### Permissions
Here, you can allow your guides to create, update, or delete their schedules and configure restrictions to prevent an unexpected update from occurring too close to the current date.
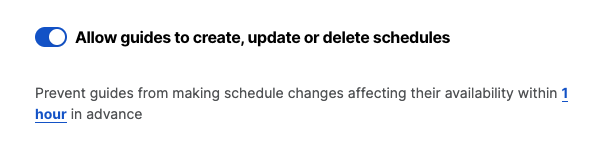
**Note:** If your guide's availability schedule is set to recur every day and has a start date that is in the past, they will not be able to make changes to it if you input a value in the "*Prevent Guides from making changes..."* section that is greater than 0.
---
#### Preferences
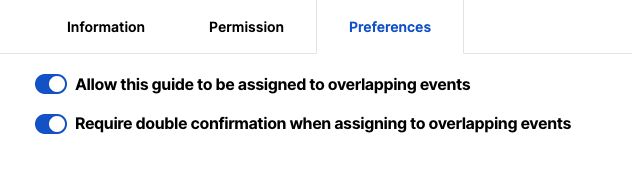
You also have the option to allow guide assignments to overlapping events and have the system prompt you before allowing guide assignments to overlapping events.
- Here you can toggle on to allow this guide to be assigned to overlapping events.
- This will allow you to assign a guide to multiple events, regardless of the duration of the event.
- For example, if you have this toggled on and your event has a duration of an hour, you can assign the guide to, let's say, the 1:00 and 1:30 tours, even though the duration is an hour.
- You can also toggle on the system to require double confirmation when assigning a guide to overlapping events.
- To learn more about this, please read the guides [assigned to the roster section](https://support.xola.com/guide-management#assigning) of this article.
---
### Guide Management Global Settings
Xola give you the option to set up permissions across all of your guides. To do this navigate to [Resources \> Guide Management \> Global Settings](https://seller.xola.app/resources/guides/settings).
#### Permissions
Here, you can allow your guides to create, update, or delete their schedules and configure restrictions to prevent an unexpected update from occurring too close to the current date.

**Note:** If your guide's availability schedule is set to recur every day and has a start date that is in the past, they will not be able to make changes to it if you input a value in the "*Prevent Guides from making changes..."* section that is greater than 0.
#### Email
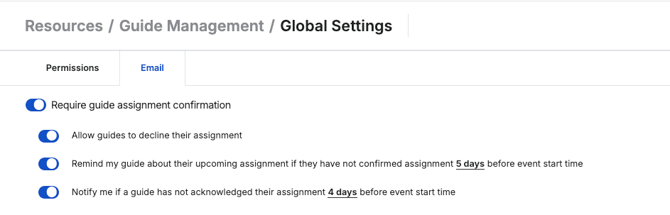
You also have the option to require your guides to confirm their assignments and set up notifications to both yourself and your guide if the assignment is not acknowledged within a certain period of time.
Under Email, you can make it a requirement for your guides to:
- Acknowledge their assignments by confirming or declining
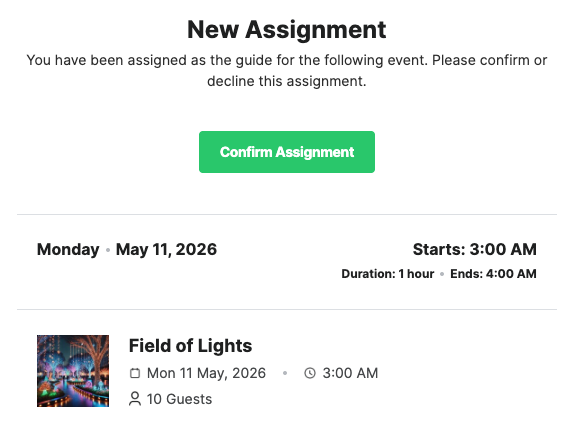
- Allow guides to decline toggle off: Confirmation request will only show
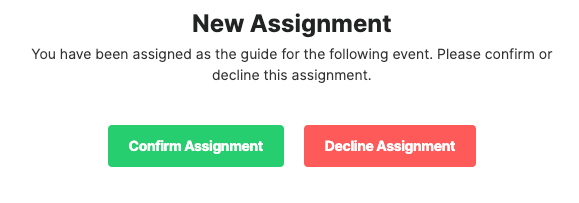
- Allow guides to decline toggle on: Confirmation or decline options will show on emails.
- Next, set your notification preferences around this and when you want to notify your guide and yourself if they have not confirmed or declined the event.
Here is what the email your guide will receive when assigned to an event:
Decline option toggled off:
Decline option toggled on:
### Managing Existing Guides
Once you’ve created a guide, you can manage them by navigating to Resources\> Guide Management[.](https://seller.xola.app/products/experiences?__hstc=266414609.ad74f4b19e6001d81692782edb772b85.1778006707368.1778523425215.1778533878582.6&__hssc=266414609.3.1778533878582&__hsfp=8fda251b41609c35294d8ed9e7526e4a) Here, you'll find tools to edit, resend confirmation email, see status of guides and delete the guides.
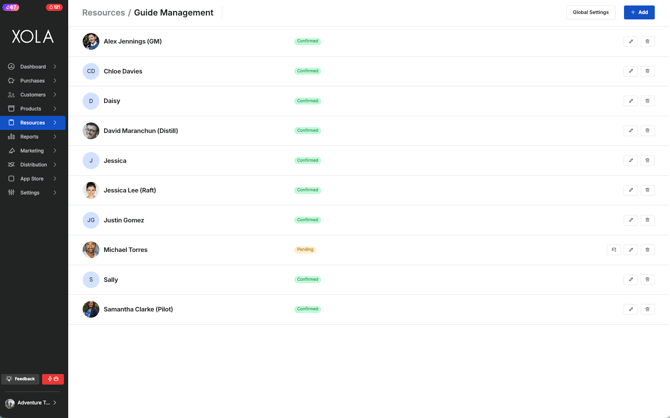
Below are the available actions:
- **Edit**: Click the  to make changes.
- **Delete:** Click the  to delete a guide.
- **Resend Confirmation Email:** Click the to resend the email that invites the guide to set up a password so they can log into Xola and see their assignments.
- : Means that the guide has set up a password and can now log into Xola.
- : Means that the guide has not set up a password in Xola yet, and cannot log in.
---
### Assigning guides to rosters
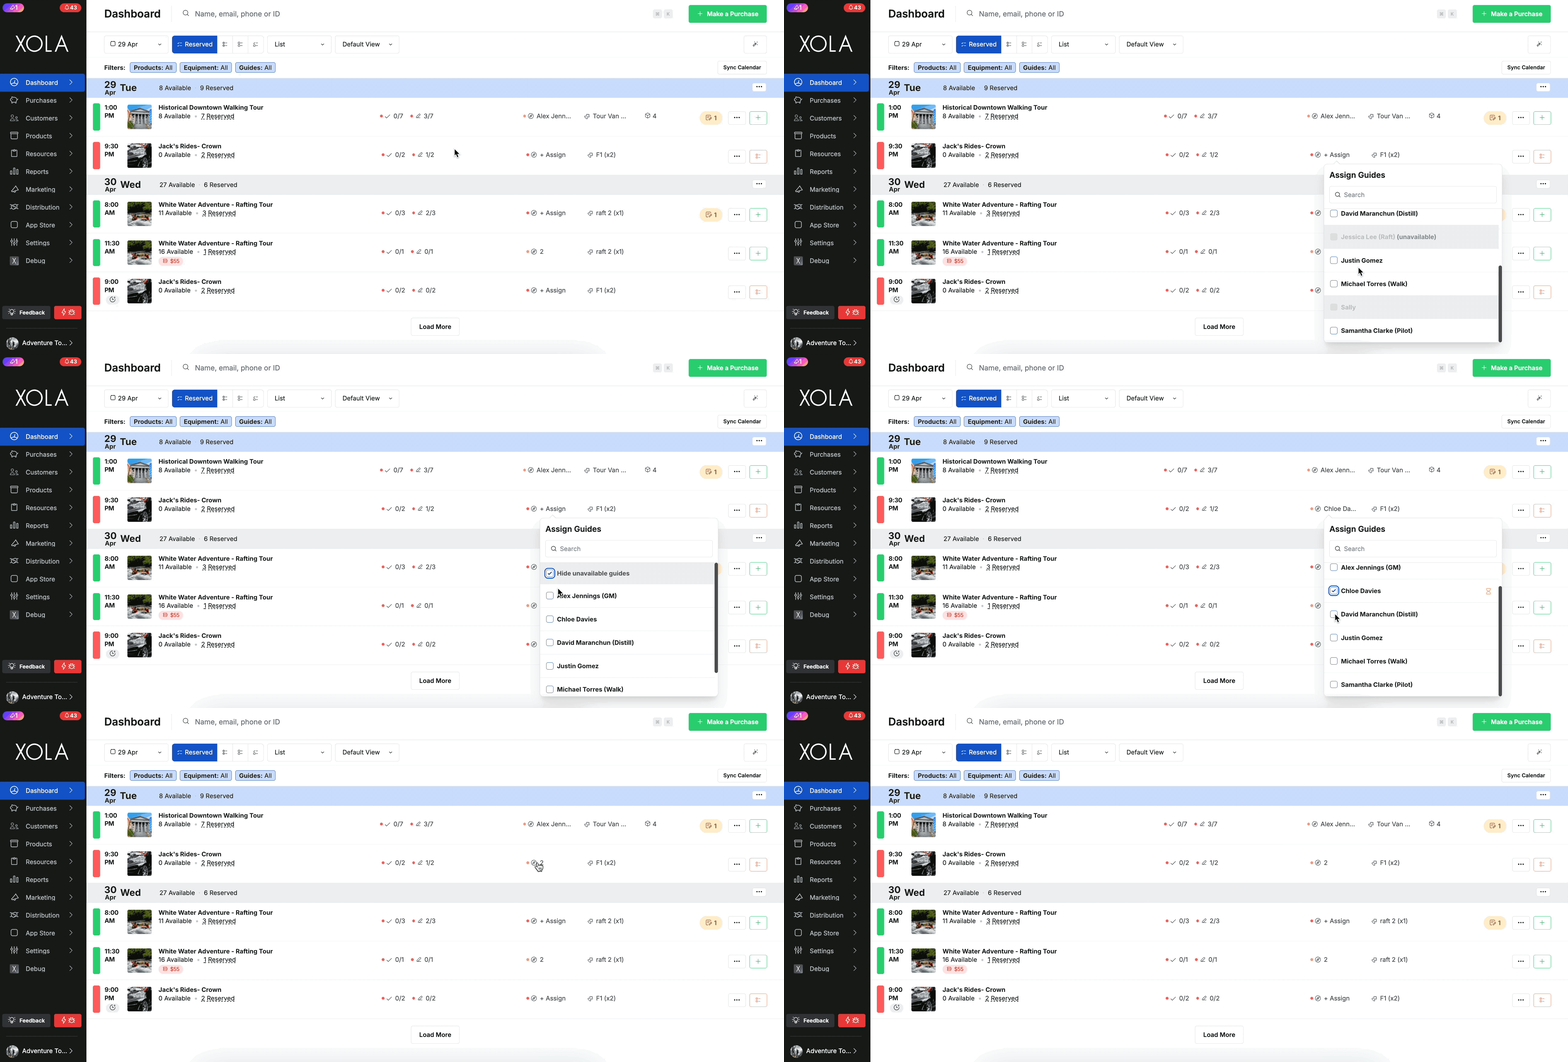
- In the Dashboard, locate the time slot that you would like to add a guide to and click **Assign** by the guide icon 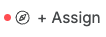.
- Now assign any guide you want to the event who is available.
- If the guide is unavailable, it will not be selectable. You can also hit '**Hide unavailable guides**' to filter those guides out and only show those you can assign.
**Note:** After you have assigned your guides, you can hover over the name on the Dashboard to see who you assigned.
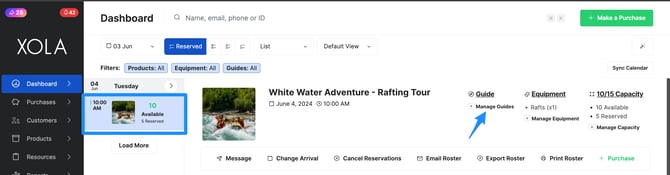
- In the Roster, locate the time slot you would like to assign the guide and click on it to enter the Roster. Click the **Manage Guides** button under Event Items.
- To assign one or multiple guides to a trip, click **Guide** and tick off the guides from the drop-down menu who will be taking out this trip.
- Depending on your **[notification preferences](https://support.xola.com/xola-settings-?hsLang=en)**, guides will be notified when they are assigned to a trip. Twelve hours prior to this tour, the guide will receive a copy of the roster at the email address provided in Guide Management. If the tour is sooner than 12 hours away, the guide will receive the email immediately.
- To assign guides to overlapping events, click **Guides** and tick off the guides from the drop-down menu who will be taking out this trip. Xola will tell you which event the guide has already been assigned to.
- If you have the **[double confirmation preference](https://support.xola.com/guide-management#preferences)** toggled on, when you assign the guide to events that overlap, Xola will ask you to confirm the overlapping event assignment for the guide.
- To unassign a guide from a trip, simply click the **Guides** dropdown, and untick the guide's name. The guide will receive an email notifying them that they are no longer assigned to the trip.
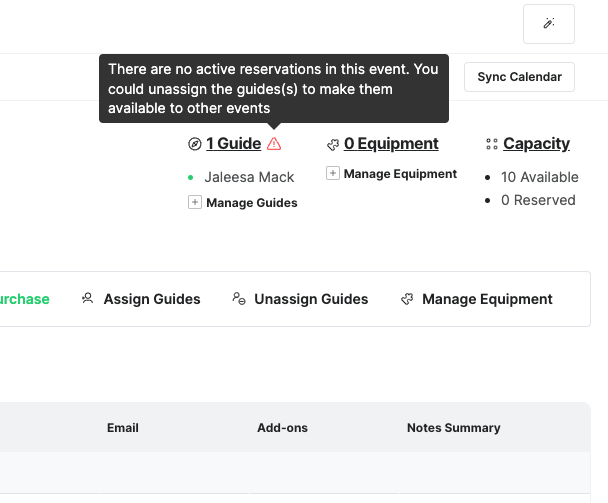
**Note:** If you remove all reservations from a time slot, Xola will ask you if you would like to unassign the guide from that event.
- If you do not confirm the un-assignment, you will see a warning sign next to the guide on the Dashboard and the Roster next to the guide's name. If you hover over the warning symbol it will tell you that 'There are no active reservations in this event. You could unassign the guide(s) to make them available to other events.'
****
#### Displaying guide information in emails to customers
You can choose to include information about the guides assigned to a specific event in the **confirmation** and **reminder** emails sent to your customers. This feature provides customers with insight into who will be part of their booked experience before the event day. It is particularly useful for experiences that take place in remote locations or when guides play a crucial role in delivering the experiences.
Guide information displayed in customer emails is set at the **Experience level.** So, to turn this on for a given experience:
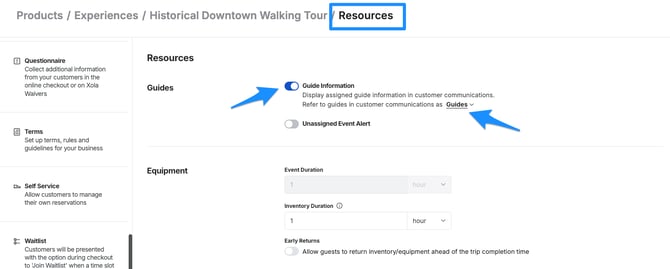
- Navigate to **Products \> Experiences \> Edit Experience \> Resources\> Guides**.
- Turn on **Guide Information**.
- **Refer to guides as:** Determine what you would like the section header in your emails to read.
> For example if you are an escape room, you likely do not refer to these staff members as “Guides”. You could put in the text “Game Master(s)”.
#### 
**Note:** If you sometimes have more than one guide assigned to a given event, we recommend that you pluralize your guide descriptor to account for this such as "Guide(s)".
Once configured, **Confirmation** and **Reminder** emails for **events that have a guide assigned to them** will now contain a section with:
- The “refer to guides as” label referenced earlier in this article
- Guide Name
- Guide Picture
- Guide Bio
Here’s an example of what the email section will look like:

- [Getting Started](https://support.xola.com/getting-started?hsLang=en#main-content)
- [Account Setup & Configuration](https://support.xola.com/getting-started?hsLang=en#account-setup-configuration)
- [Website Integration & Installation](https://support.xola.com/getting-started?hsLang=en#website-integration-installation)
- [Flex Plans](https://support.xola.com/getting-started?hsLang=en#flex-plans)
- [Managing Purchases & Customers](https://support.xola.com/managing-purchases-customers?hsLang=en#main-content)
- [Purchases Management](https://support.xola.com/managing-purchases-customers?hsLang=en#purchases-management)
- [Reservation Management](https://support.xola.com/managing-purchases-customers?hsLang=en#reservation-management)
- [Customer Management](https://support.xola.com/managing-purchases-customers?hsLang=en#customer-management)
- [Customer Data & Engagement](https://support.xola.com/managing-purchases-customers?hsLang=en#customer-data-engagement)
- [Reporting](https://support.xola.com/reporting?hsLang=en)
- [Integrations & Advanced Tools](https://support.xola.com/integrations-advanced-tools?hsLang=en#main-content)
- [Xola App Store Integrations](https://support.xola.com/integrations-advanced-tools?hsLang=en#xola-app-store-integrations)
- [Partner & Agent Management](https://support.xola.com/integrations-advanced-tools?hsLang=en#partner-agent-management)
- [Marketing & Tracking Integrations](https://support.xola.com/integrations-advanced-tools?hsLang=en#marketing-tracking-integrations)
- [Mobile and Hardware](https://support.xola.com/mobile-and-hardware?hsLang=en#main-content)
- [Mobile Tools and Apps](https://support.xola.com/mobile-and-hardware?hsLang=en#mobile-tools-and-apps)
- [Hardware Setup & Devices](https://support.xola.com/mobile-and-hardware?hsLang=en#hardware-setup-devices)
- Company
- [About Us](https://www.xola.com/about)
- [Careers](https://www.xola.com/team)
- [Press](https://www.xola.com/press)
- [Support](https://www.xola.com/support)
- [Security Policy](https://www.xola.com/security-policy/)
- Resources
- [Articles](https://www.xola.com/articles/)
- [Help Center](https://support.xola.com/)
- [Success Stories](https://www.xola.com/success-stories/)
- [App Store](https://www.xola.com/app-store)
- [Demo](https://www.xola.com/demo)
- [Xola Universe](https://www.xola.com/universe/)
- Documentation
- [API Documentation](https://developers.xola.com/)
- [Payment Services Agreement](https://www.xola.com/payment-services-agreement/)
- [Terms](https://www.xola.com/terms/)
[](https://www.xola.com/)
© 2026 Xola Inc. All rights reserved.
[Privacy Policy](https://www.xola.com/privacy-policy) [Terms of Service](https://www.xola.com/terms)