Want deeper insight into how customers discover and interact with your business online?
Google Analytics 4 (GA4) is the next generation of analytics that helps you track user behavior across websites and apps — all in one powerful platform. By capturing essential engagement and conversion data, GA4 enables you to make smarter, data-driven decisions about your marketing, product offerings, and customer journey.
With the Xola + GA4 integration, you can:
-
Monitor reservation activity in real time
-
Track every step from product views to completed purchases
-
See clearly which marketing channels and campaigns are driving your best results
Set up advanced conversion events to precisely measure every reservation, add-on, and demographic — giving you confidence that your reporting truly reflects what’s happening in your business.
Xola uses client-side tracking with a data layer, meaning information is captured through the user’s browser and sent to Google. This allows for:
-
Event customization using Google Tag Manager
-
Integration with Google Ads and other analytics platforms
While this approach offers flexibility and powerful insights, it’s important to be aware of potential limitations like ad blockers or browser privacy settings, which may occasionally prevent events from firing.
With a well-configured GA4 and Xola connection, you’ll unlock a full view of your customer lifecycle and the marketing ROI that truly moves your business forward.
User Access: Administrator or Marketer roles have access to set up GA4 in Xola.
To grant access to users, click here.
What's covered in this article:
How to Set Up
Client-Side Tracking Overview
In client-side tracking, the code runs on the user's browser. Xola uses a data layer to pass reservation and conversion data. You'll configure Google Tag Manager (GTM) to capture the events relevant to your business.
Client-side tracking can be impacted by ad blockers and browser privacy settings.
Set Up a New Google Analytics 4 Account
If you already have a GA4 account, skip to Configure Conversion Tracking.
-
Go to Google Analytics, and sign up.
-
In Admin, under the Property column, click Create Property.


-
Name your property, set the reporting time zone and currency.
- If a visitor comes to your website on a Tuesday in their time zone, but it's Monday in your time zone, the visit is recorded as having occurred on Monday.
- If you choose a time zone that honors Daylight Savings Time, Analytics automatically adjusts for time changes. Use Greenwich Mean Time if you don't want to adjust for Daylight Savings Time.
- Click Next. Select your industry category and business size.
- Click Next. Select how you intend to use Google Analytics.
- Click Create, and (if you are setting up a new account) accept the Analytics Terms of Service and the Data Processing Amendment.
- Continue to add a data stream to start collecting data.
Create a Data Stream
If you are installing any Google Analytics for the first time, you’ll be prompted to create a new data stream based on whether it is a web or an app.
-
Choose Add Stream > Web.

- Enter your website URL.

-
Enable Enhanced Measurement to auto-track page views and events.
- Enhanced measurement automatically collects page views and other events. Once the data stream has been created, you can go back and individually disable the enhanced measurement events you don’t want to collect. So, Analytics recommends that you enable enhanced measurement now.
-
After stream creation, your Measurement ID will be used in your scripts and GTM.

Configure Conversion Tracking in GA4
The steps below will help you navigate the Google Analytics 4 account to find the Measurement ID, GA4 Script, and configure cross-domain tracking.
-
In your GA4 Admin panel, select Property > Admin.

-
Go to Data Streams.

-
Select your web stream, and click Configure Tag Settings > Configure your domains.
-
Under Match Type = Contains, add:
-
checkout.xola.app
-
checkout.xola.com
- Your website domain
-


-
Get the
gtag.jsscript from “View tag instructions” and paste it before the</head>tag on your website.


Set Up Ecommerce Events in Google Tag Manager
To configure Google Analytics 4 tag in your Google Tag Manager container, please read this article provided by Google for proper steps.
If tags are managed via Google Tag Manager, follow the steps below to configure Ecommerce purchase events. It is important to note that if this is not configured in the GTM container, you may experience a drop in conversions made on desktop.
If you're using GTM:
-
Go to Google Tag Manager, click Tags > New.

-
Select Google Analytics > GA4 Event.


-
Enter your GA4 Measurement ID and set the event name to
.

-
Enable Send Ecommerce data.
Trigger Setup
- Next, add a trigger for this event. On the Trigger selection panel, click on + in the upper right-hand corner.

- Select Custom Event.
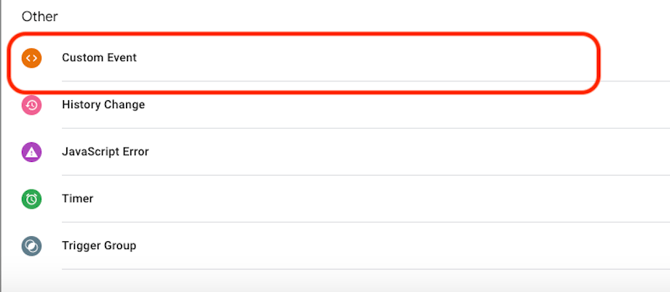
- Add the following event name using regex:
view_item|view_item_list|add_to_cart|add_payment_info|purchase
- To capture Xola user properties add xola_user_properties to the string above or as a separate variable triggered by the purchase event. Example string below:
view_item|view_item_list|add_to_cart|add_payment_info|purchase|xola_user_properties
- During the purchase, the Xola user properties event won’t be picked up automatically from the confirmation page so adding this to the Event name will assist in capturing these properties, if needed.
- These events can also be used to track parameters for multiple different platforms in Google Tag Manager including Google Ads, Facebook, TikTok etc
- Xola utilizes Googles standard events that can be found here - use the events mentioned above to customize your Google Tag Manager to your liking.
- Save and publish your container.
Configure GTM Container ID in Xola
If you're using multiple tags in GTM, configure your GTM Container ID in Xola:
- Log into Xola.
- Go to Marketing > Conversion Tracking > Google Tag Manager.
- Enter your GTM Container ID.
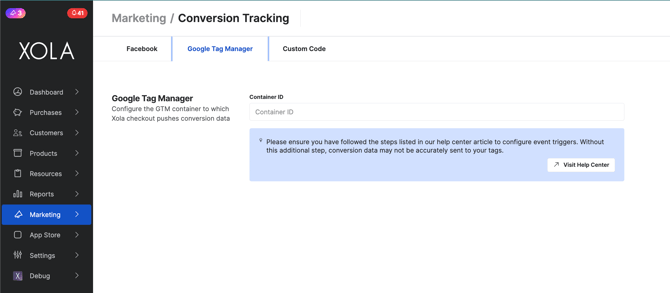
This ensures both mobile and desktop checkout load the GTM container correctly for more reliable tracking.
How It Works
-
Xola uses client-side tracking and a structured data layer to pass reservation and user data.
-
GA4 events are triggered through your GTM setup.
-
Conversions and revenue data are sent directly from Xola’s checkout into GA4 using either
gtag.jsor GTM. -
Ecommerce event tracking includes booking actions like:
-
view_item
-
add_to_cart
-
purchase
-
xola_user_properties
-
-
Tracking depends on proper event setup in GTM.
-
If ecommerce events are not configured, you may lose desktop conversion data.
-
GA4 relies on pop-ups or embedded checkouts. Avoid buttons redirecting to
xola.checkout.com, which won’t track conversions properly. -
Avoid using website builder plugins that load buttons in iframes.
Tips for Success
Install the Xola Checkout Script Properly
- Locate the Javascript Code: Find the Xola Checkout Javascript code within your Xola account by navigating to Settings > Button Code and locating Step 1.
- Implement the Code: Insert the Javascript code as close to the top of the
<head>section of your website as possible. This positioning ensures that the script loads promptly when visitors arrive at your site, facilitating accurate tracking from the outset.
Use Direct HTML Embeds
-
Embed Xola’s button codes directly into your website’s HTML code. Avoid using plugins that create iframes within website builders, as this method may fail to capture conversions.
- The Google Analytics integration must occur within the checkout iframe for accurate tracking. Ensure the checkout button on your site either opens in a pop-up or is directly embedded. Avoid buttons that redirect to a xola.checkout.com URL, as these will not track conversions.
- For a comprehensive guide on correctly installing Xola buttons, check out this article.
Keep Your Tag Management Clean
-
Remove duplicate
gtag.jsscripts if using GTM. If Google Tag Manager is being used to handle your tags, ensure only necessary scripts are present. Reducing the number of gtag.js scripts helps prevent potential conflicts and streamlines page loading times. -
Eliminate any scripts associated with Universal Analytics to avoid discrepancies in revenue or conversion data. Keeping your site updated with only the necessary scripts ensures accurate data collection.
Use Google Ads Events
-
To track conversions from Google Ads effectively you will need to setup Google Ads Conversion tracking within your Google Tag Manager container. Although Xola doesn’t support redirect-style Thank You pages, you can still track Google Ads conversions by using the events available in the data layer. Also be sure to read about how Conversion Linker will help optimize your tracking services.
Test and Troubleshoot
-
Test the setup thoroughly and refer to our Troubleshooting Guide if you're missing data or conversions.
Need help with setup? Contact Xola Support for assistance.