
Sell equipment, not just seats: charge customers for the bikes, boats, ATVs, or other gear they actually book, while collecting demographic details separately for waivers, guest information, and reporting.
Most experiences are traditionally priced by demographic—adults, children, seniors, etc. But for businesses like kayak tours, ATV rentals, bike tours, paddleboard experiences, and other equipment-based activities, the thing you’re really selling is the equipment itself, not simply a seat or a spot.
Equipment-Based Pricing lets you make the equipment the purchasable item, so your pricing, availability, capacity, and checkout experience are all built around the gear your guests are renting. Instead of asking, “How many adults and children are coming?” you can ask, “How many kayaks, bikes, or ATVs do you need?”
This gives you more control over inventory and availability, while still allowing you to collect guest demographics separately for waivers, reporting, and other operational needs. It’s a more natural fit for businesses where equipment—not headcount—is the primary thing being sold.
User Access: Administrator or Curator roles have access to set up and manage experiences in Xola.
Administrator or Reservationist roles can make and modify all purchases.
Reservationist Lite roles can make and modify purchases, but cannot cancel or refund any purchases.
To grant access to users, click here.
What's covered in this article:
- How to get started
- How it works in Checkout
- How it works in Back Office Purchases
- Modifying Purchases
- How to view on the Roster
How to Get Started
You must set up your equipment items first. To learn how, see Equipment Management.
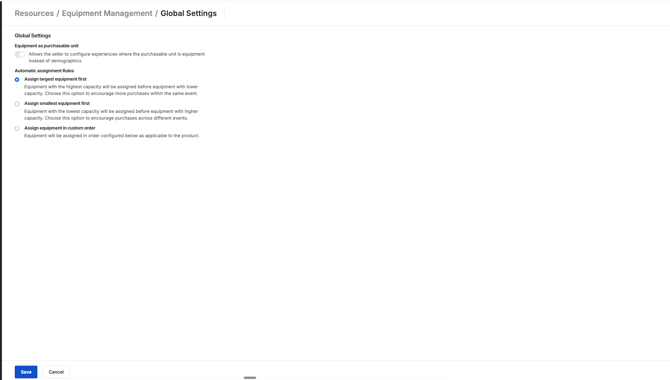
- First go to Resources> Equipment Management
- Next, click on Global Settings
- Toggle on Allows the seller to configure experiences where the purchasable unit is equipment instead of demographics
- Next, navigate to Products > Experiences
- If you need to create an experience follow this article to do so first.
- If you've already created your product, then go to Pricing on the left-hand menu.
- Make sure your experience has a schedule before enabling Equipment-Based Pricing. This pricing option is available only for scheduled experiences and isn't supported for unscheduled experiences.
Purchasable Item
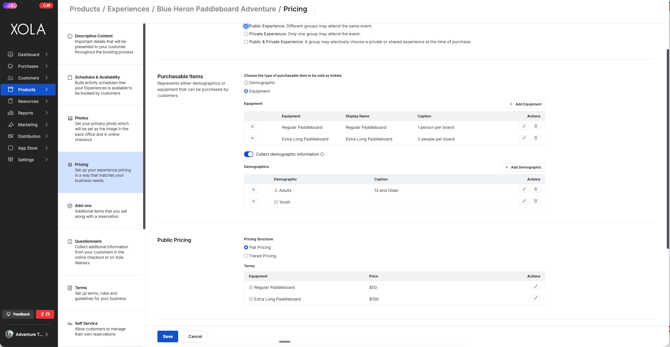
- Under Purchasable Item, choose Equipment instead of Demographic.
- If you haven't set up any equipment yet, this option will be disabled. Click Configure Equipment to set up your equipment first.
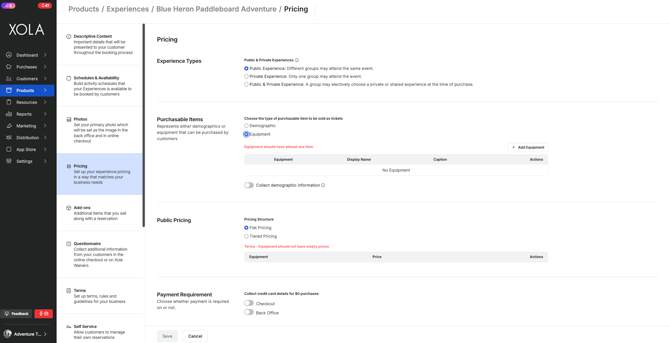
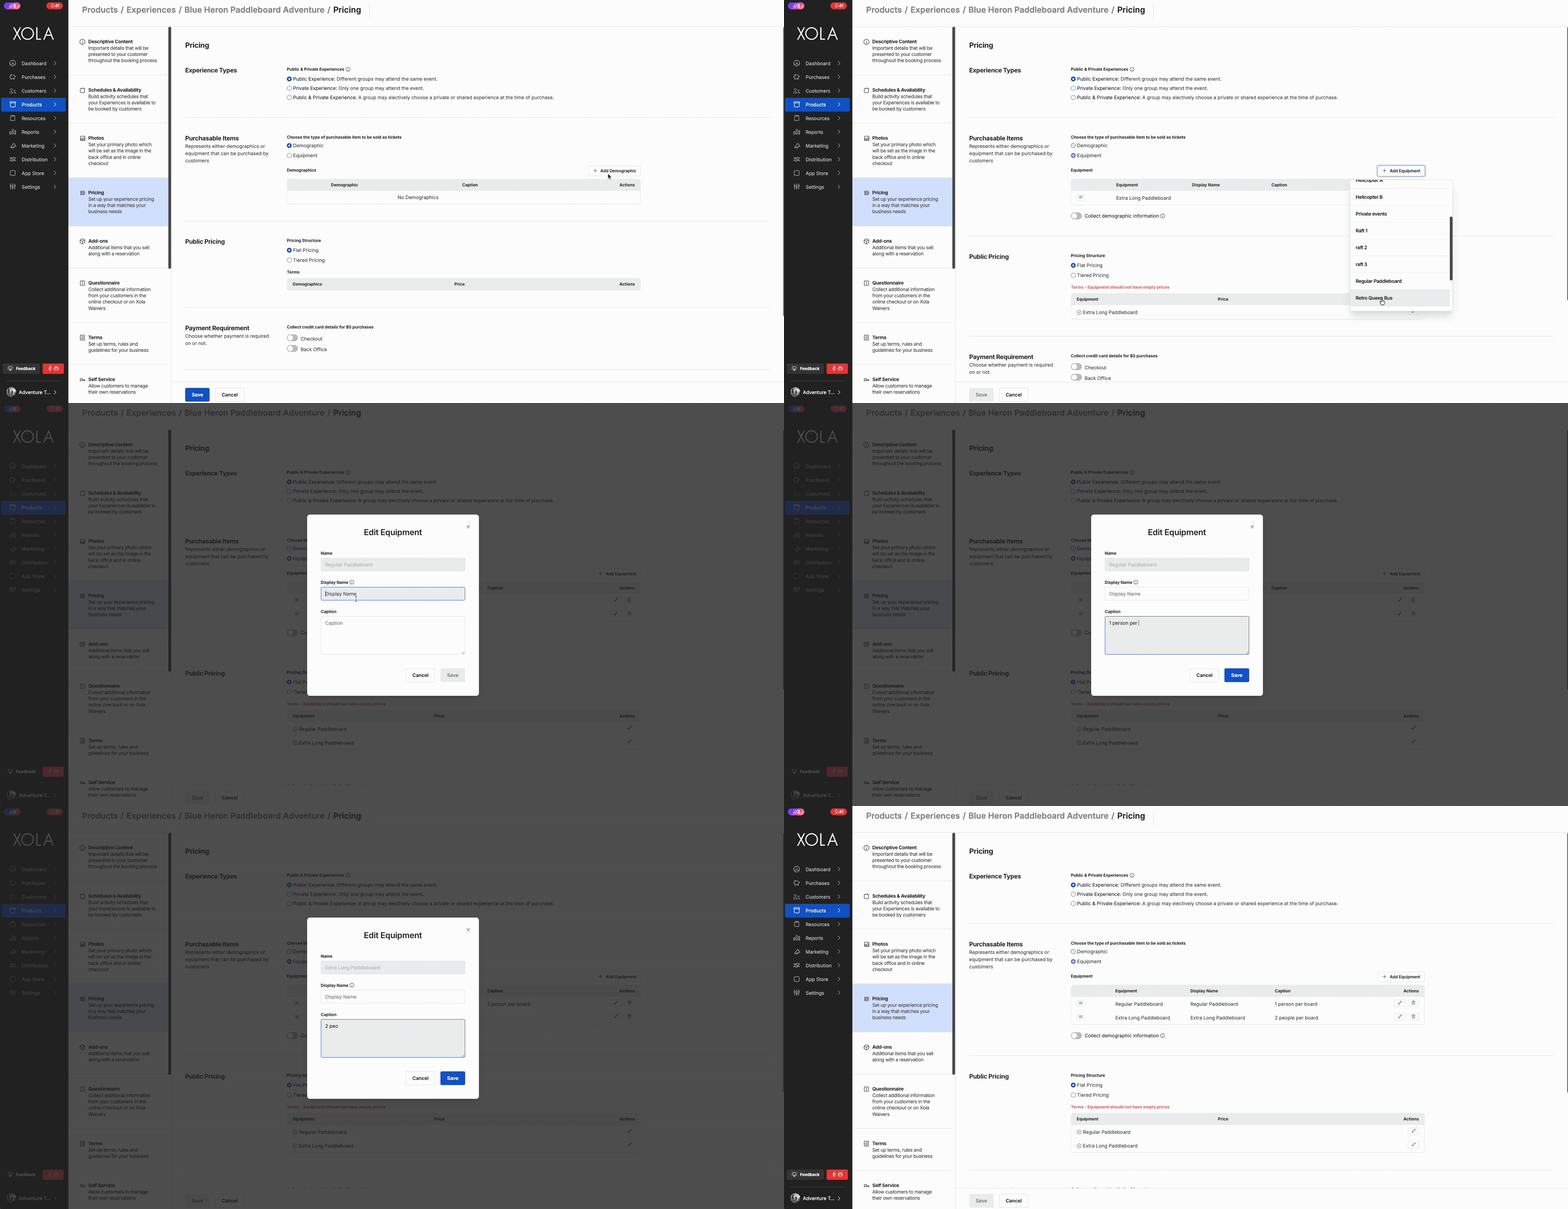
- Click + Add Equipment to choose from the equipment items you've already created.
- For each equipment item click the
 icon to set:
- Display Name: the customer-facing name shown at checkout.
- Caption (optional): extra detail shown to guests, like "seats up to 2 people."
- Click and hold the
 icon to reorder how the equipment will show on checkout and back office purchases.
- Toggle Collect Demographic Information on to add the demographic types you want to track.
- This will collect guest details for waivers, questionnaires, or reporting. This information is for your records only, guests are not charged based on it.
- Toggle it off if you only need organizer details at checkout.
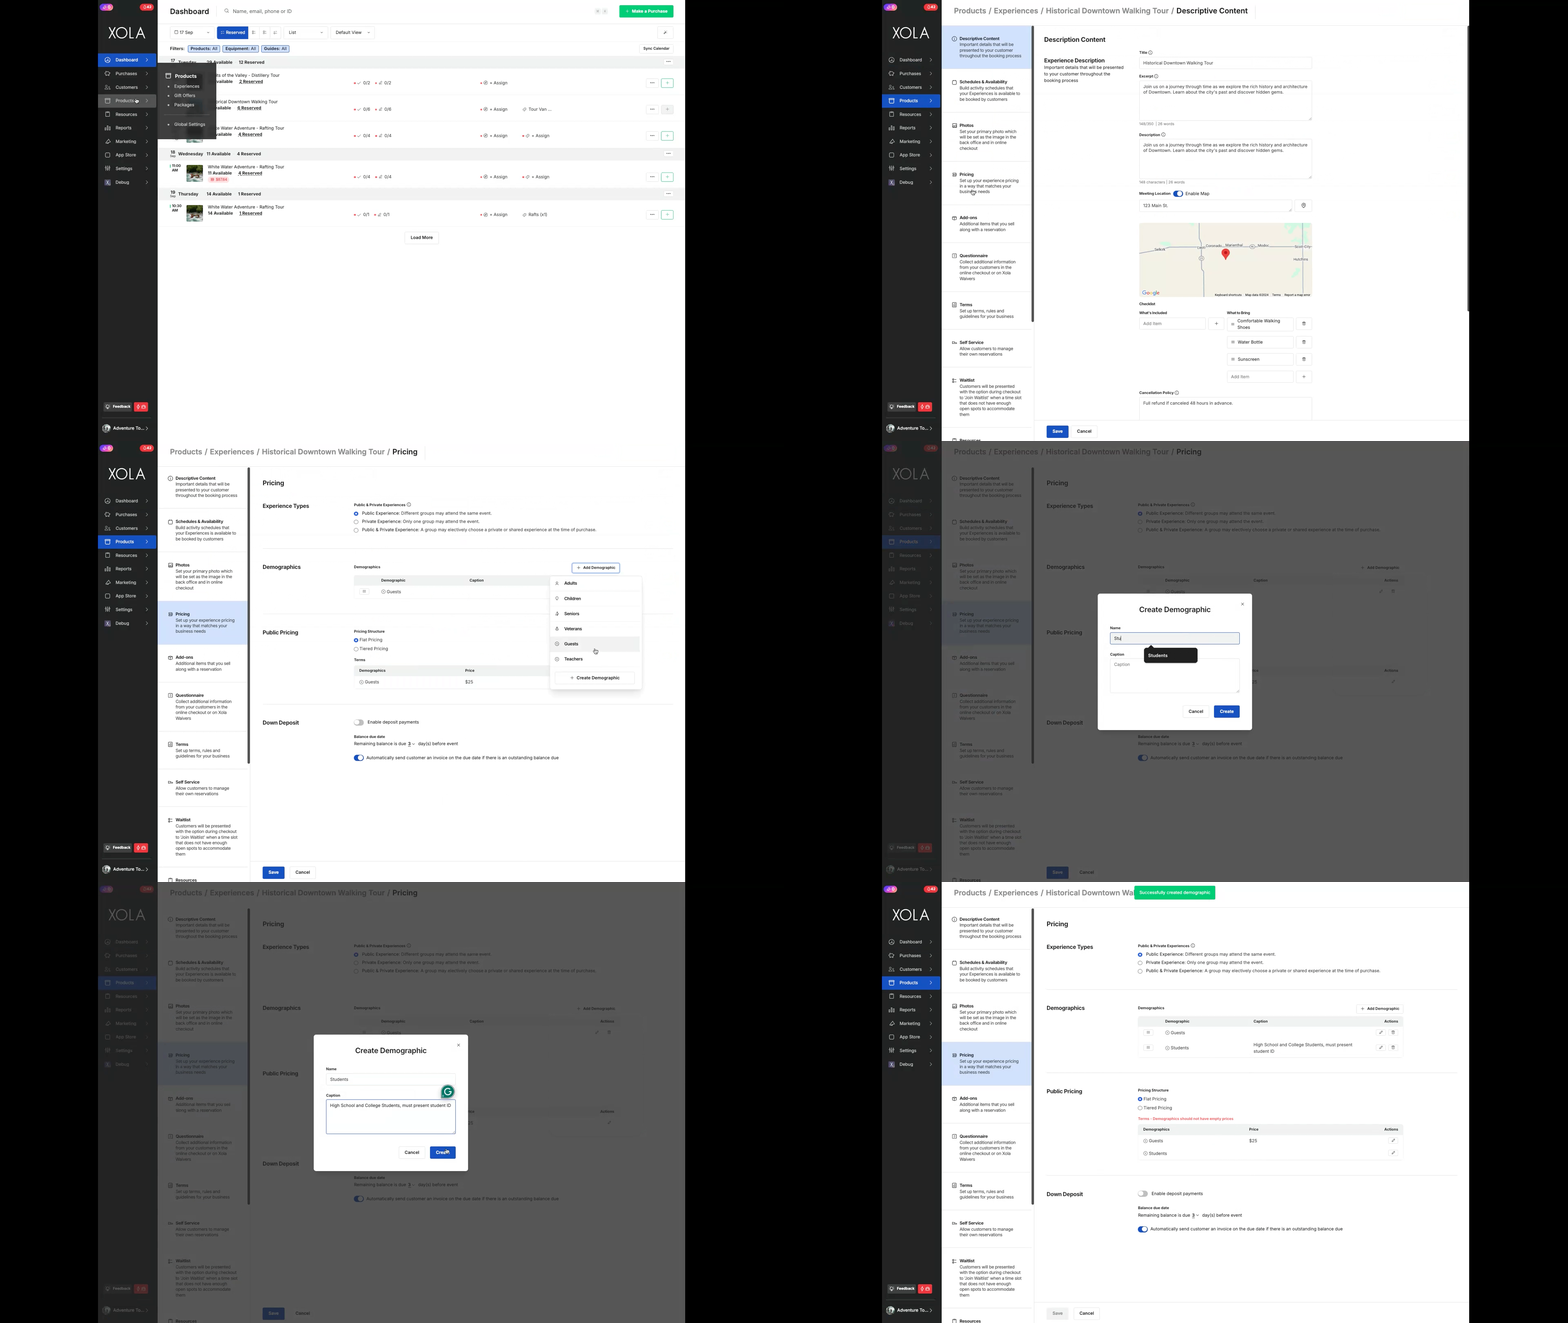
- If you toggle on Collect Demographic Information, next set up your demographics by clicking on the + Add Demographic button .
-
Select a Global Demographic or select Create Demographic and input the following:
- Name: You can use one of our default demographics, such as Adults or Children, or type your own in the text field.
- Caption: If you'd like, add an optional caption for that demographic that will be shown to your customers at checkout. For example, if the demographic is 'Students', you may want to add a caption such as "High School and College Students, must present student ID".
- Reorder the demographics in the order you want shown on checkout by clicking and holding the
 icon and dragging the demographic to the right order.
-
Tip: To edit a demographic, click the  icon.
icon.
Pricing Structure
Under the pricing structure, depending on what experience type you choose, you will have the following options:
Public Pricing
Flat Pricing
With Flat Pricing, whatever you have set for the equipment price will be the cost per peice of equipment.
Tiered Pricing
With Tiered Pricing, the price you charge changes when equipment size thresholds are passed, this could be a markup, markdown, or final price. You could also do a $ amount or % of the equipment amount.
Private Pricing
Per Equipment vs. Per Event Pricing
When you select the experience type to be private, you have the option for your experience to be priced either per Equipment or per Event.
Per Equipment:
When using per-Equipment pricing, selecting both public and private experiences unlocks additional pricing flexibility. Here’s how each pricing option works:
- Flat Pricing – Each equipment has a fixed price, keeping things simple and consistent
- Relative Pricing – Adjust prices up or down relative to your main equipment using dollar amounts or percentages (only available when both public and private are selected)
- Tiered Pricing – Set pricing based on equipment amount, allowing for discounts, markups, or fixed prices at different thresholds
- Buy Out Remaining Spots – Let customers pay to reserve all equipment on an event using a set price, dollar adjustment, or percentage (only available when both public and private are selected)
If you offer both public and private experiences, you can also display a customizable banner during checkout encouraging customers to upgrade to a private booking. Pricing and availability update in real time based on selections, creating a smooth and dynamic booking experience.
Per Event:
Per Event, pricing is a private experience at a single price, regardless of the number of people reserving.Flat Pricing
With Flat Pricing, the total number of people booking does not impact the price per event. Whatever you have set for per event price will be the cost.
Tiered Pricing
With Tiered Pricing, the price you charge changes when group size thresholds are passed, this could be a markup, markdown, or final price. You could also do a $ or % of the base per event price.
To learn more about pricing and how to set it up, click here.
Once you save an experience with Equipment selected as the purchasable item, you can't change it back to demographic pricing.
How it works at Checkout
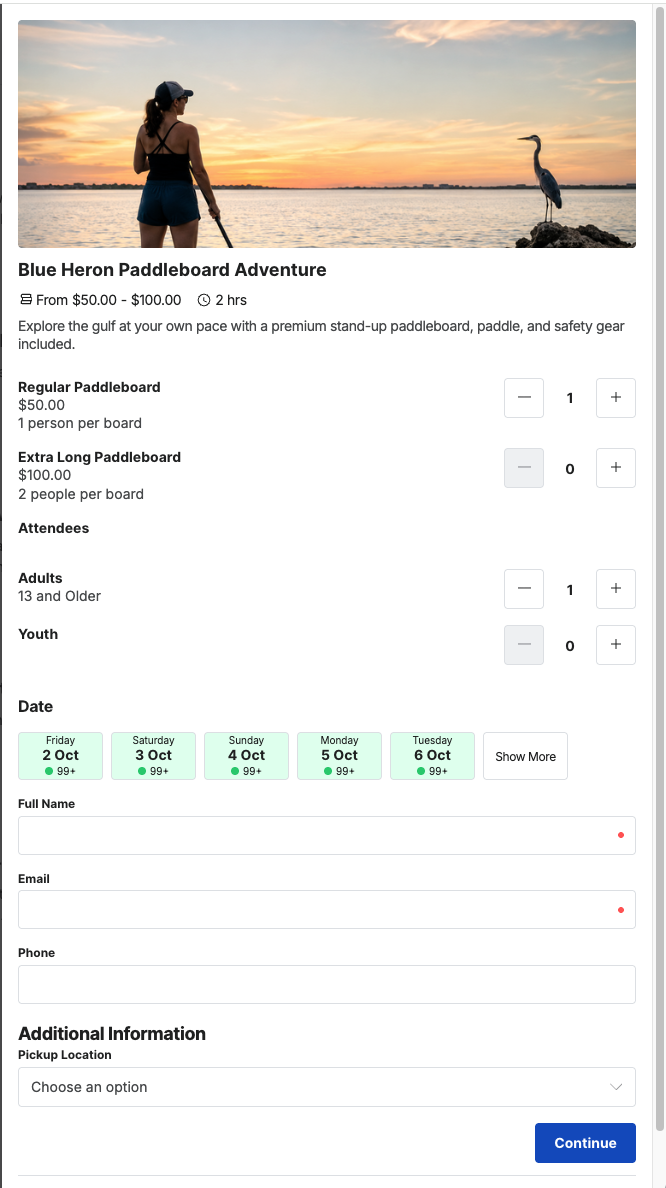
Depending on your checkout style, guests will be able to purchase the equipment and select the quantities that they want. On the checkout guest will first:
- Select the equipment and quantity they want
- They will see your caption and capacity details for each item.
- If demographic collection is turned on, guests will also fill in demographic capacity.
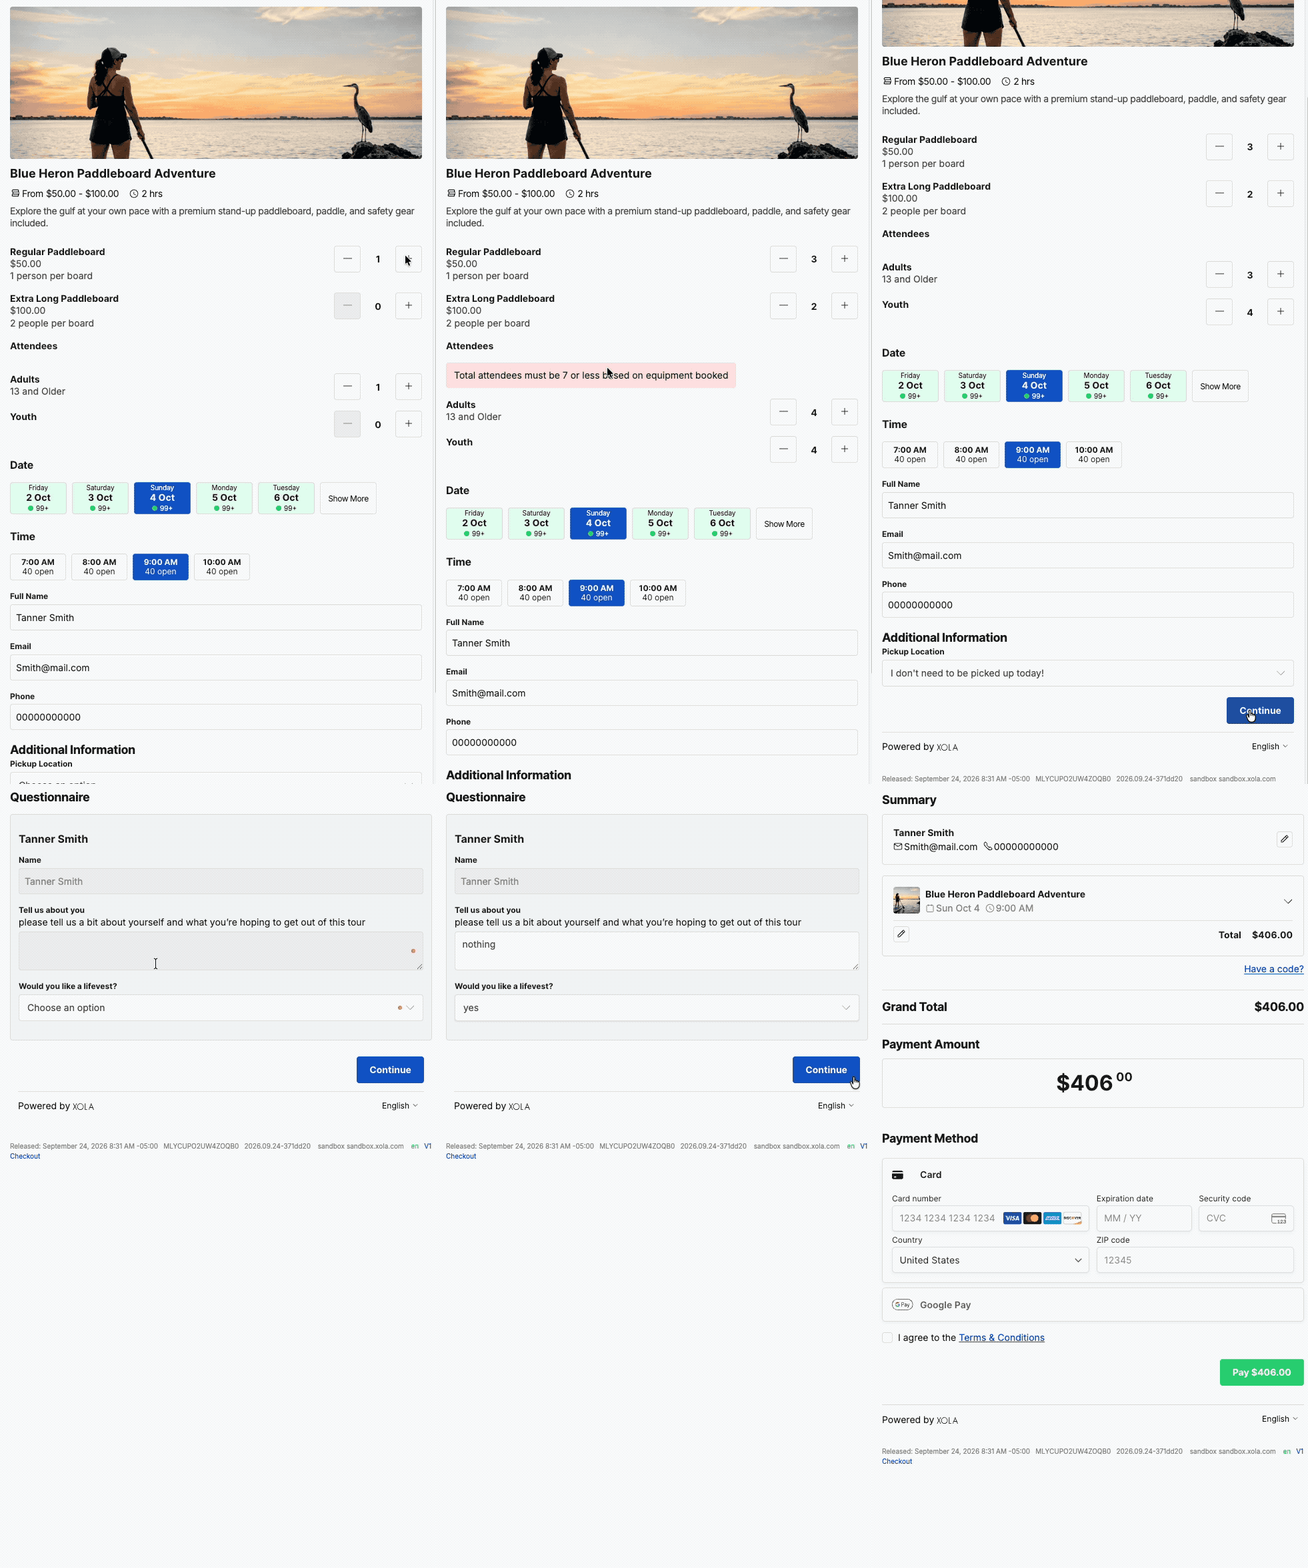
- The number of attendees allowed is based on the total capacity of the equipment selected.
- If demographic collection is turned off, only organizer details are collected.
- The guest will continue through the checkout as normal, picking a date and time, filling in their information, and filling out any questionnaire information that you have setup.
Split payment supports selecting specific equipment when a guest wants to pay for just their part of the order.
How it works in Back Office Purchases
From the Dashboard or Purchases tab, click the green Purchase button and choose a product.
Once you select the product the customer wants to purchase, you'll be directed to the Product Details page, where you can enter the following:
- Privacy Settings: Choose whether the reservation is public or private if it is an experience with public and private options. If you do not have this option, the reservation will default to its privacy settings.
- Equipment Quantity: Choose the number of the pieces of equipment the guest would like to purchase. If you have different equipment set up, you can enter the number for each type of equipment
- Attendees: Choose the number of guests attending the experience. If you have different demographic types, you can enter the number for each demographic.
- Continue with the purchase as normal. To learn more about how to make a purchase through the back office, click here.
Modifying an equipment purchase
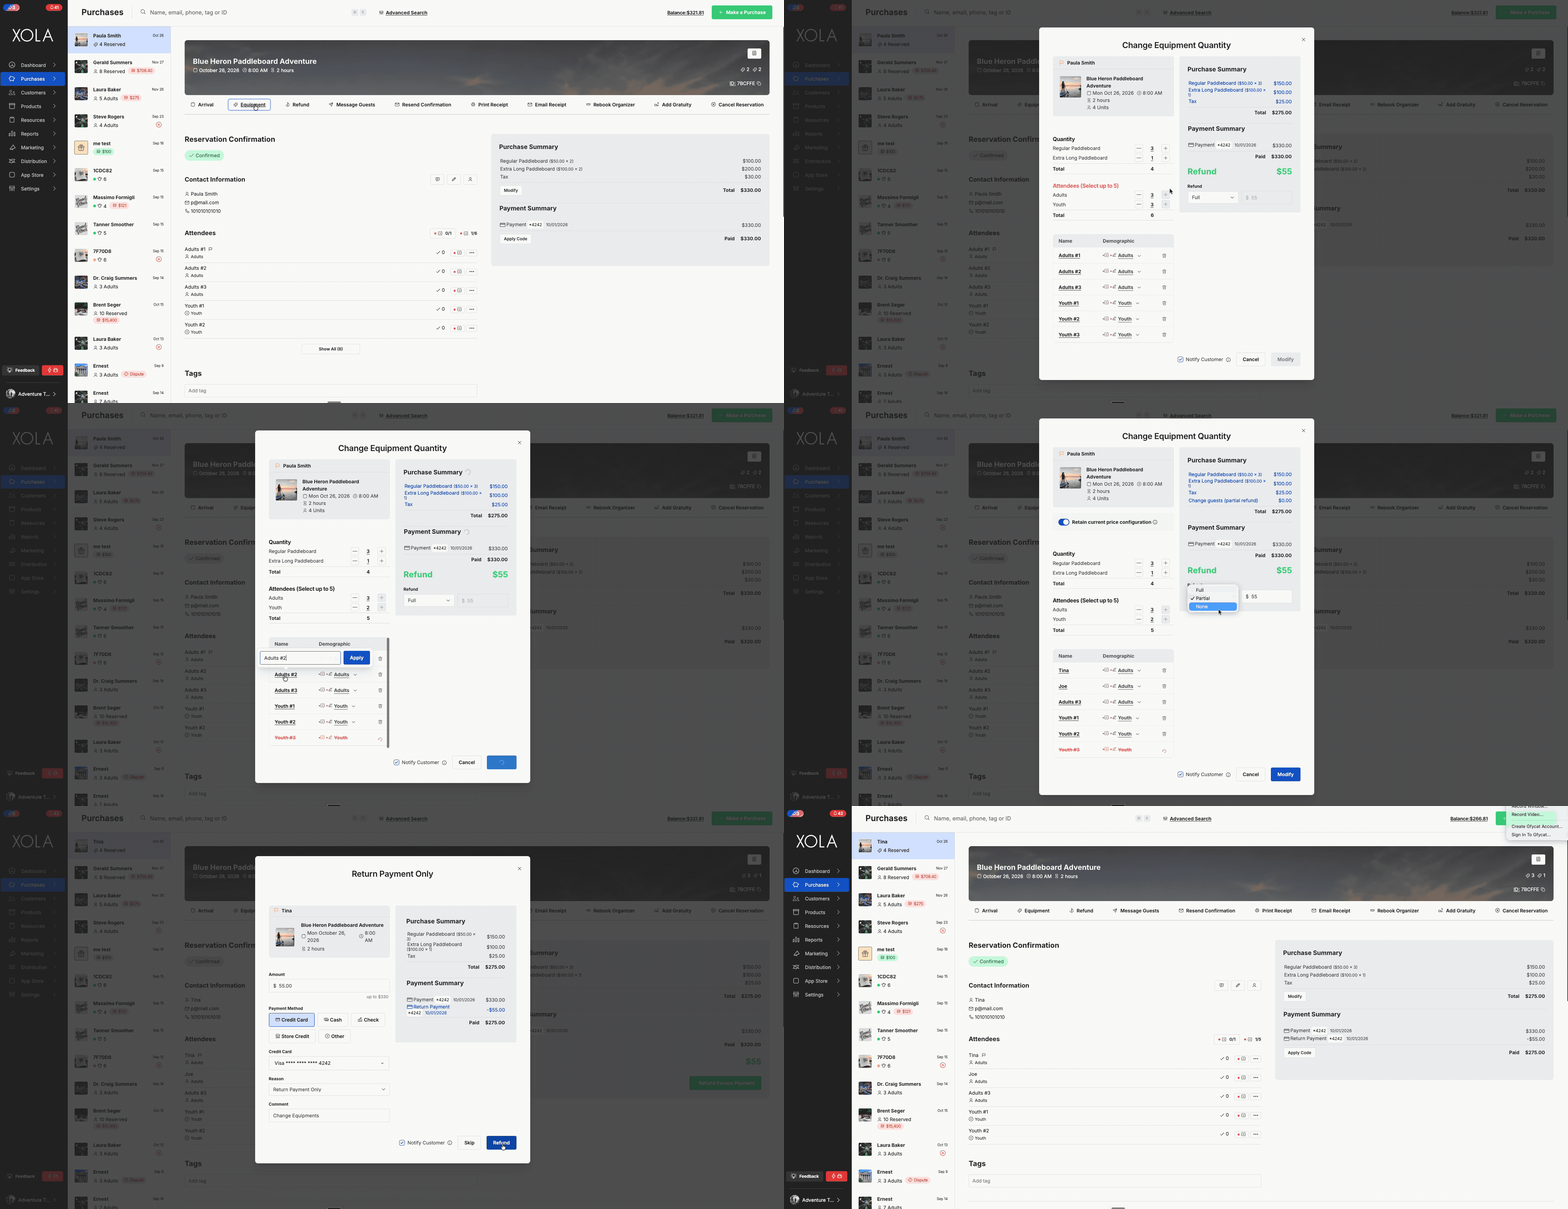
You've reserved a customer, and now they want to change the equipment they purchased. In just a few clicks on the Modifications Banner, you'll be able to update the equipment count in a jiffy.
-
- In the Purchases tab, navigate to the customer purchase.
- From the Modifications Bar, click Equipment.
- To add a equipment, simply click the + button next to the equipment you would like to add or click on the number and enter the number.
- Next, if you are collecting guest information, you can add attendees.
- Simply click the + button next to the demographic you would like to add or click on the number and enter the number of guests.
- You can also update the guest's name that appears on the Roster.
- Click Modify.
- In the next window, if you increase the equipment count, you have the option of immediately hitting Collect Balance Now and charging for the additional item. You can also collect this balance later by hitting Cancel. If you decrease the equipment count, you have the option of immediately Refunding for the subtracted items. You can also refund later by hitting Skip.
- In either case, the adjusted number of equipment will be reflected under Purchase Details, and any charges or refunds will be reflected under the Payment Summary.
Viewing equipment on the Roster
Under the Guest section of the Roster, you can find valuable guest information and take purchase actions. Xola provides you with guest information to review and allows you to sort and customize the information displayed in the Guest section. You can also look at the customer's purchase page by simply clicking on their name.
The very top row under the guest section contains the information points you can see. Under that is a summary row. This row summarizes all the items on the roster for all groups, i.e., how many demographic types or equipment types you have in this roster and how many signed and unsigned waivers you have.
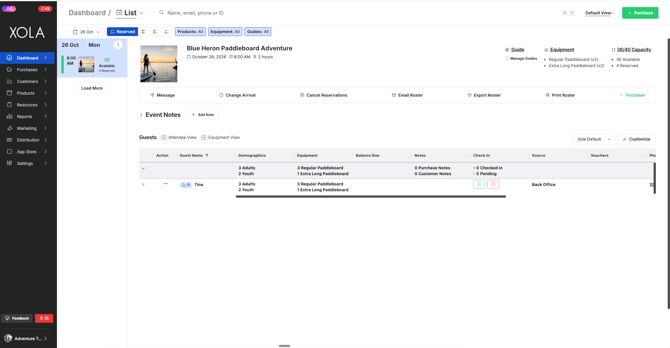
You can take Purchase actions for an individual guest while on the roster. These actions will be applied to a specific reservation within an event. All actions can be found by clicking the three dots to the left of the guest's name under the actions column. Once action is Modifying Equipment.
To learn more about the Roster and all the Actions you can take, click here.