The Advanced Account Management tool in Xola gives you centralized control to manage schedules and capacities across multiple experiences and accounts—all from one place. It’s a powerful way to save time, stay consistent, and simplify operations, especially if you manage a high volume of products or locations.
You can quickly create new schedules, adjust availability, or change capacity settings in bulk. These updates can be published immediately or saved to go live at a later date, giving you flexibility in how and when changes are applied. Whether you're planning seasonal updates, responding to staffing changes, or rolling out last-minute adjustments, this tool makes it easy to keep your offerings accurate and up to date.
Perfect for businesses with multiple offerings or franchises, Advanced Account Management helps you stay agile, scalable, and in full control.
User Access: Administrator roles have access to use Advance Account Management in Xola.
Administrator or Curator roles can view schedules made by Advance Account Management under Experiences in Xola.
To grant access to users, click here.
What's covered in this article:
- How to enable Advance Account Management
- Configure Advance Account Management
- Schedules Management
- Capacity Management
How to enable Advance Account Management
- In Xola, go to Settings > Apps.
- Find Advance Account Management.
-
Click the Request Access button.
This will send a request to our Beta team to activate the feature for you. Once it’s installed, they’ll reach out to confirm.
Only Administrator can use Advance Account Management. All other roles, including Primary emails on the account, will not have access.
Configure Advance Account Management
Once installed, either:
- Go to Settings > Apps > Advance Account Management > Go to App, or
- From your Xola Dashboard, go to Product > Multi Account Management.
This will open the tool in a new webpage.

The first step is to create a Collection. A Collection lets you choose which experience(s) you want to manage at a given time. Collections can span a single Xola account or include multiple accounts.
To create a collection:
-
Click Create Collection.
-
Name your collection.
-
Select the experiences you have access to (be sure they belong to the correct accounts).
-
Click Save.

Once saved, you’ll be able to manage schedules and adjust capacity for the experiences in that collection.
You can edit or delete a collection anytime from the collections dashboard.
Schedules Management
Once you’ve created a collection, you can begin setting up publishing schedules.
-
Click Schedules on the left-hand menu.
-
Click Create Schedule.
-
Select the collection from the dropdown menu.
-
Provide a name for your schedule.

Now set up the schedule:
- Availability
-
Open: Set times when the experience is available for customers to make reservations.
-
Blackout: Set times when the experience is unavailable.
-
- Repeats
-
Weekly: Repeats on selected days each week.
-
Custom: Manually choose specific dates the schedule will apply to.
-
- Timeslots
- Define departure times that can be reserved. Add as many as needed. When one gets reserved, Xola automatically checks remaining availability.
-
If your experience doesn’t have fixed departure times, toggle No fixed departure times. Customers will then only select a date at checkout.
- Valid From
- Set the start and end dates for the schedule (optional if it never changes).
You’ll then see a summary of your schedule. Choose from:
-
Save and Publish: Makes the schedule live for reservations immediately.
-
Save: Stores the schedule to publish later.
-
Cancel: Discards your changes.

You can return to the Schedules Dashboard to publish saved schedules or to edit/delete any you’ve created.

How schedule changes appear in Xola
When a schedule is published via Advance Account Management, it will show under the experience in your Xola account, but can only be edited from within the Advance Account Management tool.
Hover over the Advance Account Management icon to see who made the change.
Primary account emails will receive a notification each time a new schedule is published, including the creator and schedule details.

Capacity Management
With your collection(s) in place, you can manage capacities in bulk using a CSV file.
-
Click Capacity on the left-hand side.
-
Click Create Capacity.
-
Select the collection from the dropdown.
-
Name your capacity update.
-
Upload a CSV file following this format:
-
Date: Format as YYYY-MM-DD (e.g., 2021-10-08).
-
Time: Use 24-hour format (e.g., 1200 or 2100, no colons).
-
Experience ID
-
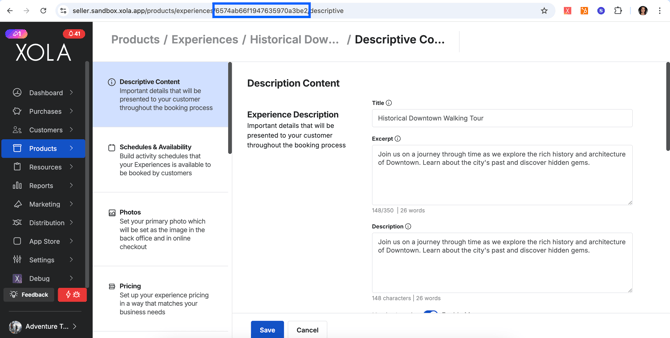
Go to Products > Experiences > Edit next to the experience.
-
Copy the ID from the URL in your browser.
-
-
-
- Use the ID as a column header.
- Under each Experience ID column, specify the new capacity (positive number only).
- Create separate columns for each Experience ID in your collection.

If there are errors in your CSV, you’ll see a warning with the rows and issues identified.
After creating the capacity change, choose from:
-
Save and Publish: Applies the new capacities immediately.
-
Save: Saves your changes to publish later.
-
Cancel: Discards your changes.
You can return to the Capacity Dashboard to publish saved capacity updates or to edit/delete any created ones.
